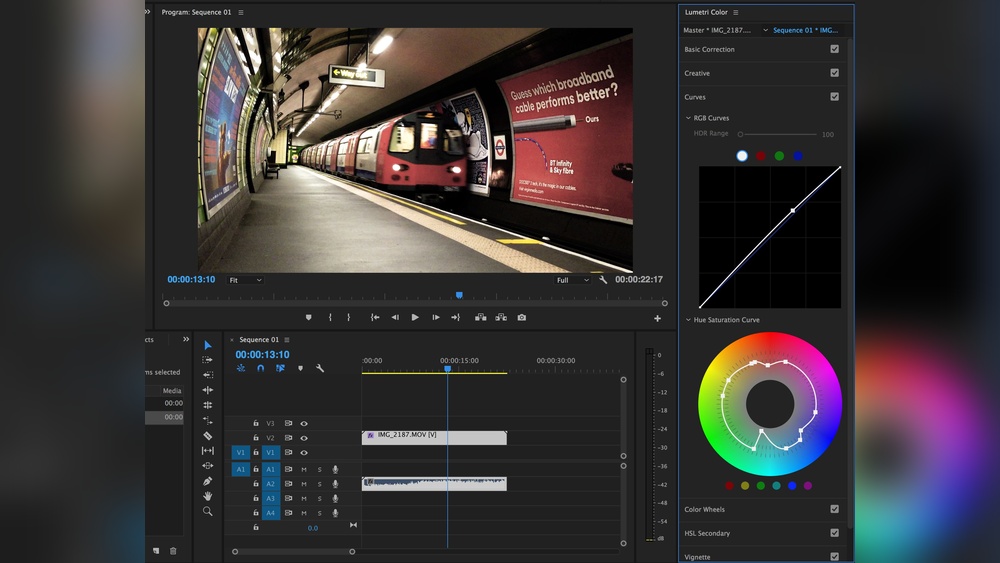
If you want your videos to look professional and visually stunning, mastering color grading in Premiere Pro is a game-changer. You don’t need to be a color expert to make your footage pop with rich tones and the perfect mood.
In this guide, you’ll discover simple, step-by-step techniques to transform your clips using Premiere Pro’s powerful color tools. Whether you’re fixing lighting issues or creating a cinematic vibe, you’ll learn how to control every shade and shadow to tell your story better.
Ready to elevate your videos and keep your viewers hooked? Let’s dive into how you can color grade like a pro right now.

Credit: www.youtube.com
Premiere Pro Color Workspace
The Premiere Pro Color Workspace is designed for easy color correction and grading. It organizes all the essential tools in one place. This workspace helps editors focus on adjusting colors efficiently. It provides a clear view of your video and color controls side by side.
Using the Color Workspace speeds up the color grading process. It shows scopes, color wheels, and sliders within reach. The layout makes it simple to compare before and after color changes. This setup is perfect for both beginners and experienced editors.
Accessing The Color Workspace
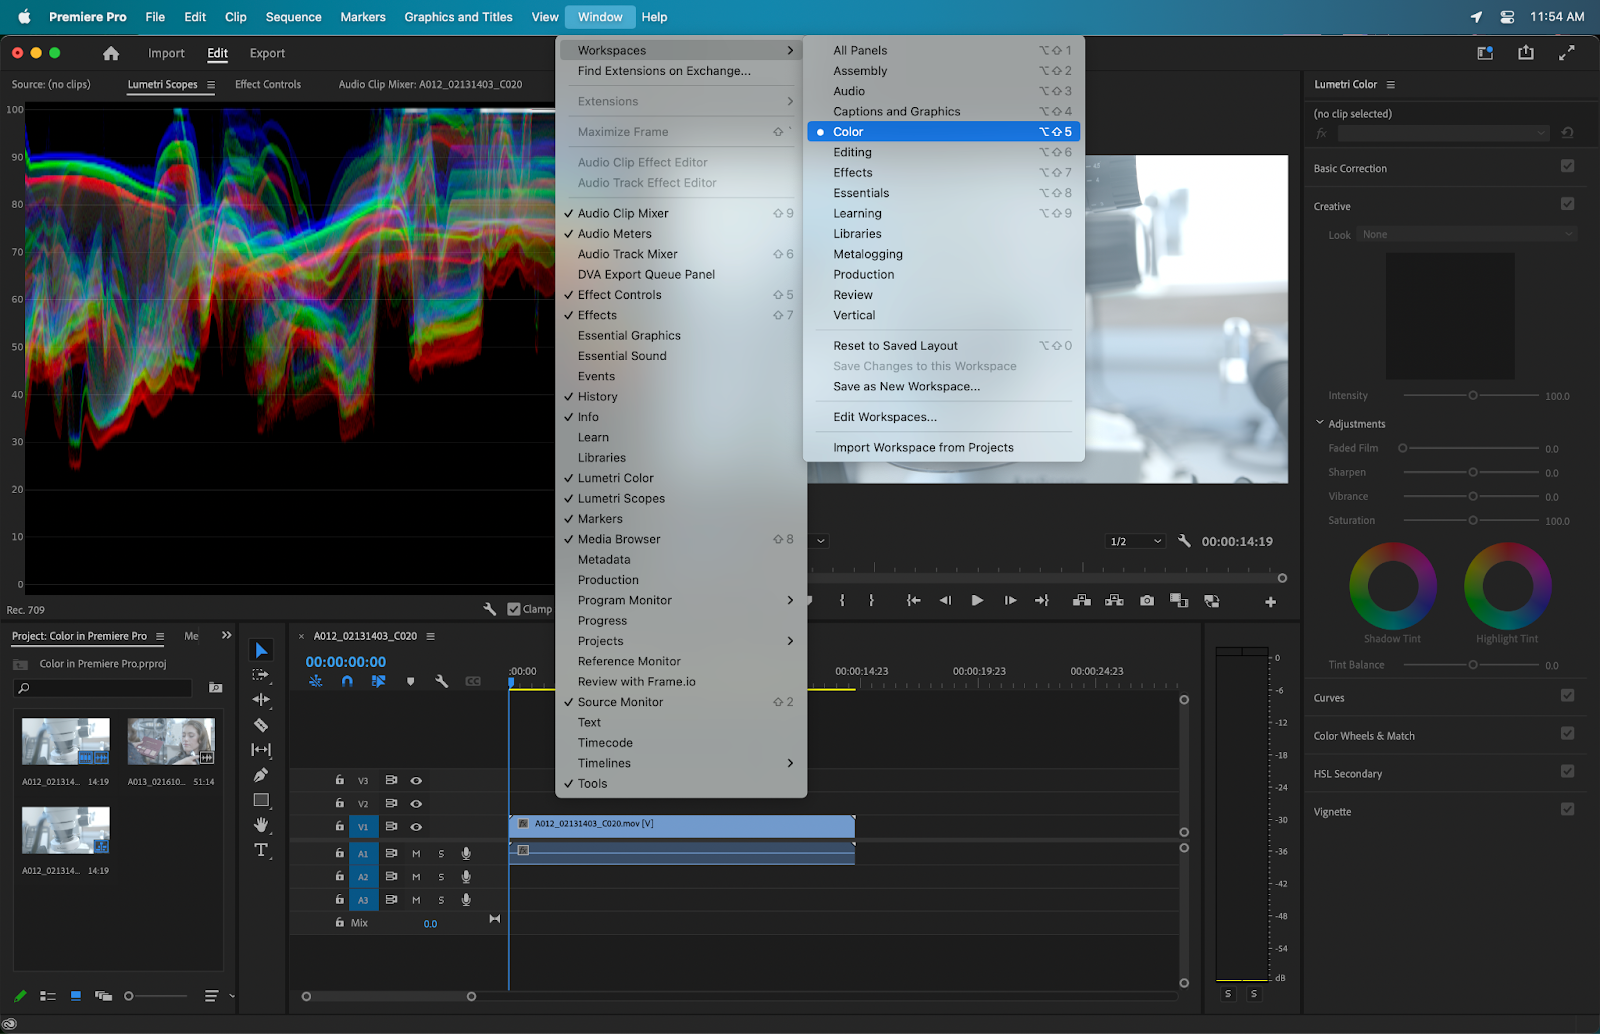
To open the Color Workspace, go to the top menu bar. Click on “Window,” then select “Workspaces.” Find and choose “Color” from the list. The workspace will switch to show all color tools.
Key Panels In The Color Workspace
The Lumetri Color panel is the main tool for color grading. It includes sections for Basic Correction, Creative Looks, Curves, and Color Wheels. The Program Monitor displays your video with real-time color changes. Scopes like Waveform and Vectorscope help analyze light and color precisely.
Customizing The Workspace Layout
You can resize or move panels to fit your editing style. Drag the edges of each panel to adjust their size. Save your custom workspace by clicking “Window” > “Workspaces” > “Save as New Workspace.” This keeps your preferred layout for future projects.
The Lumetri Color panel offers simple sliders and advanced controls. Adjust exposure, contrast, highlights, and shadows under Basic Correction. Use Creative to add color presets and adjust intensity. Curves help refine brightness and color tones. Color Wheels balance shadows, midtones, and highlights for natural results.
Basic Color Correction
Basic color correction is the first step in improving your video’s look. It helps fix problems and makes colors look natural. This process sets a solid base before applying creative color grades. You adjust exposure, fix color temperature, and balance saturation to get a clean image. These adjustments bring out details and create a pleasing image.
Using Premiere Pro’s Lumetri Color panel makes these tasks simple. Even beginners can learn to correct footage quickly. Let’s explore the key areas of basic color correction.
Adjusting Exposure And Contrast
Exposure controls the brightness of your video. Use the Exposure slider in Lumetri Color to brighten or darken the image. Avoid making the video too bright or too dark. Watch the highlights and shadows to keep details visible.
Contrast adds depth by increasing the difference between light and dark areas. Adjust the Contrast slider to make your image pop. Higher contrast can make colors richer but be careful not to lose shadow or highlight details.
Fixing Color Temperature
Color temperature affects the warmth or coolness of your footage. Use the Temperature slider to adjust it. Move it left for cooler blue tones or right for warmer yellow tones. Fixing temperature helps remove unwanted color casts from your video.
Correcting temperature ensures skin tones look natural. It also matches shots taken under different lighting conditions. Always check the overall mood and make small changes for the best result.
Balancing Saturation
Saturation controls the intensity of colors. Increase saturation to make colors vivid and lively. Decrease it for a more muted, natural look. Avoid over-saturating, as colors can look fake or harsh.
Use the Saturation slider in Lumetri Color for easy adjustments. Balancing saturation helps maintain a consistent look across all clips. It also supports the story’s mood and style.
Using Lumetri Color Panel
The Lumetri Color panel in Premiere Pro is a powerful tool for color grading. It offers many controls to adjust your video’s look. This panel lets you enhance color, contrast, and tone with ease. You do not need to be an expert to use it. The interface is simple and user-friendly.
Start by opening the Lumetri Color panel from the Window menu. You will see sections like Basic Correction, Creative, Curves, Color Wheels & Match, and HSL Secondary. Each section has different tools for specific tasks. Below, we focus on two important parts: Color Wheels and Match, and Curves and Hue Saturation.
Color Wheels And Match
The Color Wheels allow you to adjust shadows, midtones, and highlights separately. This control helps balance the color tones in your video. Drag the wheel toward a color to add that hue to the shadows, midtones, or highlights. Move the sliders for brightness to lighten or darken each range.
The Match feature can match colors between clips. It is useful when you want a consistent look across different shots. Select a reference clip and apply its color settings to the current clip with one click. This saves time and keeps your project cohesive.
Curves And Hue Saturation
Curves give you detailed control over color and contrast. You can adjust the overall brightness or tweak red, green, and blue channels separately. Click points on the curve and drag to change tones. This method is precise and helps create the exact look you want.
The Hue Saturation section lets you adjust colors by their hue range. You can boost or reduce the saturation of specific colors. For example, increase the blues to make skies pop or lower the reds to soften skin tones. This tool is great for fine-tuning colors without affecting the whole image.

Credit: www.youtube.com
Applying Luts And Presets
Applying LUTs and presets is a simple way to enhance your video’s look quickly. These tools save time and give your footage a consistent style. Premiere Pro supports many LUTs and presets, making color grading easier for beginners and pros alike.
Importing And Using Luts
Start by selecting your clip in the timeline. Go to the Lumetri Color panel. Find the Basic Correction section. Click the Input LUT dropdown menu. Choose “Browse” to find your LUT file on your computer.
LUT files often have a .cube extension. After selecting the LUT, Premiere Pro applies the look instantly. You can lower the intensity if it looks too strong. This helps you blend the effect naturally with your footage.
Customizing Presets
Presets in Premiere Pro are saved color grading settings. You can create your own after adjusting colors. Save your work as a preset for future use. This saves time on other projects.
To customize, open the Lumetri Color panel. Adjust sliders for exposure, contrast, highlights, and shadows. Play with color wheels for shadows, midtones, and highlights. When happy, click the panel menu and choose “Save Preset”.
Give your preset a clear name. Now, you can apply it to clips by selecting it from the Effects panel. This keeps your video style consistent without repeating edits.
Creating Adjustment Layers
Creating adjustment layers in Premiere Pro is a simple way to apply color grading effects to multiple clips. Adjustment layers let you make changes without altering the original footage. This method saves time and keeps your edits organized.
Adjustment layers work like filters. You add them above your clips in the timeline. Then, apply color correction or grading effects to the layer. All clips below the layer get the effect instantly.
How To Add An Adjustment Layer
First, go to the Project panel. Click on the New Item button at the bottom. Choose Adjustment Layer from the list. Make sure the settings match your sequence. Click OK to create the layer.
Drag the adjustment layer onto the timeline above your clips. Stretch or cut it to cover the clips you want to grade. This layer will hold all your color grading effects.
Applying Color Effects To The Adjustment Layer
Select the adjustment layer in the timeline. Open the Lumetri Color panel. Use the Basic Correction, Creative, Curves, and Color Wheels sections to adjust colors. These effects apply to every clip under the layer.
Adjust exposure, contrast, and saturation to enhance your video. You can also add LUTs or custom looks. Changes on the adjustment layer keep the original clips untouched.
Editing And Managing Adjustment Layers
You can move or trim adjustment layers anytime. This flexibility lets you control where the color grade applies. Duplicate adjustment layers to use different looks on various parts of your video.
Disable the layer to see the original clips. This helps compare before and after effects quickly. Adjustment layers make color grading more efficient and easy to manage.
Credit: www.simonsaysai.com
Masking And Tracking Colors
Masking and tracking colors in Premiere Pro lets you adjust specific parts of your video. This technique helps highlight or change colors without affecting the entire frame. It adds precision and creativity to your color grading process.
Using masks, you can isolate an object or area. Tracking helps the mask follow the object as it moves through the scene. This way, your color changes stay consistent and natural-looking.
Creating A Color Mask
Start by selecting the clip in your timeline. Open the Lumetri Color panel and go to the HSL Secondary section. Use the eyedropper tool to pick the color you want to change. Adjust the sliders to fine-tune the mask area. You can control hue, saturation, and luminance ranges to narrow down the selection.
Adjusting The Mask Shape
Use the masking tools in the Effect Controls panel. Choose a shape like ellipse, rectangle, or free-draw bezier. Draw the mask around the area you want to color grade. Refine the edges by adjusting feather and expansion settings. This softens the mask border for a smooth blend.
Tracking The Mask Movement
Select the mask in the Effect Controls panel. Click the play button next to Mask Path to start tracking. Premiere Pro analyzes the motion and moves the mask with your subject. Stop tracking when the object leaves the frame or stops moving. Review and adjust keyframes manually if needed.
Refining Colors Inside The Mask
After isolating the area, use the Lumetri Color sliders to adjust color. Change exposure, contrast, or saturation to create the desired look. Use curves or color wheels for more control. This targeted adjustment keeps other parts of your video untouched.
Matching Colors Between Clips
Matching colors between clips is essential for smooth video storytelling. It creates a consistent look across your footage. This step helps your audience focus on the content, not on distracting color changes. Premiere Pro offers tools to make this task easy and effective.
Using The Lumetri Color Panel For Color Matching
Start by selecting the clip with the color you want to copy. Open the Lumetri Color panel. Use the “Color Wheels & Match” section. Here, you can adjust shadows, midtones, and highlights. Try to match the colors visually by eye. Adjust sliders slowly for subtle changes.
Applying The Color Match Feature
Premiere Pro has an automatic Color Match feature. Select the clip to fix in the timeline. Open the Lumetri Color panel and go to “Color Wheels & Match.” Click “Apply Match.” Premiere Pro compares the reference clip to your selected clip. It then adjusts colors to match them closely.
Fine-tuning After Color Match
Automatic matching is a good start but may need tweaks. Use the Basic Correction controls to adjust exposure and contrast. Adjust the white balance sliders to fix color temperature. Check skin tones and natural colors for accuracy. Small adjustments improve the overall look.
Using Adjustment Layers For Consistency
Create an adjustment layer above all clips. Apply color corrections to this layer to affect multiple clips. This helps keep a consistent grade across scenes. You can stack adjustments on top of clip-specific grading. It saves time and keeps your edits organized.
Adding Creative Looks
Adding creative looks to your video can transform plain footage into something special. Color grading in Premiere Pro lets you shape the story through color and style. Small effects can make a big difference in the final mood and feel of your video.
Creative looks are about more than correction. They add personality and depth. Premiere Pro offers many tools to experiment with color, light, and tone. Below, learn how to use vignette effects and color grading to set the mood.
Using Vignette Effects
A vignette darkens or lightens the edges of your frame. It draws attention to the center where the main action happens. This effect adds focus and a cinematic touch.
In Premiere Pro, find the vignette effect in the Lumetri Color panel under the Creative tab. Adjust the amount, midpoint, roundness, and feather to fit your scene. A soft vignette works well for portraits or dramatic moments.
Use it subtly. A strong vignette can distract viewers. The goal is to guide the eye gently. It also adds a natural-looking frame to your footage.
Color Grading For Mood
Colors influence how viewers feel about your video. Warm tones like orange and yellow create a cozy, happy mood. Cool tones like blue and green give a calm or sad feeling.
In the Lumetri Color panel, use the Basic Correction and Creative tabs to shift colors. Adjust temperature, tint, and saturation to match the mood you want. Play with shadows and highlights for contrast.
Think about the story you tell with color. Dark, muted colors fit serious scenes. Bright, vibrant colors suit energetic or joyful moments. Experiment with presets or create your own look to find what works.
Exporting Color Graded Videos
Exporting color graded videos in Premiere Pro ensures your final project looks exactly as intended. Proper export settings keep your colors vibrant and true to your edits. It also maintains video quality and compatibility with various platforms.
Understanding the export process helps avoid common issues like color shifts or loss of detail. Premiere Pro offers many export options tailored for different needs. Choosing the right format and settings preserves the color grade applied during editing.
Choosing The Right Export Format
Select a format that supports high-quality color. Common choices include H.264 for web or ProRes for professional use. Avoid formats that compress too much, as they can degrade your color work.
Adjusting Export Settings For Color Accuracy
Set the color space and bit depth carefully. Use 10-bit or higher if available. Enable maximum render quality to keep sharp details. Disable any automatic color adjustments during export.
Using Presets And Custom Export Profiles
Premiere Pro offers presets for popular platforms like YouTube or Vimeo. These presets balance quality and file size. Create custom profiles to match your project’s color needs and save time on future exports.
Checking Exported Video Quality
Review your exported video on different devices. Look for any color shifts or banding issues. Compare the export to your timeline preview to ensure consistency. Make adjustments and re-export if necessary.
Tips For Faster Grading
Speed matters in color grading. Faster grading lets you finish projects sooner. It also keeps your creative flow smooth. Focus on smart techniques that save time. These tips help you work efficiently in Premiere Pro.
Keyboard Shortcuts
Keyboard shortcuts speed up your workflow a lot. Use shortcuts for common tasks like opening Lumetri Color panel. Press Shift+7 to open it quickly. Adjust highlights and shadows with keys instead of mouse clicks. Learn shortcuts for toggling scopes and resetting color settings. Practice them until they become natural. This reduces clicks and time spent searching menus.
Batch Applying Grades
Apply one grade to many clips at once. Select all clips you want to color grade in the timeline. Right-click and choose “Paste Attributes.” Pick the Lumetri Color effect to copy. This copies your color grade settings to all selected clips. Saves time compared to grading each clip separately. Use adjustment layers for global color changes. Put an adjustment layer above clips and apply your grade. This changes color for all clips below instantly.
Frequently Asked Questions
Is Adobe Premiere Pro Good For Color Grading?
Adobe Premiere Pro offers powerful, professional color grading tools with customizable LUTs, curves, and color wheels. It suits both beginners and experts.
How To Apply Color Grade To All Clips In Premiere Pro?
Create an adjustment layer above all clips in the timeline. Apply your color grade to this layer. This affects all underlying clips uniformly.
Does Premiere Pro Have Color Grading Presets?
Yes, Premiere Pro offers color grading presets called LUTs. These presets help quickly apply cinematic looks and enhance footage. Users can also create and save custom presets for consistent grading across projects.
How To Make Color Gradient In Premiere?
Create a new Color Matte via the New Item button. Match sequence settings, choose colors, then apply a gradient effect using the Gradient Ramp in the Effects panel. Adjust colors and direction for a smooth gradient in Premiere Pro.
What Is Color Grading In Premiere Pro?
Color grading adjusts video colors to create mood, style, and improve visual appeal.
How Do I Start Color Grading In Premiere Pro?
Use the Lumetri Color panel to adjust exposure, contrast, highlights, and shadows.
Can I Apply One Color Grade To All Clips?
Yes, copy your grade and paste it onto multiple clips quickly.
Are There Free Color Grading Presets In Premiere Pro?
Premiere Pro offers built-in presets and supports free LUTs from various sources.
How Do I Use Adjustment Layers For Grading?
Add an adjustment layer above clips, then apply color corrections to it.
What Tools Help Match Colors Between Clips?
Use the Color Match feature in the Lumetri Color panel for consistent looks.
Conclusion
Color grading in Premiere Pro can truly improve your video’s look. Start with basic corrections, then add creative touches. Use adjustment layers to keep your edits flexible. Remember to check your work on different screens. Practice often to build your confidence and skill.
Keep colors consistent to tell your story well. Small changes make a big difference in final results. Enjoy the process and experiment freely with your footage.