Are you tired of your printer only producing dull black-and-white pages when you want vibrant colors? Printing in color should be simple, but many people struggle with settings, ink issues, or driver problems that keep their prints looking plain.
What if you could fix these common obstacles and bring your photos, documents, and designs to life with bright, true-to-life colors? In this guide, you’ll discover easy, step-by-step tips to make sure your printer is set up correctly, your ink cartridges are ready, and your computer settings are perfect for color printing.
Get ready to unlock the full potential of your printer and transform every print into a colorful masterpiece you’ll be proud to share. Keep reading to learn exactly how to print in color without frustration or guesswork.

Credit: www.youtube.com
Choose The Right Printer
Selecting the right color printing mode is essential for vibrant and accurate printouts. Many printers offer both color and black-and-white options. Choosing the correct mode ensures your documents or photos appear as intended. This section guides you through selecting color printing mode effectively.
Select Color Printing Mode In The Print Dialog
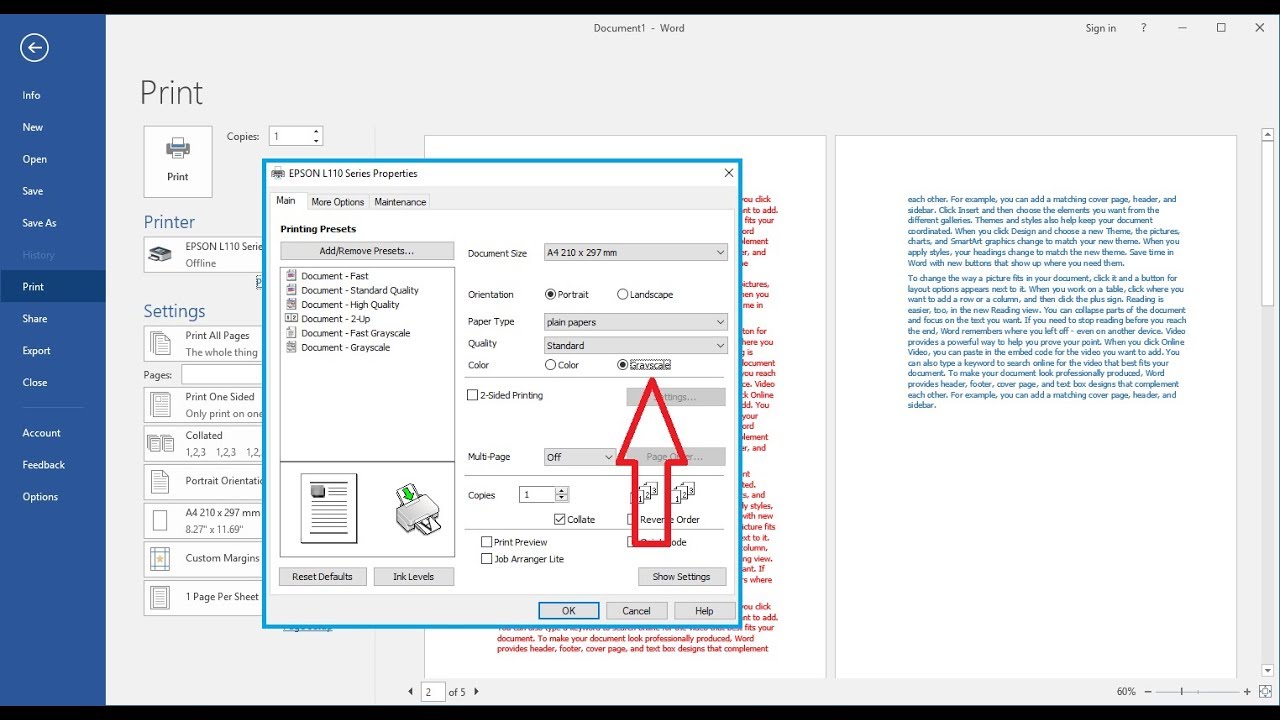
Start by opening the print dialog in your document or photo app. Look for a button named “Properties,” “Preferences,” or “Settings” near your printer’s name. Click it to open printer options.
Find the tab labeled “Color” or “Paper/Quality.” Select the “Color” option here. Turn off any “Grayscale” or “Black & White” settings to avoid monochrome prints.
Adjust Color Settings On Windows
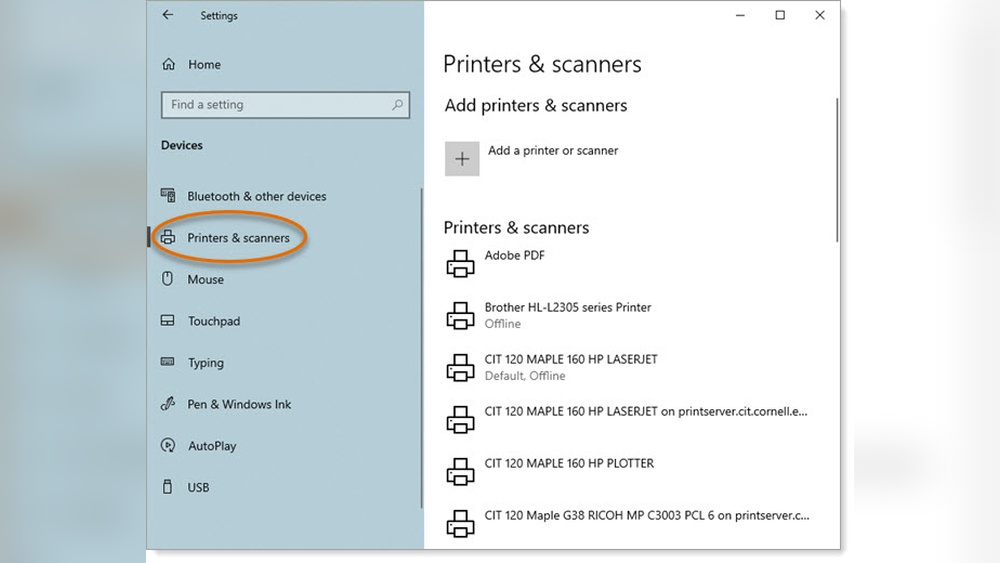
Open Windows Settings and go to Devices > Printers & scanners. Select your printer from the list. Click “Manage,” then “Printing preferences.”
Look for color options within preferences. Choose “Color” mode to enable full-color printing. Ensure grayscale is disabled for correct output.
Set Color Printing On Macos
Open System Settings and navigate to Printers & Scanners. Select your printer from the list. Find the default settings or preferences for your printer.
Within these settings, pick the color printing mode. Confirm that black-and-white or grayscale options are turned off. This step activates color printing for your jobs.
Select Color Printing Mode
Choose the color printing mode in your printer settings to print in color. Disable grayscale or black-and-white options to ensure color output. Confirm that color ink cartridges are installed and have enough ink before printing.
Printing in color needs enough ink in the cartridges. Low ink can cause faded or missing colors. Checking ink levels avoids wasting paper on poor prints.
Most printers show ink levels on their display or computer software. It helps to know which cartridges need replacing before printing.
How To Check Ink Levels On Your Printer
Look at your printer’s control panel for ink status icons. Some printers have a button to show ink levels. Others show warnings if ink is low.
Use the printer’s menu to find ink or maintenance options. Select “Ink Levels” or “Ink Status” to see details for each cartridge.
Check Ink Levels On Your Computer
Open your computer’s printer software or app. Select your printer and look for an ink or supplies section. It shows the amount of ink left in each cartridge.
Windows users: Go to Settings > Devices > Printers & scanners. Choose your printer, click “Manage,” then “Printing preferences” to check ink.
Mac users: Open System Settings > Printers & Scanners. Select your printer and open “Options & Supplies” to view ink levels.
Replace Or Refill Ink Cartridges
When ink is low, replace cartridges with new ones. Use cartridges made for your printer model. Refill kits can work but may cause issues.
Remove cartridges carefully and avoid touching the nozzles. Insert new cartridges firmly until they click into place. Run a test print to check.
Check Ink Cartridge Levels
Installing and updating printer drivers is crucial for printing in color. Drivers act as a bridge between your computer and printer. They ensure your device understands print commands correctly. Without the right driver, your printer may not print in color or might produce errors.
New drivers fix bugs and improve printer functions. They also add support for the latest operating systems. Keeping drivers updated helps maintain print quality and speed. It also avoids compatibility issues that stop color printing.
How To Install Printer Drivers
First, identify your printer model. Visit the manufacturer’s official website. Look for the “Support” or “Downloads” section. Find drivers matching your printer and operating system. Download the latest driver file. Run the installer and follow the on-screen instructions. Restart your computer after installation.
How To Update Printer Drivers
Check your current driver version in device settings. On Windows, open Device Manager and find your printer. Right-click and select “Update driver.” Choose “Search automatically for updated driver software.” On macOS, use System Preferences > Software Update. Download and install any available printer driver updates.
Tips For Driver Installation And Updates
- Always download drivers from official sources.
- Disconnect the printer during installation if instructed.
- Restart your computer and printer after updates.
- Check your printer manual for model-specific steps.
- Keep your operating system updated for better compatibility.
Install And Update Drivers
Adjusting your printer settings is key to printing in color correctly. The printer may default to black and white or grayscale. Changing these settings ensures your documents print with full color.
Most printers have options both in the print dialog and in the computer’s system preferences. These settings control whether the printer uses color ink or just black ink. Checking and adjusting them helps avoid unexpected monochrome prints.
Change Color Settings In The Print Dialog
Open the print menu from your document or browser. Look for buttons labeled “Properties,” “Preferences,” or “Settings” near the printer’s name. Click to open the printer’s detailed options.
Find the tab named “Color,” “Paper/Quality,” or something similar. Select the “Color” option instead of “Grayscale” or “Black & White.” This tells the printer to use color ink for your print job.
Turn off any grayscale or black and white modes to prevent printing without color. Confirm your choices and proceed to print.
Adjust Color Preferences In Your Computer Settings
On Windows, open Settings and go to Devices > Printers & Scanners. Select your printer, click “Manage,” then choose “Printing preferences.” Find the color options and select “Color.”
On macOS, open System Settings and go to Printers & Scanners. Select your printer, then check the default settings or preferences for color options. Choose “Color” instead of monochrome settings.
Verify Ink Cartridge And Printhead Status
Check that your color ink cartridges are installed properly and have enough ink. Low or empty cartridges cause prints to come out black and white.
Run a printhead cleaning cycle if colors still do not print correctly. This process clears clogged nozzles and improves print quality.
Adjust Printer Settings
Running printhead cleaning is a simple step to improve color printing quality. It clears clogged nozzles that block ink flow. This helps your printer deliver bright and clear colors on paper.
Printhead cleaning is useful when colors appear faded or missing. It can fix streaks or spots in your prints. This process uses extra ink to flush out dried or blocked ink.
How To Start Printhead Cleaning From Printer Menu
Most printers have a built-in cleaning option. Check your printer’s control panel or screen. Look for settings like “Maintenance” or “Tools.” Select “Printhead Cleaning” or similar. Follow the on-screen instructions to begin the cleaning.
Using Printer Software On Your Computer
Open the printer software on your computer. This software usually comes with your printer. Find the “Maintenance” or “Utility” tab. Click on “Printhead Cleaning” or “Nozzle Check.” Start the cleaning process and wait for it to finish.
When To Repeat Printhead Cleaning
If colors still look poor after one cleaning, try again. Wait a few minutes between cleanings. Do not run it too many times in a row. Excessive cleaning wastes ink and may damage the printhead.
Check Ink Levels Before Cleaning
Low ink can cause poor print quality. Make sure your color cartridges have enough ink. Replace any empty or low cartridges before cleaning. Cleaning works best with fresh ink in the printer.
Run Printhead Cleaning
Using high-quality paper plays a big role in printing vivid and sharp color images. Paper type affects how ink spreads and how colors appear. Choosing the right paper can bring your prints to life with brighter and clearer colors.
Standard office paper absorbs too much ink. This can cause colors to look dull or blurry. High-quality paper has a smooth surface that holds ink well. It helps the printer produce crisp lines and vibrant tones.
Thicker paper also prevents ink from bleeding through. This keeps colors clean and distinct on every page. Glossy or semi-glossy papers enhance color depth and contrast. They make photos and graphics stand out.
Choose Paper With Proper Weight
Paper weight is measured in grams per square meter (gsm). Heavier paper feels thicker and stronger. For color printing, select paper with at least 90 gsm. This weight reduces ink absorption and improves print quality.
Pick Paper Designed For Color Printing
Look for paper labeled as “photo paper” or “color print paper.” These types have coatings that improve color reproduction. They prevent ink from spreading and keep colors sharp. Using such paper ensures your prints look professional.
Consider The Finish Of The Paper
Paper finishes include matte, glossy, and satin. Matte finish reduces glare and works well for text and graphics. Glossy finish adds shine and makes colors pop. Satin offers a balance between matte and glossy.
Test Different Papers For Best Results
Try printing on several paper types to see which works best. Some printers perform better with specific paper finishes or weights. Testing helps find the right match for your printer and project.
Use High-quality Paper
Optimizing color profiles is key to getting vibrant, accurate colors from your printer. Color profiles help match the colors on your screen to the colors your printer produces. This keeps your prints looking natural and true to your design.
Without the right color profile, printed colors can look dull or different from what you see on your computer. Using optimized profiles reduces color shifts and improves print quality. It also saves ink by avoiding repeated test prints.
What Are Color Profiles?
Color profiles are sets of data that describe how colors should appear on different devices. They tell your printer how to interpret the colors from your file. Common profiles include sRGB and Adobe RGB.
How To Choose The Right Profile
Pick a profile that matches your printer and paper type. Many printers come with recommended profiles. You can also download profiles from paper or ink manufacturers.
Setting Color Profiles In Software
Most photo or design software lets you select color profiles before printing. Choose the profile that fits your printer. This step helps keep colors consistent from screen to paper.
Calibrate Your Monitor
Calibrating your monitor helps you see true colors while editing. Use calibration tools or software to adjust brightness and color balance. This ensures your prints match what you see on screen.
Embed Color Profiles In Your Files
Embedding profiles in your images keeps color info intact. This tells the printer how to handle colors correctly. Most editing programs have an option to embed profiles when saving.
Optimize Color Profiles
Testing with sample prints is a smart step before printing your final color documents. It helps you see how colors appear on paper. This saves ink and paper by avoiding mistakes. Sample prints show if colors look bright or dull. They also reveal any printer issues early.
Use small test pages with different colors and patterns. This gives a clear idea about your printer’s color accuracy. Adjust settings if needed, then test again. This process improves your print quality and reduces waste.
How To Prepare Sample Prints
Create a simple file with various colors. Include primary colors like red, blue, and yellow. Add gradients and different shades for better testing. Use basic shapes or text to check color clarity. Save the file in a common format like PDF or JPEG.
Adjust Printer Settings Before Testing
Open your printer’s preferences or properties menu. Select the color printing option, not grayscale. Choose the right paper type for better color output. Check if ink levels are sufficient. Run a printhead cleaning if colors look faded.
Evaluate Your Sample Prints
Look at the test prints in natural light. Check if colors match what you see on screen. Notice any streaks or color smudges. If colors are off, tweak the printer settings again. Repeat the test print until colors look correct.
Test With Sample Prints
Troubleshooting common issues helps you get the best color prints. Many problems happen due to simple settings or hardware faults. Fixing these issues saves time and paper.
Start by checking your printer settings and ink levels. Ensure the printer is ready for color printing before assuming a technical fault.
Check Printer Settings For Color Printing
Open the print dialog on your computer. Click “Properties,” “Preferences,” or “Settings” next to your printer’s name. Look for a “Color” or “Paper/Quality” tab. Select “Color” and make sure “Grayscale” or “Black & White” is off. This step often fixes color print problems fast.
Verify Ink Cartridge Installation And Levels
Inspect the color ink cartridges inside the printer. Make sure they are installed correctly and click firmly into place. Check the ink levels through your printer’s software or display. Replace any empty or low cartridges to avoid dull or missing colors.
Run A Printhead Cleaning Cycle
If colors look faded or missing, run a printhead cleaning. Use your printer’s maintenance menu to start this process. Cleaning clears clogged nozzles and improves color output. Repeat cleaning up to three times if needed, but avoid overdoing it.
Check Paper Type And Quality
Use the right paper for color printing. Some papers absorb ink poorly, causing dull colors. Select “Photo Paper” or “High Quality” in the print settings for better results. Avoid using recycled or damaged paper.
Update Printer Drivers And Software
Outdated drivers may cause color printing issues. Visit the printer manufacturer’s website to download the latest drivers. Install updates regularly to maintain compatibility and fix bugs. Restart your computer and printer after updates.

Credit: stanford.service-now.com
Credit: www.youtube.com
Frequently Asked Questions
How Do I Get My Printer To Print In Color?
Open the print menu and select “Color” instead of “Grayscale. ” Ensure color cartridges are installed and have ink. Update drivers and run a printhead cleaning if needed.
How Can I Print A Document In Color?
Open the print menu and select your printer. Choose “Color” under settings, disable “Grayscale,” and ensure color ink cartridges are full and installed correctly. Update printer drivers if needed and run a printhead cleaning cycle to fix color printing issues.
How Can I Print In Color Instead Of Black?
Open the print menu and select your printer’s preferences. Choose “Color” instead of “Grayscale” or “Black & White. ” Ensure color cartridges have ink and are properly installed. Run a printhead cleaning if colors don’t print correctly. Update printer drivers from the manufacturer’s website if issues persist.
How To Make A Pdf Print In Color?
Open the print menu, select your printer’s properties or preferences, then choose “Color” mode. Disable “Grayscale” or “Black & White. ” Ensure color cartridges have ink and are properly installed. Update printer drivers if needed and run a printhead cleaning cycle to fix color printing issues.
How Do I Enable Color Printing On My Printer?
Open the print menu, select printer properties, and choose “Color” instead of “Grayscale. “
Why Is My Printer Printing Only Black And White?
Check if “Grayscale” is enabled or if color ink cartridges are empty or not installed.
How Can I Check Ink Levels For Color Printing?
Use your printer’s software or display panel to view the status of color ink cartridges.
What Should I Do If Colors Print Faint Or Faded?
Run a printhead cleaning cycle and ensure your ink cartridges have enough ink.
Can I Print In Color From Any Software Program?
Most software supports color printing; just select the color option in the print settings.
How Do I Set Color Printing As My Default Option?
Go to printer preferences in your computer’s settings and set color printing as default.
Conclusion
Printing in color can enhance your documents and images significantly. Always check printer settings before printing to ensure color mode is on. Keep ink cartridges full and properly installed for best results. Regular maintenance, like cleaning printheads, helps avoid color printing problems.
With these simple steps, you can enjoy vibrant, colorful prints every time. Printing in color is easy once you know the right settings and care tips. Try these tips today to bring your prints to life.