
Want to transform your images in Photoshop with a simple but powerful effect? Learning how to invert colors can open up a whole new world of creative possibilities.
Whether you’re looking to create striking visual contrasts, fix color negatives, or add a unique twist to your photos, inverting colors is a technique you’ll want to master. In this guide, you’ll discover easy, step-by-step methods to invert colors quickly using Photoshop’s shortcuts and tools.
By the end, you’ll be ready to enhance your projects and impress with bold, eye-catching edits. Let’s dive in and unlock the full potential of your images!
Credit: www.tourboxtech.com
Photoshop Invert Colors Shortcuts
Using shortcuts to invert colors in Photoshop saves time and makes editing faster. These simple key combinations apply color inversion to layers, selections, or masks instantly.
Knowing the right shortcuts helps you work smoothly without searching menus. Below are the main keyboard shortcuts to invert colors efficiently.
Invert Layer Colors Shortcut
Windows: Control + I
Mac: Command + I
This shortcut inverts all pixels on the selected layer. Black turns to white, white to black, and other colors reverse too. It changes the entire layer’s color scheme quickly.
Invert Selection Shortcut
Windows: Shift + Control + I
Mac: Shift + Command + I
Use this shortcut to reverse a selection. It deselects your current area and selects everything else on the layer or image. It helps edit outside the original selection.
Invert Layer Mask Shortcut
Windows: Control + I
Mac: Command + I
Select the mask thumbnail in the Layers panel first. Then press this shortcut to invert the mask. Opaque areas become transparent and transparent areas become opaque.

Credit: www.businessinsider.com
Invert Entire Layer Colors
Inverting the entire layer colors in Photoshop changes every color to its opposite on the color wheel. This effect creates a unique, eye-catching look. It works on all pixels in the selected layer, flipping light areas to dark and dark areas to light.
This method is quick and useful for creative edits or correcting images. The process requires only a few clicks or keyboard shortcuts. It helps to experiment with different layers to see various results.
How To Select The Layer To Invert
Open your Photoshop project. In the Layers panel, click on the layer you want to invert. Make sure the layer is active and visible. Only the active layer’s colors will invert.
Using Keyboard Shortcuts To Invert Colors
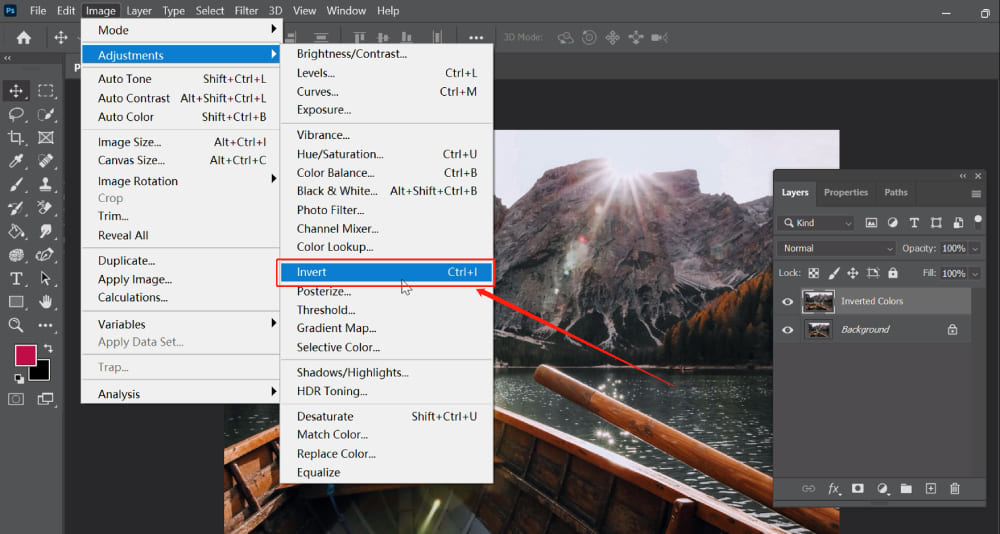
Press Control + I on Windows or Command + I on Mac. This shortcut instantly inverts the colors of the selected layer. It flips blacks to whites and all colors to their complements. This method saves time and is easy to remember.
Using The Menu To Invert Colors
Go to the top menu and click Image. Then select Adjustments and choose Invert. This also reverses the colors on the active layer. The menu option is helpful if you prefer using the mouse over shortcuts.
Invert Selected Area
Inverting colors in a specific part of your image can create striking effects. The “Invert Selected Area” technique allows precise control over which parts change color. Photoshop makes this process simple and quick.
You start by selecting the area you want to invert. This lets you keep the rest of the image unchanged. The colors inside the chosen area will flip, turning dark tones light and light tones dark.
How To Select The Area
Use tools like the Lasso, Marquee, or Quick Selection to pick your area. These tools let you draw freeform shapes or fixed rectangles and circles. Adjust your selection to cover exactly what you want.
Applying The Invert Command
Once your area is selected, use the shortcut keys to invert colors. Press Shift + Control + I on Windows or Shift + Command + I on Mac. This flips the colors only within your selection.
Adjusting The Inverted Area
You can fine-tune the inverted section by adding or subtracting from your selection. Use the selection tools again to modify the area. Repeat the invert command to see changes instantly.
Using Layers For Non-destructive Editing
Create a new layer from your selection before inverting. This keeps your original image safe. Invert colors on the new layer to experiment without permanent changes.

Credit: www.youtube.com
Invert Layer Masks
Inverting layer masks in Photoshop changes which areas of the layer are visible or hidden. It swaps the black and white areas of the mask. White areas become black, hiding parts of the layer. Black areas become white, revealing parts of the layer. This technique helps refine image edits and effects with precision.
Working with layer masks allows non-destructive editing. Inverting masks quickly reverses the mask’s effect without redrawing. This saves time and keeps your workflow smooth and flexible.
How To Select The Layer Mask
First, locate the layer you want in the Layers panel. Click the mask thumbnail next to the layer’s image. The thumbnail highlights with a border, showing it is active. This step is essential before inverting the mask.
Using Keyboard Shortcuts To Invert Layer Masks
Press Control + I (Windows) or Command + I (Mac) while the mask is selected. Photoshop instantly inverts the mask colors. This shortcut toggles the white and black areas of the mask fast. No need for complex menus or tools.
Effects Of Inverting Layer Masks
Inverting a mask reverses transparency and visibility. Areas once visible become hidden. Hidden areas become visible. It helps compare different effects or fix mistakes quickly. This simple action can dramatically change your image’s look.
Using Adjustment Layers For Inversion
Using adjustment layers to invert colors in Photoshop offers a flexible and non-destructive way to edit your images. Adjustment layers let you apply changes without altering the original image pixels. This method is ideal for experimenting with color inversion while maintaining full control over your edits.
Adjustment layers appear as separate layers in the Layers panel. You can toggle their visibility or modify their settings anytime. This approach keeps your workflow organized and reversible, perfect for both beginners and advanced users.
Creating An Invert Adjustment Layer
Open your image in Photoshop. Go to the Layers panel and click the Adjustment Layer icon. Choose “Invert” from the list. This instantly reverses all the colors in your image on a new layer. The original image remains untouched below the adjustment layer.
Editing The Invert Effect
With the invert adjustment layer selected, you can fine-tune its effect. Use layer masks to apply inversion to specific areas only. Paint with black on the mask to hide the effect and white to reveal it. This control allows precise color inversion on parts of your photo.
Combining With Other Adjustment Layers
Adjustment layers can be stacked for creative effects. Add layers like Brightness/Contrast or Hue/Saturation above the invert layer. Each adjustment modifies the image without permanent changes. Experiment with blending modes to achieve unique color results after inversion.
Correcting Color Negatives
Color negatives are the original film images where colors appear reversed. Photographers use color negatives to produce positive prints with accurate colors. Digital editing tools like Photoshop help correct these negatives by inverting the colors back to normal. This process makes the image look natural and true to life. Understanding how to invert colors and refine the result is key to restoring color negatives effectively.
Flip Colors With Invert
Start by opening the color negative in Photoshop. Select the image layer you want to correct. Use the shortcut Control + I on Windows or Command + I on Mac. This flips all colors to their opposites. Blues turn to yellows, reds switch to greens, and whites become black. The image now looks like a positive print but may need more adjustment.
Refine With Levels And Curves
After inverting, the colors might seem off or dull. Use the Levels adjustment to improve brightness and contrast. Move the sliders to balance shadows, midtones, and highlights. Next, apply the Curves tool for finer color control. Adjust the curve lines to fix color casts and enhance details. These steps help make the corrected image look natural and vibrant.
Creative Effects With Color Inversion
Color inversion in Photoshop offers unique creative effects for your images. It flips colors to their opposites, creating striking contrasts. This technique can transform ordinary photos into eye-catching art pieces. Experimenting with color inversion reveals unexpected visual styles. It brings a fresh look to portraits, landscapes, and graphic designs.
Creating Abstract Art With Inverted Colors
Inverting colors can turn a photo into abstract art. Bright areas become dark and dark areas turn bright. This swap changes the image mood completely. Use this effect to highlight shapes and patterns. It makes your artwork stand out with bold contrasts.
Enhancing Textures And Details
Color inversion reveals hidden textures in your images. It enhances fine details often missed in normal views. This effect works well on nature photos and architectural shots. Inverted colors bring out lines and surfaces clearly. It adds depth and interest to your pictures.
Designing Unique Backgrounds
Inverted colors create striking backgrounds for digital projects. They offer a fresh alternative to standard color schemes. Use this effect to make website banners or social media posts pop. It draws attention and adds creativity to your designs.
Adding Surreal Effects To Portraits
Invert colors to give portraits a surreal look. Skin tones and eyes change to unusual hues. This effect creates a dreamlike or eerie atmosphere. It’s perfect for creative photo edits and artistic portraits. Experiment with blending modes for varied results.
Combining Invert With Other Filters
Combining the invert filter with other filters in Photoshop creates unique visual effects. This technique enhances creativity and adds depth to your images. Experimenting with different filters after inverting colors produces striking results. It is easy and fun to blend invert with other adjustments.
Using Invert With Blur Filters
Applying blur after inverting colors softens the image edges. Gaussian Blur works well to create a dreamy effect. Motion Blur adds a sense of movement to the inverted colors. This combination helps highlight certain areas by contrasting sharp and blurred parts.
Combining Invert With Sharpen Filters
Sharpen filters enhance details in an inverted image. After inversion, use Unsharp Mask to bring out texture. Smart Sharpen can target specific areas for clarity. This method makes the colors pop while maintaining crisp edges.
Mixing Invert And Artistic Filters
Artistic filters change the style of an inverted image creatively. Filters like Poster Edges or Cutout add graphic effects. The Paint Daubs filter creates a painted look on inverted colors. This mix transforms photos into digital art easily.
Inverting Colors Before Applying Adjustment Layers
Invert colors first, then add adjustment layers for fine-tuning. Levels or Curves improve contrast after inversion. Hue/Saturation adjusts color intensity in the inverted image. This workflow refines the final look with precise control.
Non-destructive Inversion Techniques
Non-destructive inversion techniques in Photoshop let you invert colors without changing the original image. These methods preserve your edits and keep your workflow flexible. You can adjust or remove the inversion effect anytime without losing quality.
Using these techniques is smart for professional editing and experimentation. It helps maintain image integrity and allows easy corrections later.
Using An Invert Adjustment Layer
The Invert Adjustment Layer is the easiest non-destructive way to invert colors. It applies the effect on a separate layer above your image. This layer affects all layers below it without altering them.
You can toggle this layer on or off anytime. Change its opacity or mask parts of the effect to control where inversion applies.
Applying Invert With A Smart Object
Convert your image layer into a Smart Object first. Then apply the invert adjustment or filter. This method keeps the original image safe inside the Smart Object.
You can edit or remove the invert effect later. Double-click the Smart Object to access and modify the original image easily.
Inverting Colors On A Duplicate Layer
Create a duplicate of your original layer to invert colors. Apply the invert command to the copy. The original layer stays untouched below.
This approach lets you blend the inverted layer with the original using layer opacity or blending modes. Adjust the effect strength without permanent changes.
Troubleshooting Common Inversion Issues
Inverting colors in Photoshop is usually straightforward. Yet, some users face common problems that block smooth editing. Understanding these issues helps fix them quickly. This section covers key troubles and easy solutions.
Incorrect Layer Selected
Sometimes, inversion does not work because the wrong layer is active. Check the Layers panel to confirm the correct layer is selected. Inverting a hidden or locked layer will not show changes. Unlock or make the layer visible before inverting.
Layer Mask Confusion
Inverting a layer mask is different from inverting the layer itself. Make sure you click the mask thumbnail before applying the inversion shortcut. Inverting the wrong part can cause unexpected results. Verify what is selected in the Layers panel.
Selection Issues Affecting Inversion
If a selection is active, Photoshop inverts only inside that area. This can cause partial inversion or no visible change if the selection is empty. Press Ctrl+D (Cmd+D on Mac) to clear any selection before inverting colors.
Image Mode Limitations
Some image modes, like Bitmap, do not support color inversion. Convert the image to RGB or CMYK mode to invert colors properly. Go to Image > Mode and select the correct mode before trying to invert.
Using Adjustment Layers Instead Of Direct Inversion
Adjustment layers can cause confusion if users expect direct pixel changes. Invert colors using the Invert adjustment layer for non-destructive editing. This method allows toggling the effect on and off easily.
Frequently Asked Questions
What Is The Shortcut For Invert Colors In Photoshop?
The shortcut to invert colors in Photoshop is Ctrl + I (Windows) or Command + I (Mac). It reverses layer colors. To invert a selection, press Shift + Ctrl + I (Windows) or Shift + Command + I (Mac). Use these shortcuts for quick color inversion.
How To Convert Color Negative In Photoshop?
Open the color negative in Photoshop. Press Ctrl+I (Windows) or Cmd+I (Mac) to invert colors. Adjust Levels or Curves for accuracy. Save your corrected image.
How To Turn Black To White In Photoshop?
Open your image in Photoshop. Press Ctrl + I (Windows) or Command + I (Mac) to invert colors, turning black into white.
How To Invert A Layer In Photoshop?
To invert a layer in Photoshop, select the layer and press Ctrl + I (Windows) or Command + I (Mac). This reverses all colors on the layer instantly.
What Is Color Inversion In Photoshop?
Color inversion flips all colors to their opposites on the color spectrum.
How Do I Invert Colors Using A Shortcut?
Press Control + I (Windows) or Command + I (Mac) to invert colors.
Can I Invert Colors On Only One Layer?
Yes, select the layer and use the invert shortcut to change its colors.
How To Invert Colors In A Specific Area?
Make a selection and use Shift + Control + I (Windows) or Shift + Command + I (Mac).
Is It Possible To Invert A Layer Mask?
Yes, select the mask thumbnail and press Control + I (Windows) or Command + I (Mac).
Will Inverting Colors Affect The Original Image?
No, it only changes the selected layer or area without altering the original image.
Conclusion
Inverting colors in Photoshop is quick and simple. Use shortcuts like Control + I or Command + I to invert layers. You can also invert selections or masks with easy commands. Practice these steps to edit images creatively. Keep experimenting to see new effects.
Photoshop makes color changes easy and fun. Try inverting colors on different images today. Your designs will gain fresh looks with this skill.