Are you tired of struggling with dark circles, redness, or uneven skin tone that no amount of foundation seems to fix? Imagine a simple trick that can instantly brighten your complexion and give you that flawless, natural look you’ve been craving.
That’s exactly what color correctors do. But how do you use them the right way to get the best results? In this guide, you’ll discover easy and effective steps to choose and apply the perfect color corrector for your skin.
By the time you finish reading, you’ll be confident in transforming your makeup routine and saying goodbye to stubborn discolorations for good. Ready to unlock the secret to radiant skin? Let’s dive in!

Credit: typsybeauty.com
Color Corrector Basics
Color correctors help balance uneven skin tones. They hide redness, dark circles, and dullness. Using them right improves makeup’s look and feel.
Understanding color corrector basics is key. Choose the right shade and apply it carefully. This section covers the essentials you need to know.
What Is A Color Corrector?
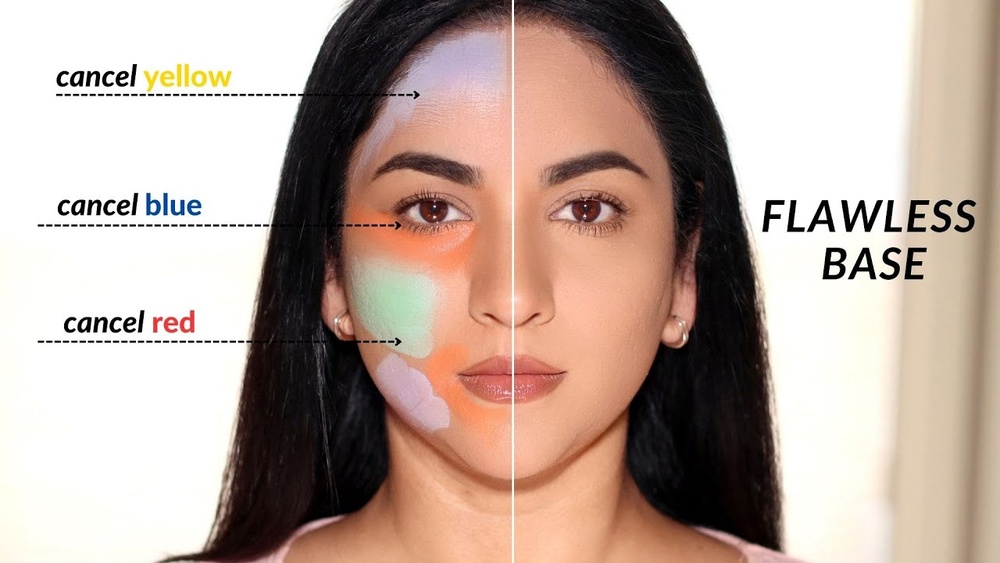
A color corrector is a makeup product that cancels out skin discoloration. It uses colors opposite on the color wheel to neutralize marks. For example, green corrects red spots, while peach hides blue shadows.
Choosing The Right Shade
First, identify the skin discoloration you want to fix. Use green for redness like acne or rosacea. Peach or orange works for blue and purple under-eye circles. Lavender helps with yellow or dull skin tones. Pick a shade that suits your skin color for natural results.
How To Apply Color Corrector
Apply color corrector directly on the problem areas. Use a small brush or your fingertip for precise application. Blend gently by tapping to avoid wiping away the product. Use a light hand to keep the coverage natural and smooth.
Choosing Shades For Skin Tones
Choosing the right color corrector shade is key to flawless makeup. The goal is to cancel out unwanted tones on your skin. Select shades that work with your skin tone for natural results.
Different skin tones need different corrector colors. Using the wrong shade can make discoloration worse. Understanding basic color theory helps you pick the best shade.
Understanding Your Skin Tone
Identify if your skin tone is fair, medium, or dark. Fair skin usually has pink or light beige undertones. Medium skin shows yellow or olive undertones. Dark skin has deep brown or red undertones.
Knowing your undertone guides you to the correct shade. This step ensures the corrector blends well and looks natural.
Corrector Shades For Fair Skin
Peach and light orange tones work best for fair skin. These shades brighten blue or purple under-eye circles. Green correctors reduce redness from acne or irritation.
Lavender correctors help neutralize yellow or dull areas. Use soft, pastel shades to avoid harsh contrast on light skin.
Corrector Shades For Medium Skin
Deeper orange and peach tones suit medium skin well. These shades cover dark circles without looking too bright. Green still works great for redness on medium skin.
Lavender tones balance out sallow or yellow patches. Choose shades that blend seamlessly with your natural skin color.
Corrector Shades For Dark Skin
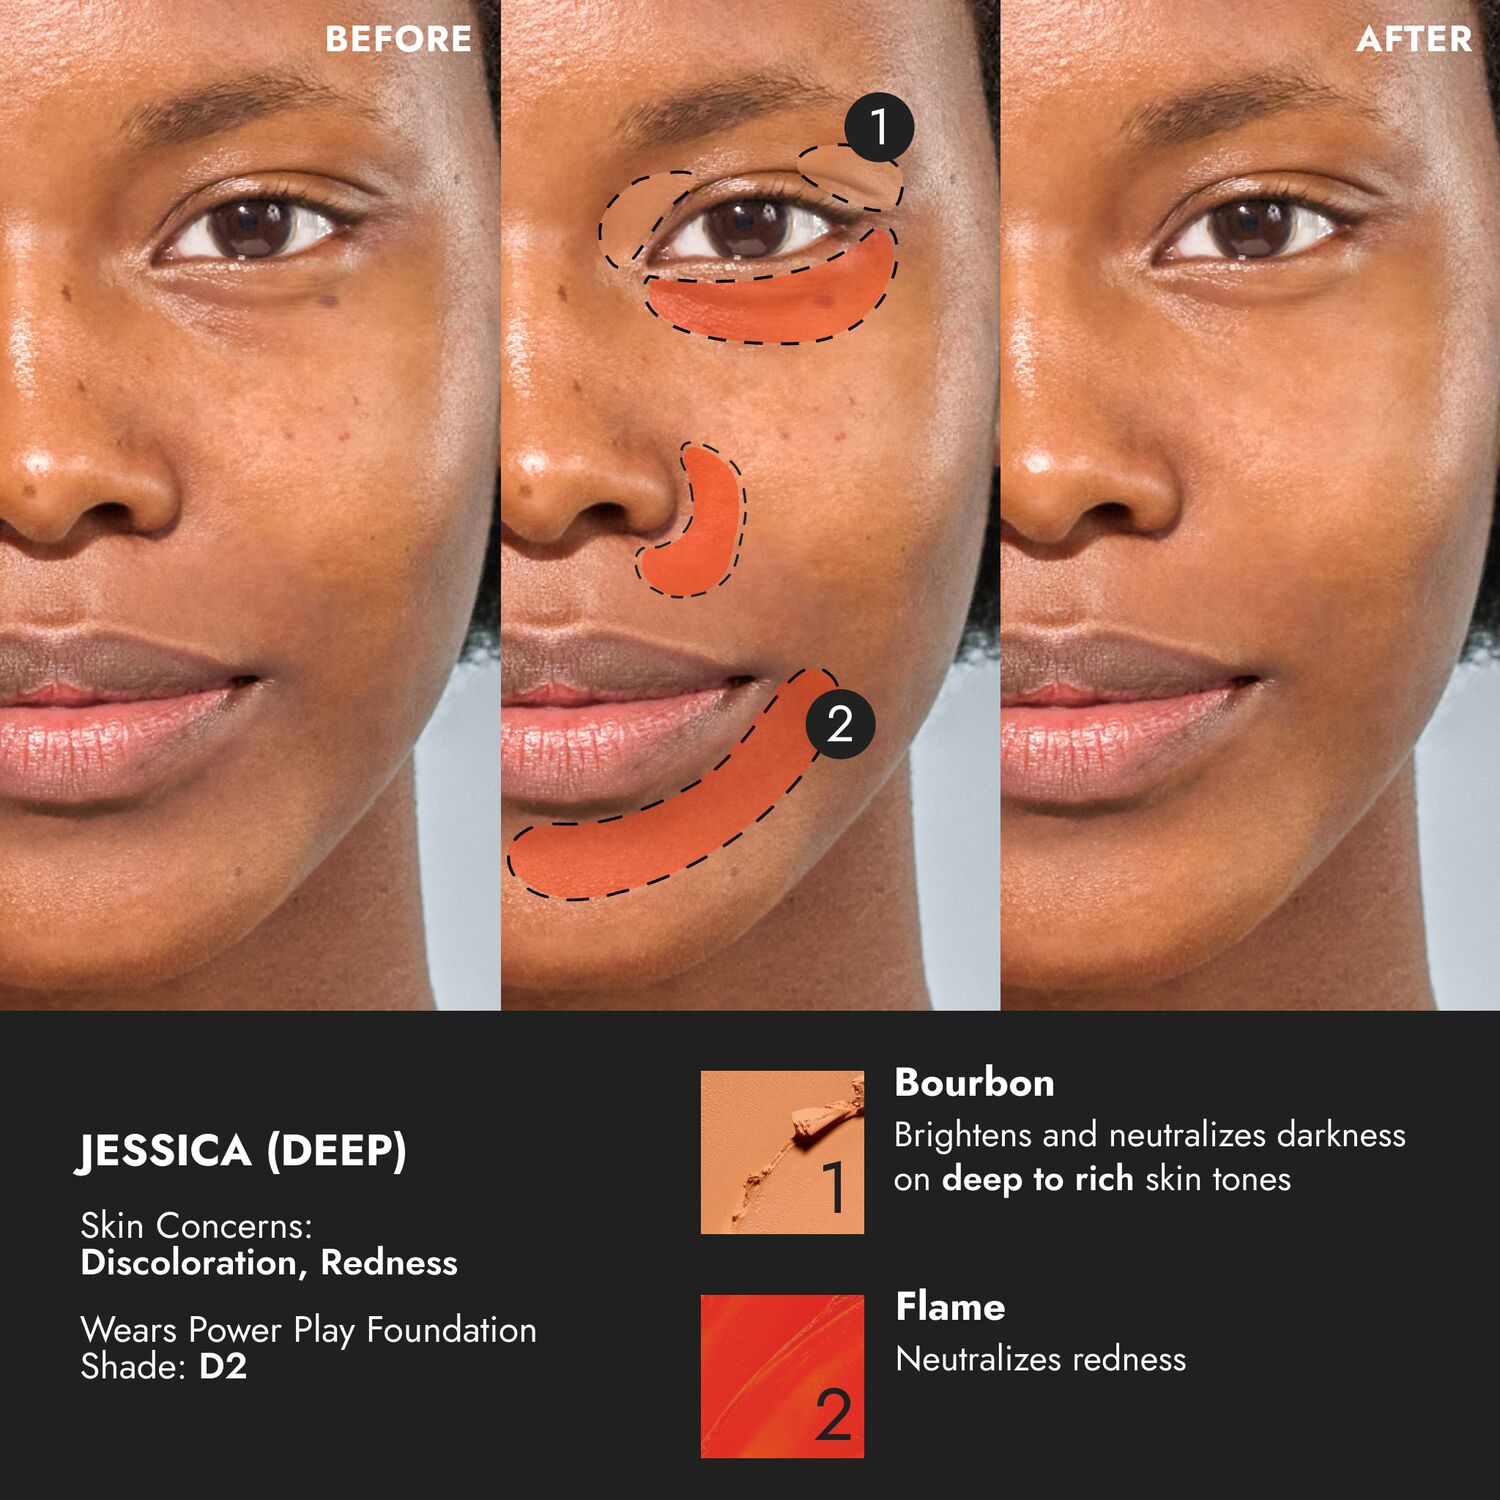
Rich orange or red correctors work best for dark skin tones. These colors hide blue or purple under-eye circles effectively. Green can reduce redness but use darker formulas.
Avoid pale correctors that create a chalky look. Pick deep, warm shades that complement your skin tone.
Neutralizing Redness
Neutralizing redness is a key step in color correcting. Red spots, blemishes, or rosacea can make skin look uneven. A color corrector helps balance these red areas for a smoother complexion.
Using the right color corrector can reduce redness without hiding your natural skin tone. It prepares your face for foundation and other makeup. The goal is to create a calm, even base.
Choosing The Right Green Color Corrector
Green tones cancel out red hues on the skin. Pick a green corrector that suits your skin type. Light green works well for fair skin. Deeper green shades suit medium to dark skin. Test the product on your jawline before applying.
How To Apply Green Corrector For Redness
Apply a small amount of green corrector on red areas. Focus on acne spots, redness around the nose, or rosacea patches. Dab gently with your finger or a brush. Blend the edges softly to avoid harsh lines.
Blending Tips For A Natural Finish
Blend the green corrector until it looks like part of your skin. Use a light touch and pat the product in. Avoid rubbing to keep the coverage even. Follow with foundation to cover the corrected areas smoothly.
Credit: www.coverfx.com
Concealing Under-eye Circles
Under-eye circles can make anyone look tired and dull. They often appear as dark shadows under the eyes. Using a color corrector helps to brighten this area and give a fresh look. This technique hides discoloration before applying foundation or concealer. It creates a smooth and even base for makeup.
Choose The Right Shade For Your Skin
Peach or orange tones work best to cover blue or purple circles. Fair skin matches well with peach shades. Medium to dark skin tones need deeper orange correctors. Pick a color that cancels the darkness without looking unnatural.
Apply Corrector Gently
Use a small brush or your fingertip to dot the corrector under the eyes. Focus on the darkest areas. Avoid applying too much product to prevent creasing. Lightly tap to blend the edges smoothly into the skin.
Blend With Care
Blending is key for a natural finish. Use a damp makeup sponge or your ring finger. Gently press the product into the skin without rubbing. Blend the corrector so it fades seamlessly into your foundation.
Set With A Light Powder
After blending, set the area with a translucent powder. Use a small, fluffy brush for a light dusting. This step keeps the corrector from moving or creasing. It also helps the makeup last longer throughout the day.
Brightening Yellow Tones
Brightening yellow tones is essential for achieving a fresh and radiant complexion. Yellowish areas on the skin can make the face look dull or tired. Using a color corrector designed to neutralize these tones helps create a balanced base for makeup.
Yellow undertones often appear on sallow skin or areas with uneven pigmentation. A lavender or purple color corrector works best to counteract this yellowish tint. This step brightens the skin and evens out the overall tone.
Choosing The Right Lavender Corrector
Select a lavender corrector that suits your skin tone. Light lavender shades are ideal for fair skin, while deeper lavender hues work well for medium to dark skin. The right shade helps neutralize yellow without looking unnatural.
Applying Lavender Color Corrector
Apply the lavender corrector on yellow-toned areas using a small brush or fingertip. Focus on dull spots, such as around the cheeks or forehead. Use a gentle patting motion to blend the product into the skin.
Blending Techniques For A Natural Finish
Blend the corrector seamlessly with a beauty sponge or brush. Avoid rubbing, which can remove the product. Blend until the yellow tones are softened and the skin looks brighter but still natural.
Layering Foundation Over Color Corrector
After blending, apply foundation lightly over the corrected areas. Use a damp sponge for light coverage. This step seals the corrector and creates an even skin tone without hiding the brightening effect.
Covering Dark Spots
Dark spots can make your skin look uneven and tired. Using a color corrector helps hide these spots before applying foundation or concealer. This step creates a smoother, more flawless base for your makeup.
Color correctors neutralize dark spots by using colors opposite to the discoloration. Applying the right shade brightens your skin and reduces the appearance of spots.
Choose The Right Shade For Dark Spots
Select a color corrector that cancels out the dark tones of your spots. For blue or purple spots, use a peach or orange corrector. For brown or red spots, use a yellow or green corrector. Match the shade to your skin tone for the best effect.
Apply Color Corrector Carefully
Use a small brush or your fingertip to dab the corrector directly on dark spots. Apply a thin layer to avoid a cakey look. Gently blend the edges so it merges with your skin. Do not rub it off.
Layer With Foundation Or Concealer
After the corrector, apply foundation or concealer over the area. Use a light hand to avoid moving the corrector. Tap the product gently with a sponge or brush to build coverage.
Set With Powder
Finish by setting the area with translucent powder. This locks the corrector and makeup in place. Use a small brush to press powder lightly on the spots. This keeps the coverage long-lasting and prevents creasing.
Picking The Right Formula
Picking the right color corrector formula is key for a smooth, natural look. The formula you choose depends on your skin type and the area you want to cover. Each formula has its own texture and coverage level. These affect how well the corrector blends and how long it stays on your skin.
Powder, cream, and liquid formulas serve different purposes. Knowing their benefits helps you pick the best one for your needs. The right formula makes color correction easier and more effective.
Liquid Color CorrectorsLiquid correctors are lightweight and easy to blend. They work well on normal to oily skin. These correctors give a natural finish without feeling heavy. Use them under foundation for a smooth base. Liquid formulas are best for large areas of discoloration.
Cream Color CorrectorsCream correctors have a thicker texture. They offer medium to full coverage. This formula is good for dry or combination skin types. Creams stick well to the skin and cover stubborn discoloration. They work great on small spots or uneven patches.
Powder Color CorrectorsPowder correctors are easy to set with foundation. They help reduce shine and control oil. Powders are suitable for oily and combination skin. Use a small brush to apply powder correctors. They work best on oily areas or to set cream formulas.
Choosing Based on Skin TypeDry skin needs moisturizing formulas like creams or liquids. Oily skin benefits from powders or light liquids. Combination skin can use creams on dry areas and powders on oily zones. Sensitive skin should pick gentle, hypoallergenic formulas. Always test a small area first to avoid irritation.
Application Techniques
Applying color corrector is a key step to even out skin tone before foundation. Proper techniques ensure smooth, natural results without looking heavy. Focus on gentle application and blending for flawless coverage.
Choose The Right Tool
Use your finger, a brush, or a makeup sponge. Fingers offer warmth to melt the product into the skin. A small brush helps target precise areas. Sponges blend softly and evenly.
Apply Sparingly
Start with a small amount of product. Dab lightly on the discoloration or uneven skin. Less is more to avoid cakey or thick patches. You can add more if needed.
Pat, Don’t Rub
Use a gentle patting motion to apply corrector. Rubbing can remove the product or irritate the skin. Patting helps the color settle into the skin smoothly.
Blend The Edges
Blend the edges softly to avoid harsh lines. Use a damp sponge or clean finger to feather the edges. This creates a seamless transition to your foundation.
Layer Foundation Carefully
Apply foundation after color correction. Use a light hand to avoid disturbing the corrector underneath. Press foundation lightly with a sponge or brush for best results.
Blending Tips For Seamless Finish
Blending is the key step for a flawless color corrector finish. Without proper blending, the corrector can look patchy or stand out unnaturally. A smooth, seamless blend helps the corrector melt into your skin. This creates a natural base for your foundation or concealer. Follow simple blending tips to achieve a soft, even look that hides discoloration well.
Use Light, Tapping Motions
Apply the color corrector in small dots or thin layers. Then, gently tap the product using your fingertip or a makeup sponge. Avoid rubbing or dragging the product across your skin. Tapping helps press the color into your skin and blends it softly. This technique prevents streaks and harsh edges.
Blend The Edges Carefully
Focus on blending the edges of the color corrector. Use a clean sponge or brush to softly diffuse the borders. Blending the edges removes any sharp lines and blends the corrector into your natural skin tone. This step creates a smooth transition between corrected and non-corrected areas.
Build Coverage Slowly
Apply the corrector in thin layers rather than a thick coat. Thin layers blend more easily and look natural. Build up coverage gradually until the discoloration fades. This method avoids cakey or heavy spots. It gives you control over the intensity of correction.
Set With A Light Powder
After blending, set the corrector with a translucent or light powder. Use a small brush to apply powder gently. Setting the corrector prevents it from moving or creasing throughout the day. It also helps keep your skin smooth and matte.

Credit: www.youtube.com
Common Mistakes To Avoid
Using a color corrector can improve your makeup look. Avoid mistakes that cause uneven or unnatural results. Learn common errors to get smooth, flawless skin. Focus on simple steps to make color correcting easy and effective.
Applying Too Much Product
Many use a thick layer of color corrector. This makes blending hard and looks cakey. Use a small amount first. Build coverage gradually where needed. Light layers blend better and look natural.
Choosing The Wrong Shade
Select a color opposite the skin issue on the color wheel. Green cancels redness. Peach or orange hides blue or purple under eyes. Lavender corrects yellow tones. Using the wrong shade can highlight flaws.
Not Blending Properly
Color corrector must blend well into skin. Harsh edges look fake and draw attention. Use a soft brush or finger to gently blend. Blend until the edges disappear and the color looks natural.
Applying Directly Over Dry Skin
Dry skin makes corrector patchy and flaky. Moisturize and use a primer before applying corrector. Smooth skin helps the product spread evenly. This keeps your makeup fresh all day.
Ignoring Skin Tone
Match the corrector to your skin tone for the best effect. Light peach suits fair skin. Deeper orange works for darker tones. Wrong tones can create a ghostly or muddy look.
Frequently Asked Questions
How Do You Apply Color Corrector?
Apply color corrector directly on discoloration areas using a small brush or finger. Blend gently with a sponge or fingertip. Use green for redness, peach/orange for blue or purple under-eye circles, and lavender for yellow tones. Layer foundation afterward for a natural finish.
How Do You Know What Color Corrector To Use?
Identify your skin discoloration and pick the opposite color on the color wheel. Use green for redness, peach/orange for blue or purple tones, and lavender for yellow tones. Match corrector shades to your skin tone for best results.
Do I Do Color Corrector Before Or After Foundation?
Apply color corrector before foundation to neutralize discoloration. Blend it well, then apply foundation on top for an even finish.
What Step Do You Apply Color Corrector?
Apply color corrector after moisturizing and priming, but before foundation. Dab it on discoloration areas and blend gently for even skin tone.
What Is A Color Corrector In Makeup?
A color corrector is a makeup product that neutralizes skin discoloration.
How Do You Apply Color Corrector Properly?
Apply color corrector on discoloration spots before foundation for best results.
Which Color Corrector Is Best For Dark Under-eye Circles?
Use peach or orange correctors to hide dark blue or purple under-eye circles.
Can Color Correctors Reduce Redness On The Face?
Green color correctors help neutralize redness from acne or rosacea.
How To Choose The Right Color Corrector Shade?
Pick a shade opposite the skin discoloration on the color wheel.
Should I Blend Color Corrector Before Or After Foundation?
Blend the color corrector gently before applying foundation for natural coverage.
Conclusion
Using a color corrector can improve your makeup look easily. Apply the right shade on problem areas first. Blend well to make the skin look natural. Choose colors opposite to your skin’s discoloration. Practice helps you find what works best.
With simple steps, you can hide redness, dark circles, and spots. Color correcting brightens your face and evens skin tone. Keep your routine gentle and light for best results. Enjoy a fresh, smooth complexion every day with color correctors.