Are you looking to master the art of color tweaking in Adobe Illustrator? Whether you want to brighten up a design, match brand colors perfectly, or create eye-catching artwork, knowing how to change color values is key.
In this guide, you’ll discover simple, step-by-step techniques to adjust color values quickly and precisely. By the end, you’ll have the confidence to control your colors like a pro and bring your creative vision to life. Ready to transform your designs with color?
Let’s dive in!

Credit: www.youtube.com
Accessing Color Panel
The Color Panel in Adobe Illustrator is essential for adjusting and changing colors quickly. Accessing it allows you to modify color values with ease. It gives control over color modes like RGB, CMYK, and more. Understanding how to open and use this panel improves your workflow.
The Color Panel shows sliders and color boxes. You can change colors by moving sliders or typing values. This panel works with fills, strokes, and gradients.
Opening The Color Panel From The Window Menu
To open the Color Panel, go to the top menu. Click on Window, then select Color from the dropdown list. The panel will appear on your screen. You can dock it for easy access later.
Using The Toolbar To Access The Color Panel
Look at the left side toolbar in Illustrator. Find the color box near the bottom. Click the small double arrow next to it. This will open the Color Panel directly. This method is fast for quick color changes.
Keyboard Shortcut To Show Or Hide The Color Panel
Press F6 on your keyboard to toggle the Color Panel. This shortcut works on both Windows and Mac. It helps keep your workspace clean while working fast.
Customizing The Color Panel For Different Modes
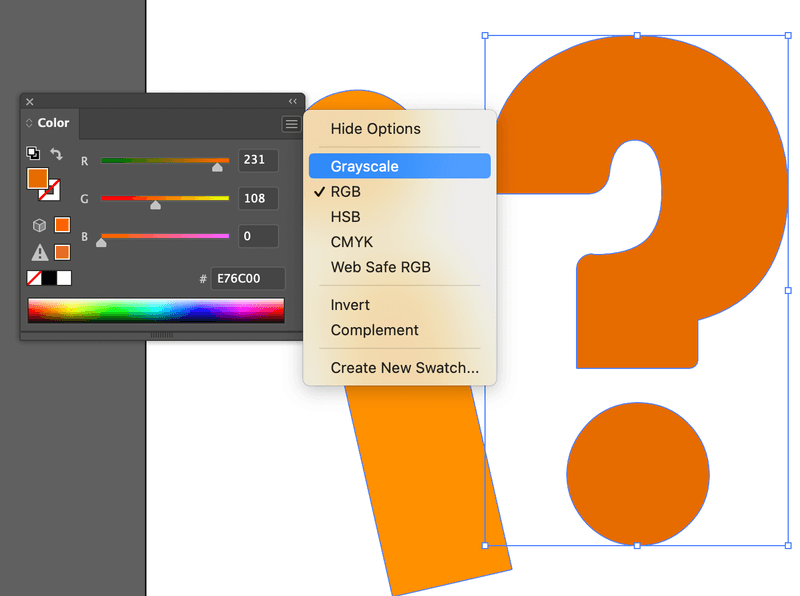
Inside the Color Panel, click the menu icon on the top right. Choose color mode like RGB, CMYK, or Grayscale. The sliders will change based on the mode. Select the mode that matches your project needs.
Selecting Objects For Color Change
Selecting objects for color change in Illustrator is the first step to modify your artwork’s appearance. It lets you choose exactly which parts will get the new color. Accurate selection saves time and keeps your design neat.
Illustrator offers several tools to pick objects quickly. Using these tools well helps you work faster and avoid mistakes. Understanding how to select items will improve your color editing skills.
Selecting Single Objects
To change the color of one object, click it with the Selection Tool (V). The object will show anchor points around it. This means it is selected and ready for color change. You can also select objects on locked layers by unlocking them first.
Selecting Multiple Objects
Hold the Shift key and click multiple objects one by one. This adds them to your selection. Alternatively, use the Lasso Tool to draw around objects. All enclosed objects will be selected. This method is useful for selecting irregular shapes.
Selecting Objects By Color
Use the Select > Same > Fill Color command to pick all objects with the same color. This helps when you want to change one color across many items. It saves time compared to selecting each object manually.
Selecting Objects With The Direct Selection Tool
The Direct Selection Tool (A) selects individual points or paths within an object. Use it to change color of parts inside a grouped object. It gives more control over complex designs.
Selecting Objects Using Layers
Open the Layers panel to select objects by layer. Clicking the circle on the right of a layer selects all objects inside. This is helpful for changing colors of grouped items or entire sections.
Adjusting Color Values With Sliders
Adjusting color values with sliders in Adobe Illustrator is a simple way to fine-tune your artwork’s colors. Sliders let you control the amount of each color component, such as red, green, and blue in RGB mode. This method helps you achieve the exact shade you want without guessing hex codes or mixing colors manually.
You can see the sliders in the Color panel or Color Picker. Moving a slider changes the color value immediately, showing real-time results. This instant feedback helps you decide which color fits best for your design.
Accessing The Color Sliders
Open the Color panel by clicking Window > Color. You will see sliders for each color mode component. Select RGB, CMYK, or Grayscale from the panel menu. The sliders will change to match the chosen color mode.
Using Rgb Sliders
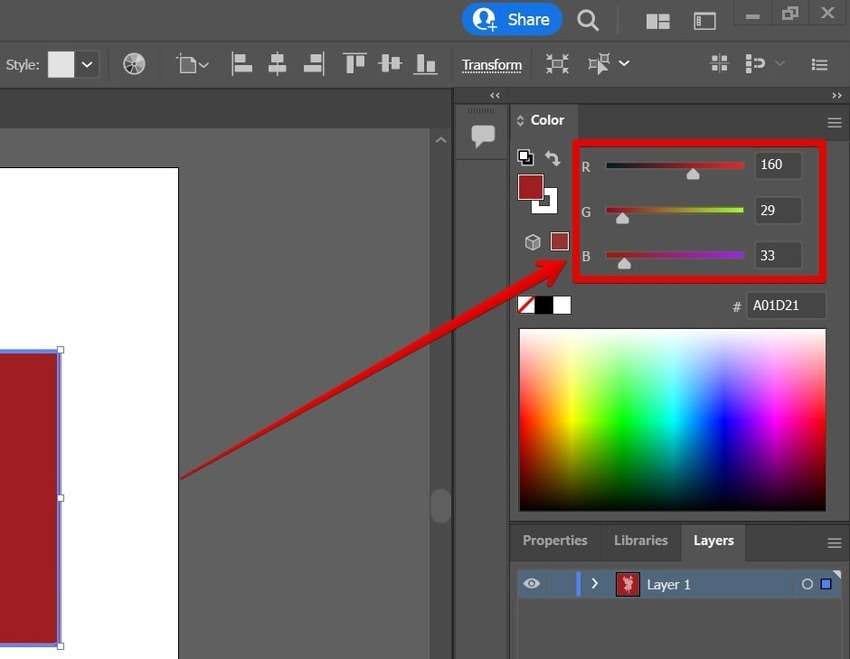
RGB sliders control red, green, and blue values. Drag each slider left or right to reduce or increase the color intensity. You can create millions of colors by mixing these three colors in different amounts.
Adjusting Cmyk Sliders
CMYK sliders adjust cyan, magenta, yellow, and black values. This mode is ideal for print designs. Change each slider to control ink levels and produce accurate print colors.
Working With Grayscale Slider
The grayscale slider adjusts the brightness of the color. Move the slider to create shades from black to white. This is useful for black-and-white designs or adding shading effects.
Tips For Precise Color Adjustment
Hold the Shift key while dragging a slider to make smaller adjustments. Enter numeric values in the input box for exact control. Use the Eyedropper tool to pick colors and then adjust their values with sliders.
Using Hex Codes In Illustrator
Using hex codes in Adobe Illustrator offers a precise way to select colors. Hex codes are six-digit codes that represent colors on the web and in design software. They start with a hashtag () followed by numbers and letters. Entering a hex code ensures you get the exact shade you want without guessing or adjusting sliders. This method works well for designers who need consistency across projects or want to match colors from other sources.
How To Find The Hex Code Field In Illustrator
Open the Color panel by clicking Window > Color. Look for the text box that starts with a symbol. This is where you type your hex code. If you don’t see it, click the small menu icon in the panel and choose RGB mode. The hex code box appears at the bottom of the Color panel in RGB mode.
Entering Hex Codes To Change Colors
Click on the object you want to change. Go to the Color panel and click the hex code field. Type the six-digit hex code, like FF5733. Press Enter or Return. The object updates immediately to the new color. Use this for fills and strokes to get exact colors quickly.
Using Hex Codes In The Color Picker
Double-click the Fill or Stroke color box in the toolbar. The Color Picker window opens. Find the hex code input near the bottom. Type your hex code here and click OK. The object changes color right away. This method is helpful if you prefer the Color Picker interface.
Saving Hex Colors For Future Use
After entering a hex code, add the color to your Swatches panel. Click the New Swatch button in the Swatches panel. Name your color and save it. This saves time by reusing exact hex colors without retyping codes. It keeps your color palette consistent across your design.
Changing Color Modes Rgb Vs Cmyk
Changing color modes in Adobe Illustrator affects how colors appear and print. The two main modes are RGB and CMYK. Each mode suits different projects. RGB works best for digital screens. CMYK is ideal for print materials. Understanding these modes helps you choose the right settings for your artwork.
What Is Rgb Color Mode?
RGB stands for Red, Green, and Blue. It uses light to create colors. Screens like phones and computers use RGB. Colors in RGB are bright and vibrant. Values range from 0 to 255 for each color. Mixing these creates millions of colors. It is perfect for web and digital art.
What Is Cmyk Color Mode?
CMYK stands for Cyan, Magenta, Yellow, and Black. It uses ink for colors. Printers use CMYK for physical prints. Colors in CMYK are made by mixing inks. Values range from 0% to 100% for each color. It works well for brochures, posters, and magazines. Colors may look different than on screens.
How To Switch Between Rgb And Cmyk In Illustrator
Open your Illustrator file. Go to the “File” menu. Choose “Document Color Mode.” Select either RGB or CMYK. The colors on your artboard will update. Changing the mode affects color sliders and values. Adjust your colors after switching for best results.
Why Choosing The Right Color Mode Matters
Using the correct color mode ensures color accuracy. RGB colors may not print correctly if used for print. CMYK colors may look dull on screens. Choose RGB for online designs. Choose CMYK for print projects. This avoids unexpected color changes and saves time.
Credit: illustratorhow.com
Applying Recolor Artwork Tool
The Recolor Artwork tool in Adobe Illustrator offers a fast way to adjust colors in your design. It lets you change colors across multiple objects at once. This tool helps keep your artwork consistent and saves time.
Using the Recolor Artwork tool, you can shift colors, swap them, or create new color themes. It works well for both simple and complex graphics. This feature is perfect for designers who want to explore color options quickly.
Opening The Recolor Artwork Tool
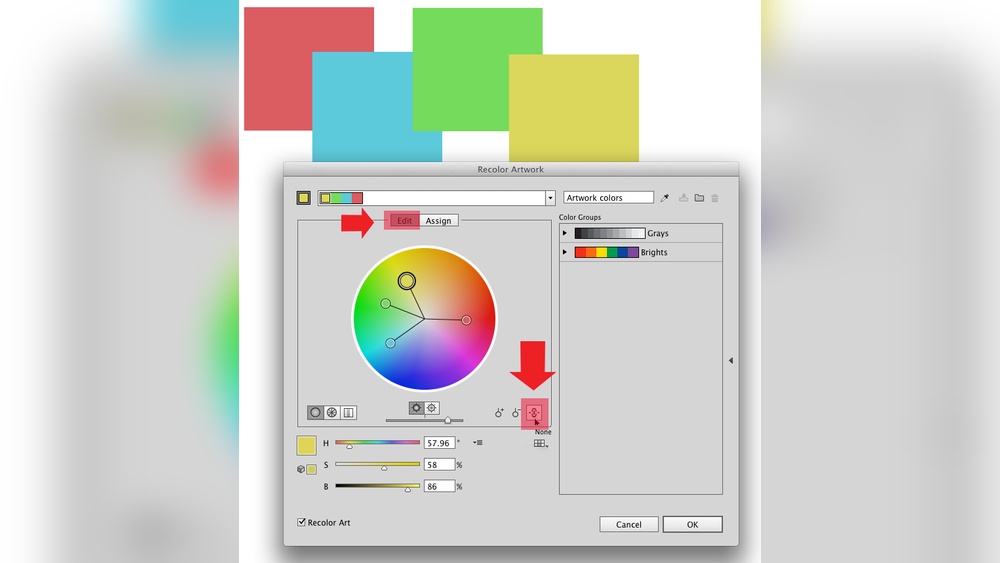
Start by selecting the artwork you want to recolor. Then, click the Recolor Artwork icon in the control panel or use the menu: Edit > Edit Colors > Recolor Artwork. The tool window will appear, showing all colors used in your design.
Adjusting Colors With Color Wheels
The tool displays a color wheel with your current colors. Drag the color markers around the wheel to shift hues. You can also move them closer or farther from the center to change saturation and brightness. This makes it easy to experiment with new color schemes.
Using Color Groups For Quick Changes
You can assign colors to existing color groups in Illustrator. This helps keep colors organized and consistent. Select a color group from the drop-down menu in the Recolor Artwork dialog. The tool updates your artwork with the new group colors instantly.
Editing Individual Colors
To change a single color, click its color box in the tool. Choose a new color from the swatches or enter a specific color value. This lets you fine-tune colors without affecting the rest of your artwork.
Saving And Applying Color Changes
After adjusting, click OK to apply your new colors. You can save your color settings as a new color group for future use. This keeps your workflow efficient and your designs consistent across projects.
Replacing Colors Across Artwork
Replacing colors across your entire artwork in Adobe Illustrator saves time and keeps your design consistent. This process changes every instance of a specific color, making updates easy. It works well for large projects with many elements sharing the same color.
Using Illustrator’s tools, you can quickly find and swap colors without selecting objects one by one. This method helps maintain the visual harmony of your design. It also allows you to experiment with color variations fast.
Using The Recolor Artwork Tool
The Recolor Artwork tool is the easiest way to replace colors. Select your artwork, then open the tool from the toolbar or the Edit menu. It shows all colors used in your design.
Click the color you want to change and pick a new one. Illustrator updates all objects using that color instantly. You can adjust multiple colors at once and see the changes live.
Replacing Colors With Select Same Fill Color
Another way is to select an object with the color you want to change. Then go to Select > Same > Fill Color. This highlights all objects with that color.
Once selected, use the Color Picker or Swatches panel to choose a new color. All selected objects change immediately. This method works well for simpler artwork.
Using The Edit Colors Menu
Access Edit > Edit Colors > Recolor Artwork for advanced color control. This menu lets you adjust color balance and harmony rules. It helps keep your palette consistent.
You can also convert colors between color modes, like RGB to CMYK. The tool gives precise control over each color channel. It’s helpful for print-ready designs.
Tinting And Shading Colors
Tinting and shading colors help create depth and interest in your designs. These techniques adjust the lightness or darkness of a color without changing its base hue. Tinting adds white to a color, making it lighter. Shading adds black, making it darker. Both methods let you create variations that work well together.
Tinting Colors In Illustrator
Select the object you want to tint. Open the Color panel by going to Window > Color. Use the sliders to add white to your chosen color. This lightens the color, creating a tint. You can also use the Swatches panel to pick a lighter shade. Adjust until you find the right tint for your design.
Shading Colors In Illustrator
To shade a color, select your object. Open the Color panel and add black using the sliders. This darkens the color, creating a shade. You can make subtle or strong shades depending on your needs. Shading helps add contrast and dimension to your artwork.
Using Opacity For Tints And Shades
Another way to create tints or shades is by adjusting opacity. Select your object and open the Transparency panel. Lower the opacity to create a lighter tint effect. For shading, duplicate the object and fill it with black. Then reduce the opacity to blend it as a shade. This method offers flexible control over color values.
Editing Color Balance
Editing color balance in Adobe Illustrator helps adjust the colors in your artwork. It changes how colors mix and appear. This tool can make your design look more natural or creative. It also corrects color issues in your project.
Using color balance allows you to shift colors toward red, green, or blue. It also helps to control shadows, midtones, and highlights. This way, you can improve the overall look of your design easily.
Edit Color Balance Using The Menu
Go to the top menu and click Edit. Then select Edit Colors. Choose Adjust Color Balance from the list. A new window will appear with sliders for colors.
Move the sliders left or right to add or reduce red, green, or blue. Watch your artwork change in real-time. When you get the color you want, click OK.
Adjust Shadows, Midtones, And Highlights
In the Adjust Color Balance window, you can select which tones to change. Choose between shadows, midtones, or highlights. Each affects different parts of your image.
Change shadows to darken or lighten the dark areas. Adjust midtones for the main color balance. Edit highlights to affect the bright parts of your design.
Use Preview To See Changes
Check the Preview box before making adjustments. This shows changes live on your artwork. It helps you decide if the colors look right. Uncheck to compare before and after.
Reset Colors If Needed
If the colors don’t look right, click the Reset button. This returns all sliders to their original position. You can start adjusting again without closing the window.
Save Your Color Settings
After adjusting, save your file to keep changes. You can also create color swatches from your new color balance. This saves time if you want to reuse the colors later.
Credit: repairit.wondershare.com
Making Colors Web Safe Or Printable
Making colors web safe or printable in Adobe Illustrator is essential for consistent results across different devices and printers. Colors can look different depending on screens or print methods. Using web safe or printable colors ensures your design appears as intended everywhere.
Web safe colors use a limited palette that displays reliably on most monitors. Printable colors use CMYK values suited for printers. Both require adjusting color values correctly in Illustrator.
What Are Web Safe Colors?
Web safe colors are a set of 216 colors. They were created to display consistently on old computer monitors. These colors use six levels of red, green, and blue values. Each level jumps by 51 in the RGB scale. Using these colors avoids unexpected color shifts.
How To Convert Colors To Web Safe In Illustrator
Select the object or shape with the color you want to change. Open the Color panel by going to Window > Color. Switch the color mode to RGB. Adjust the red, green, and blue values to the nearest multiple of 51. This matches the web safe palette. You can also use the Color Guide panel for suggestions.
Understanding Printable Colors With Cmyk
Printable colors use the CMYK color mode. It stands for Cyan, Magenta, Yellow, and Black. This mode works best for printers and print shops. Colors in CMYK can look different from screen colors. Adjusting the CMYK values ensures your print colors are accurate and vibrant.
Changing Colors To Cmyk For Printing
Go to File > Document Color Mode and select CMYK Color. Select your objects with the colors you want to change. Use the Color panel to adjust the cyan, magenta, yellow, and black sliders. Test print samples to check color accuracy. This helps avoid surprises in the final print.
Frequently Asked Questions
How Do I Change The Color Value In Illustrator?
Select the object, open the Color panel, and adjust the sliders or input new values. Use the Recolor Artwork tool for multiple colors.
How Do You Change The Value Of A Color?
Change a color’s value by adjusting its hue, saturation, or brightness using sliders in design software like Illustrator.
How Do I Edit The Color Balance In Illustrator?
To edit color balance in Illustrator, go to Edit > Edit Colors > Adjust Color Balance. Use sliders to modify color values easily.
How To Recolor Specific Colors In Illustrator?
Select the artwork, then click the Recolor Artwork button in the Properties panel. Use the dialog to target and change specific colors easily.
How Do I Change The Color Value In Illustrator?
Select the object, open the Color panel, and adjust the sliders or enter new values.
Can I Change Multiple Colors At Once In Illustrator?
Yes, use the Recolor Artwork tool to adjust several colors simultaneously.
How To Convert Color Mode To Rgb In Illustrator?
Go to File > Document Color Mode and choose RGB Color.
What Is The Easiest Way To Edit Hex Color Codes?
Open the Color panel, click the hex box, and type your new code.
How Do I Adjust The Brightness Of A Color In Illustrator?
Use Edit > Edit Colors > Adjust Color Balance for brightness changes.
Can I Replace One Color With Another In Illustrator?
Yes, use the Select > Same > Fill Color option and then change it.
Conclusion
Changing color values in Illustrator is simple with the right steps. Practice using color sliders and modes to find the perfect shade. Adjusting colors helps improve your designs and makes them stand out. Keep experimenting with different color values for better results.
Soon, changing colors will feel natural and quick. Don’t forget to save your work regularly as you adjust colors. This skill enhances your creative projects and makes editing easier. Stay patient and enjoy the process of creating colorful artwork.