
Want to make your Google Slides presentation look polished and professional? One simple trick is to match colors perfectly across your slides.
But how do you pick the exact shade you want without guessing? That’s where sampling a color comes in. If you’ve ever struggled to get the right color match in Google Slides, this guide is for you. You’ll learn how to use the built-in eyedropper tool to easily pick and apply colors from any element on your slide.
By the end, you’ll be able to create stunning, cohesive designs that grab attention and keep your audience engaged. Ready to master color sampling in Google Slides? Let’s dive in!
Credit: www.slidesai.io
Color Sampling Basics
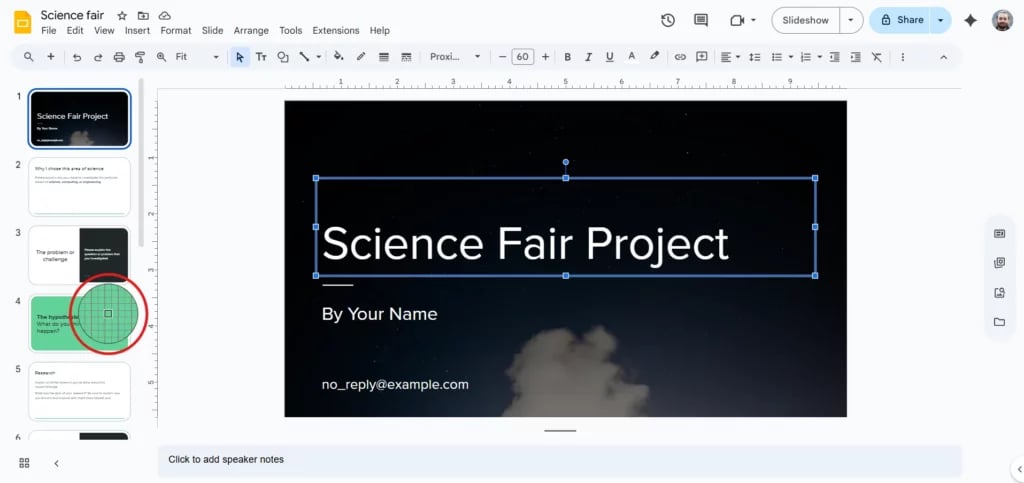
Sampling a color on Google Slides is simple. Select your object, click the fill or text color icon, then choose the eyedropper tool. Click any color on your slide to match and apply it instantly.
Understanding Color Sampling
Color sampling helps you match colors exactly on your slide. It ensures a consistent look across your presentation. This is useful for branding, themes, or design harmony. Google Slides offers tools to pick colors from any element on your slide.
You can sample colors from shapes, images, or text. The eyedropper tool captures the exact shade you want. This way, your slides look professional and well-coordinated.
The eyedropper tool in Google Slides is easy to use. First, select the object you want to color. Then, click the “Fill color” or “Text color” icon on the toolbar. In the color menu, find the “Custom” section.
Click the eyedropper icon to activate it. Your cursor changes to a dropper shape. Move it over any color on your slide or image. Click to sample the color. The selected object updates with the new color instantly.
Benefits Of Color Sampling
Sampling colors saves time and effort. It avoids guessing or manually entering color codes. This feature helps maintain color accuracy throughout your presentation. It also allows creative freedom by mixing colors from different elements.
Using sampled colors improves visual appeal. It creates a unified and polished design. This simple step enhances your slide’s professional look and feel.

Credit: www.slidesai.io
Selecting Slide Elements
Selecting slide elements starts by clicking the shape, text, or background you want to change. Then, open the color menu and use the eyedropper tool to sample any color from your slide. This helps match colors quickly and easily.
Choosing the right element is the first step to sample a color in Google Slides.
Click on the shape, text box, or background you want to change.
Make sure the element is active and ready for editing before sampling the color.
Clicking The Fill Or Text Color Icon
Find the color icons in the toolbar at the top of your screen.
For shapes and backgrounds, click the “Fill color” icon. It looks like a paint bucket.
For text, select the “Text color” icon, which looks like an uppercase A.
After clicking the color icon, a color menu will appear.
Scroll down to the “Custom” section in this menu.
Click the eyedropper icon to activate the color picker.
Your cursor changes to an eyedropper shape, ready to sample colors.
Sampling The Color From The Slide
Move the eyedropper cursor over any color on your slide.
Click the color you want to pick from images or other elements.
The selected color will apply to the chosen slide element immediately.
Locating Color Tools
Finding the right color tools in Google Slides is the first step to sampling colors accurately.
These tools let you pick colors from any object or image on your slide.
Knowing where to find them helps you work faster and with more precision.
Accessing The Fill Color Icon
Look for a paint bucket icon in the top toolbar. This is the fill color tool.
It changes the color inside shapes or backgrounds on your slide.
Click this icon to open the color menu and start sampling colors.
Opening The Text Color Tool
For text, find the “A” icon with a color bar beneath it in the toolbar.
This tool changes the color of your text elements.
Click it to reveal color options, including the eyedropper for custom colors.
Finding The Eyedropper Tool
Inside the color menu, scroll down to the “Custom” section.
Here, you will see the eyedropper icon labeled “Pick a custom color.”
Click the eyedropper to activate the color sampler on your slide.
:max_bytes(150000):strip_icc()/GoogleSlides-DefaultPalette-4f0017ba6de44a19b749a8ea0fe83f4b-224ad069947d4c838fb56c09029e1001.jpg)
Credit: www.lifewire.com
Using The Eyedropper Tool
The Eyedropper Tool in Google Slides helps you match colors exactly. It lets you pick a color from any object or image on your slide. This tool ensures your design looks clean and consistent. Using it saves time and avoids guessing colors.
Follow simple steps to sample a color with the Eyedropper Tool. It works for shapes, text, and backgrounds. This feature is easy to find and use in Google Slides.
How To Access The Eyedropper Tool
First, select the object you want to change. Click on a shape, text box, or background area. Look for the color icon in the toolbar. For shapes and backgrounds, click the “Fill color” icon. For text, click the “Text color” icon.
In the color menu, scroll down to find “Custom.” Here, click the eyedropper icon. This opens the tool to sample colors from the slide.
Using The Eyedropper To Pick A Color
After activating the eyedropper, your cursor changes to a dropper icon. Move it over any color on your slide or image. Click on the exact color you want to sample. The chosen color will apply immediately to your selected object.
This method helps keep your presentation colors consistent and professional.
Tips For Best Results With The Eyedropper Tool
Zoom in on detailed images for precise color picking. Avoid selecting colors from blurry or low-contrast areas. Use the tool on high-quality images to get accurate shades. Test the color by applying it to different objects before finalizing.
These tips improve the look and feel of your Google Slides presentation.
Picking Colors From Images
Picking colors from images on Google Slides makes your design more lively. It helps match colors exactly as you see them. This way, your slides look professional and consistent.
Google Slides allows you to sample colors directly from any image on your slide. You can use the eyedropper tool to pick the exact shade. This tool is simple and quick to use for all users.
How To Access The Eyedropper Tool
First, select the object you want to change. It can be a shape, text, or background. Next, click the “Fill color” or “Text color” icon in the toolbar. Scroll down to the “Custom” section. Click the eyedropper icon to activate the color picker.
Sampling Colors From An Image
With the eyedropper active, move your cursor over the image. Click the color you want to sample. The selected color will appear on your chosen object. This method ensures color accuracy from any image on your slide.
Tips For Effective Color Sampling
Zoom in on the image for precise color picking. Avoid sampling colors from blurry or low-quality images. Use simple shapes or text to test the color before applying it to larger areas.
Applying Sampled Colors
Applying sampled colors in Google Slides helps keep your design consistent. It lets you match colors exactly from images or other slide elements. This process improves the look of your presentation by using the right shades every time.
Once you sample a color, you can easily apply it to different objects. The color stays true to the original, making your slides look professional and polished. Here are ways to apply the colors you have sampled.
Applying Sampled Colors To Shapes And Backgrounds
Select the shape or background you want to change. Click the “Fill color” icon in the toolbar, which looks like a paint bucket. Then, choose the eyedropper tool under the “Custom” section. Click on the color you sampled to apply it instantly.
Using Sampled Colors For Text
Click on the text box or highlight the text you want to recolor. Click the “Text color” icon in the toolbar, shown as the letter ‘A’. Open the “Custom” color menu and select the eyedropper tool. Pick your sampled color to update the text color quickly.
Applying Sampled Colors To Borders And Lines
Select the border or line you want to color. Click the “Border color” icon in the toolbar. Choose the eyedropper from the “Custom” colors. Click on the sampled color to apply it to your borders or lines.
Saving Custom Colors
Saving custom colors in Google Slides lets you keep your chosen shades ready for future use. This saves time and keeps your presentation colors consistent. You can save colors sampled from images or other slide elements. Once saved, these colors appear in your custom palette. This section explains how to save and reuse your custom colors easily.
How To Save A Sampled Color
After using the eyedropper tool to sample a color, open the color menu again. Scroll to the bottom and click “Custom.” You will see a color box with your selected shade. Click the “Add” button to save this color to your palette. Now, this custom color stays available for your current presentation.
Using Saved Custom Colors Later
To use a saved color, select the object you want to recolor. Open the “Fill color” or “Text color” menu. Your saved colors show under the “Custom” section. Click the saved color to apply it instantly. This method ensures color consistency across slides without re-sampling.
Editing And Removing Custom Colors
You can manage saved colors by opening the “Custom” color menu. Click on a saved color to edit its shade or remove it. Removing a color deletes it from the palette. Editing allows you to tweak the shade to better fit your design. This keeps your custom palette clean and useful.
Matching Colors Across Slides
Matching colors across slides helps keep your presentation neat and professional. Consistent colors make your slides look connected and easy to follow. Using the same shade for titles, shapes, and backgrounds creates a smooth visual flow.
Google Slides lets you sample colors from one slide and apply them to others. This saves time and avoids guessing color codes. It also helps maintain brand colors or a specific theme throughout your deck.
Using The Eyedropper Tool For Color Sampling
Select the shape or text you want to recolor. Click the “Fill color” or “Text color” icon in the toolbar. Then choose the eyedropper tool from the “Custom” section. Click any color on your current or previous slides to pick it. The selected color will apply instantly to your chosen element.
Copying Colors Between Slides
Sample a color on one slide using the eyedropper. Go to the next slide and select the item to color. Open the color menu and pick the eyedropper again. Click the same color on the first slide or its element. This copies the exact color, keeping your design uniform.
Saving Custom Colors For Future Use
After sampling a color, save it as a custom color. Click the “+” button in the color menu to add it. This lets you reuse the exact shade anytime. Save multiple colors to build a palette for your presentation. It speeds up your workflow and ensures color consistency.
Troubleshooting Color Sampling
Sampling colors in Google Slides can save time and keep your design consistent. Sometimes, the eyedropper tool does not work as expected. Troubleshooting helps fix these issues quickly. This section covers common problems and simple solutions.
Check Browser Compatibility
Google Slides works best on updated browsers like Chrome or Firefox. Older browsers might not support the eyedropper tool. Update your browser to the latest version. This often solves color sampling problems.
Refresh Or Restart Google Slides
Sometimes, the tool may freeze or lag. Refresh the Google Slides tab in your browser. If that does not help, close and reopen the slide. Restarting can clear temporary glitches.
Use The Correct Tool Location
Make sure you select the right icon for color sampling. Click the “Fill color” or “Text color” button in the toolbar first. Then, find the eyedropper tool under the “Custom” section. Clicking the wrong area may cause errors.
Ensure Slide Content Is Visible
The eyedropper only samples visible colors. Hidden layers or transparent objects may cause incorrect color picks. Check that the area you want to sample is fully visible on the slide.
Clear Browser Cache
A full browser cache can slow down tools and cause issues. Clear your browser cache and cookies. This refreshes your browser’s memory and improves performance.
Try A Different Device
If problems persist, test Google Slides on another computer or mobile device. This helps identify if the issue is device-specific or related to your account.
Tips For Consistent Design
Consistent design makes your Google Slides look professional and polished. Using the same colors throughout your presentation helps keep it clean and easy to follow. Sampling colors precisely avoids mismatched shades that distract your audience.
These tips help maintain color harmony and improve the overall look of your slides. Consistency in design supports your message and creates a better viewer experience.
Use The Eyedropper Tool For Exact Color Matching
The eyedropper tool picks the exact color from any part of your slide. This tool helps copy colors from images or other elements without guessing. Use it to match text, shapes, and backgrounds perfectly.
Create A Custom Color Palette
Save your sampled colors in a custom palette inside Google Slides. This palette keeps all your colors in one place for easy access. Reuse these colors across different slides to keep your design uniform.
Limit The Number Of Colors
Use only a few colors to keep your slides simple and clear. Too many colors can confuse your audience and clutter your design. Stick to two or three main colors plus one or two accent colors.
Check Color Contrast For Readability
Make sure text stands out from the background by checking color contrast. High contrast helps viewers read your content easily. Use dark text on light backgrounds or light text on dark backgrounds.
Apply Sampled Colors To Key Elements
Use your sampled colors on important parts like titles, headings, and shapes. This draws attention and guides your audience through the slide. Consistent use of color highlights key information effectively.
Frequently Asked Questions
How Do I Sample A Color On Google Slides?
Select the object, click the “Fill color” or “Text color” icon, then choose the eyedropper in “Custom” to sample any color on your slide.
Is There An Eyedropper In Google Slides?
Yes, Google Slides has an eyedropper tool. Select an object, click “Fill color” or “Text color,” then choose the eyedropper to sample colors from slides.
How To Match A Color In Google Slides?
Select the object, click the “Fill color” or “Text color” icon, then choose the eyedropper tool in “Custom. ” Click any color on the slide to match and apply it instantly.
Is There An Eyedropper Tool In Google Docs?
Google Docs does not have a built-in eyedropper tool. Use Google Slides for color sampling instead.
How Do I Sample A Color On Google Slides?
Select the object, click the fill or text color icon, then choose the eyedropper tool to pick a color.
Can I Use The Eyedropper Tool For Text Color?
Yes, click the text color icon, then use the eyedropper to sample any color on your slide.
Where Is The Eyedropper Tool Located In Google Slides?
It’s in the color menu under the “Custom” section after clicking fill or text color icons.
Can I Sample A Color From An Image In Google Slides?
Yes, use the eyedropper tool and click on any color in the image to apply it.
Does Google Slides Support Custom Color Picking?
Yes, the eyedropper tool allows you to pick and use custom colors from your slides.
How Do I Open The Color Menu In Google Slides?
Click the fill color icon for shapes or text color icon for text in the toolbar.
Conclusion
Sampling a color on Google Slides is simple and quick. Select your item, open the color menu, and use the eyedropper tool. Click the color you want to match, and it applies instantly. This method helps keep your slides consistent and visually pleasing.
Practicing these steps will make your presentations look more professional. Try it out and see how easy color matching can be.