
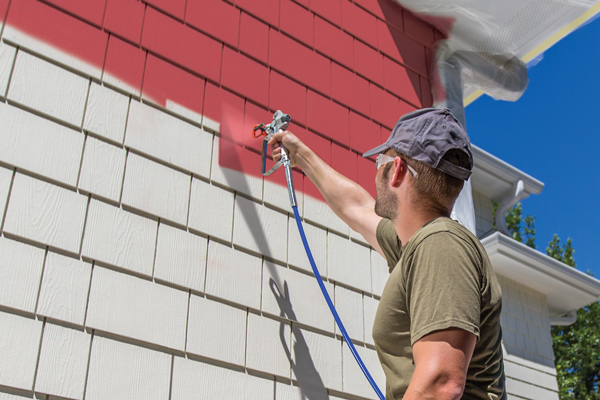
Using an airless paint sprayer for exterior projects can save time and effort. This method creates a smooth finish, making it a popular choice among DIY enthusiasts and professionals alike.
In this guide, you will learn how to effectively use an airless paint sprayer for your outdoor painting tasks. Painting the exterior of your home or any outdoor structure can be a big job. Many people find brushes and rollers too slow.
An airless sprayer speeds up the process and ensures even coverage. Proper techniques are key to achieving great results. From setup to cleanup, each step is important. This guide will provide you with essential tips and tricks to make your painting project successful. Get ready to transform your outdoor spaces with ease!
Choosing The Right Airless Paint Sprayer
Choosing the right airless paint sprayer for exterior projects ensures a smooth finish. Focus on the sprayer’s pressure, tip size, and ease of use. These factors will help achieve even coverage and save time during your painting tasks.
Choosing the right airless paint sprayer can make all the difference in achieving a smooth, professional finish on your exterior projects. Whether you’re painting your home or a fence, using the right sprayer saves time and enhances the final look. Here’s how to ensure you select the perfect model for your needs.Selecting The Appropriate Model
Consider the size of your project first. For smaller jobs, a handheld airless sprayer might be sufficient. However, for larger areas, a robust model with a higher capacity is essential.Think about the type of paint you’ll use. Some sprayers are better suited for thicker paints, while others excel with thinner materials. Always check the manufacturer’s recommendations for compatibility.Don’t overlook portability. If you need to move around your property frequently, look for a lightweight model with wheels. This can save your back and make the job easier.Understanding Tip Sizes And Filters
Tip size directly affects the spray pattern and finish. A smaller tip works best for detailed work, while larger tips are ideal for broad surfaces. For example, if you’re painting a fence, a larger tip will help you cover more ground quickly.Filters are equally important. They prevent clogs and ensure a smooth spray. Choosing the right filter size based on your paint type can save you from interruptions during your project.Have you ever had to stop mid-project due to clogs? It’s frustrating. By understanding tip sizes and filters, you can avoid this hassle and keep your work flowing smoothly.Selecting the right airless paint sprayer involves careful consideration of your project requirements. By understanding your needs and the equipment, you can achieve stunning results with ease.Preparing Your Exterior Surface
Preparing your exterior surface is crucial for a smooth paint job. Proper preparation ensures that the paint adheres well and lasts longer. It involves cleaning, priming, and protecting areas that do not need paint. Follow these steps for the best results.
Cleaning And Priming
Start by cleaning the surface thoroughly. Remove dirt, dust, and any loose paint. A pressure washer can make this task easier. Allow the surface to dry completely before proceeding.
Next, inspect for any damage. Fill cracks and holes with appropriate fillers. Once repaired, sand the surface lightly for better adhesion.
Priming is essential for porous surfaces. Use a suitable primer to seal the surface. This step helps improve the paint’s coverage and durability.
Taping And Covering Non-painted Areas
Protect non-painted areas before you start spraying. Use painter’s tape to mask edges around windows and doors. This prevents overspray and keeps lines clean.
Cover large areas with drop cloths or plastic sheets. Ensure that the ground is protected as well. Take your time to tape neatly to avoid mess.
Double-check all covered areas. Proper masking saves time during cleanup and enhances the final look.
Safety Measures And Equipment
Using an airless paint sprayer can make your exterior painting easier. Yet, safety is crucial. Proper measures protect you from risks. Always use the right equipment. This section covers important safety steps and gear.
Personal Protective Gear
Wear protective gear to keep yourself safe. Start with safety goggles. They protect your eyes from paint splashes. Use a respirator mask. This mask filters harmful fumes. Choose gloves made for painting. They protect your hands from chemicals.
Consider wearing long sleeves and pants. This keeps paint off your skin. Non-slip shoes are also a must. They help prevent slips on wet surfaces. Take safety seriously. It ensures a safe painting experience.
Preventing Overspray
Overspray can create a mess and waste paint. To prevent this, use drop cloths. Place them on the ground around your work area. Use painter’s tape to cover edges. This protects surfaces you don’t want painted.
Control the sprayer’s pressure. High pressure increases overspray. Practice spraying on cardboard first. This helps you get a feel for the sprayer. Move steadily and avoid sudden movements. This keeps your spray pattern consistent.
Always check wind conditions. Wind can carry overspray to unwanted areas. Choose a calm day for outdoor work. Follow these tips to minimize overspray. Your project will look cleaner and more professional.
Setting Up The Sprayer
Setting up your airless paint sprayer is crucial for a smooth painting process. Proper setup ensures even application and reduces the chances of errors. Follow these steps carefully to prepare your sprayer for exterior work.
Assembling Components
Start by laying out all the components. Check the user manual for specific instructions. Assemble the sprayer according to the guide. Ensure that all parts fit tightly. Connect the hose to the sprayer. Attach the spray gun to the hose. Make sure there are no leaks in the connections.
Priming The Pump
Next, you need to prime the pump. This step prepares the sprayer for use. Fill the paint container with the chosen paint. Turn on the sprayer and let it run. Keep an eye on the fluid. Once paint flows smoothly, you are ready. This process may take a few minutes. Be patient as the pump fills with paint.
Adjusting Pressure Settings
Adjusting the pressure settings is essential for optimal results. Set the pressure according to the paint type. Generally, a lower pressure works for thinner paints. Higher pressure suits thicker paints. Test the pressure on a scrap piece first. Aim for a fine mist that evenly covers the surface. Adjust as needed until satisfied.
Mixing And Loading Paint
Mixing and loading paint correctly is vital for a smooth spray. Proper preparation ensures your airless paint sprayer works efficiently. It also guarantees an even finish on your exterior surfaces. Let’s explore how to stir, strain, and fill your sprayer.
Stirring And Straining Paint
Start by stirring your paint thoroughly. Use a paint stir stick for this task. Stir until the paint is uniform. This step removes any settled pigments.
Next, strain the paint to catch any lumps or debris. Use a paint strainer or a fine mesh filter. Pour the paint through the strainer into a clean container. This ensures a smooth application and protects your sprayer.
Filling The Sprayer
Now it’s time to fill your airless paint sprayer. Open the lid of the paint reservoir. Carefully pour the strained paint into the reservoir. Avoid overfilling to prevent spills.
Secure the lid tightly after filling. Ensure all connections are tight before starting. This prevents leaks during the spraying process. You are now ready to spray your exterior surfaces with confidence.
Credit: www.graco.com
Spraying Techniques
Using an airless paint sprayer can seem tricky. Mastering the right techniques makes the job easier. Here are key spraying techniques to help you achieve a smooth finish.
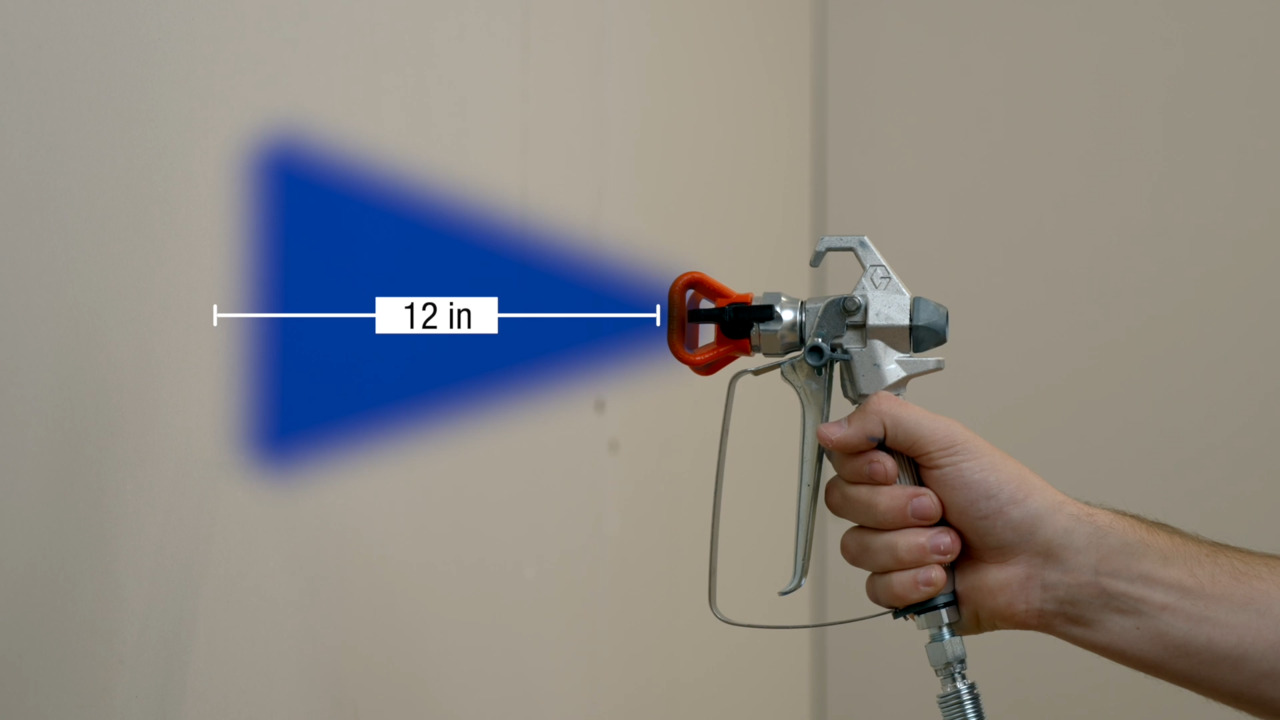
Maintaining A Consistent Distance
Keep the spray gun at a steady distance. Aim for about 12 to 18 inches from the surface. This distance allows for even coverage. Moving too close causes excess paint to build up. Too far will create dry spots. Practice maintaining this distance for better results.
Overlapping Strokes
Overlap each stroke by about 50%. This method ensures full coverage. It also prevents streaks and uneven spots. Start spraying before you reach the surface. Continue spraying as you move across. This technique leads to a consistent finish.
Avoiding Drips And Runs
Watch for drips and runs while spraying. Start and stop the spray outside the area. This prevents excess paint from pooling. If you notice drips, reduce the speed of your strokes. Keep a steady pace to minimize mistakes. Check your work often to catch issues early.
Navigating Corners And Edges
Navigating corners and edges can be tricky with an airless paint sprayer. Precision matters here. A clean finish enhances your project’s overall look. Follow these tips to paint edges neatly.
Using A Shield Or Cardboard
To protect surfaces, use a shield or cardboard. This helps prevent overspray. Position the shield along the edge you are painting. Hold it firmly while spraying.
Choose a thick piece of cardboard. It should be sturdy enough to block paint. A shield gives you control in tight spots. Move it as you spray to cover all areas.
Managing Stop And Start Points
Stopping and starting correctly is crucial. Begin spraying just before the edge. This prevents paint buildup. Always finish your stroke past the edge. This technique creates a smooth line.
Practice your timing. Consistent speed helps maintain coverage. Avoid abrupt stops that can leave marks. A steady hand leads to a clean finish.
Credit: www.graco.com
Applying Multiple Coats
Applying multiple coats with an airless paint sprayer is essential for a smooth finish. Each coat adds depth and color. It also ensures better durability. Knowing how to time these coats can make a big difference.
Timing Between Coats
Timing is important for applying multiple coats. Wait for the first coat to dry before adding another. The drying time varies by paint type. Most latex paints dry in about one to two hours.
For oil-based paints, wait at least six to eight hours. Check the manufacturer’s instructions for specific drying times. Avoid applying the next coat too soon. This can cause peeling or an uneven finish.
Assessing Coverage And Thickness
After the first coat, assess the coverage. Look for any thin spots or uneven areas. If the paint looks transparent, it needs another coat. A good rule is to apply at least two coats for best results.
Use a flashlight to see the thickness. A uniform layer is key to an even finish. If you notice streaks or patches, apply another coat. Remember, quality matters more than speed.
Cleanup And Maintenance
Proper cleanup and maintenance are vital for your airless paint sprayer. This ensures longevity and efficiency. A clean sprayer works better and saves you time on future projects.
Cleaning The Sprayer
Start cleaning immediately after use. Paint dries quickly and can clog the sprayer. Begin by removing the paint container and emptying any leftover paint.
Next, fill the container with water or the appropriate solvent. Run the sprayer for a few minutes. This helps clear out any remaining paint. Flush the sprayer until the water or solvent runs clear.
Don’t forget to clean the filter. Remove it and rinse it under warm water. A clean filter prevents blockages during your next use.
Finally, wipe down the exterior of the sprayer with a damp cloth. This removes any paint splatters and keeps your equipment looking new.
Storing Equipment Properly
Store your sprayer in a dry place. Moisture can damage the equipment. If possible, keep it in its original box or a protective case.
Before storing, ensure the sprayer is completely dry. Leaving any moisture can lead to rust or damage. Check all parts for wear and replace them as needed.
Label and organize your paint and accessories. This makes it easy to find everything for your next project. Proper storage protects your investment and ensures you are ready to paint.

Credit: www.amazon.com
Troubleshooting Common Issues
Using an airless paint sprayer for exterior projects can lead to common issues. Clogs and uneven spraying are frequent problems. Troubleshooting these issues early ensures a smooth painting experience and professional results.
Troubleshooting common issues with your airless paint sprayer can save you time and ensure a smooth painting experience. Every painter encounters a hiccup now and then, but understanding how to address these problems makes all the difference. Let’s dive into some practical solutions for common challenges you might face while using your sprayer.Unclogging Tips
A clogged paint sprayer can be frustrating. If the spray tip gets blocked, it disrupts your flow and can ruin your project.To unclog it, first, turn off the sprayer and relieve the pressure. Then, remove the tip and soak it in a solution of warm water and vinegar for about 30 minutes.Use a soft brush to gently scrub any stubborn paint residue.If the clog persists, try using a thin wire or a specialized cleaning tool designed for your sprayer model.Regular maintenance is key; always clean your sprayer after use to prevent clogs in the future.Fixing Uneven Spray Patterns
An uneven spray pattern can lead to a patchy finish that’s less than desirable. This often happens due to improper technique or equipment issues.First, check the spray tip size. Using the wrong size for your paint can cause uneven coverage.Adjust the pressure settings on your sprayer, as low pressure can create a splattered pattern.If the problem continues, inspect the paint viscosity. Thicker paint may need to be thinned for optimal spraying.Have you ever found yourself frustrated with an uneven coat? It can be disheartening, but experimenting with these adjustments can lead to a flawless finish.Keep practicing and refining your technique. The more you use your airless sprayer, the better you’ll become at identifying and correcting these issues on the fly.Eco-friendly Painting Practices
Using an airless paint sprayer for your exterior projects can be eco-friendly. It helps reduce waste and promotes safer materials. Adopting green practices makes a positive impact. Let’s explore two key areas: low-VOC paints and responsible waste disposal.
Using Low-voc Paints
Low-VOC paints are a great choice for eco-friendly projects. VOC stands for volatile organic compounds. These chemicals can harm the environment and your health. Low-VOC paints release fewer harmful fumes. They come in many colors and finishes.
When selecting paint, check the label for VOC levels. A lower number means a healthier option. Using low-VOC paints helps create a safer space for you and your family. It also protects the air quality around your home.
Disposing Of Waste Responsibly
Proper disposal of paint waste is crucial for the environment. Never pour paint down the drain or in the trash. Instead, look for local hazardous waste facilities. Many communities have special disposal days for paint and chemicals.
Consider recycling leftover paint. Some places accept unused paint for reuse. This reduces waste and conserves resources. Always follow local regulations for paint disposal. Be responsible and protect the planet.
Advanced Tips For Professional Results
Achieving professional results with an airless paint sprayer for exterior projects goes beyond just mastering the basics. There are advanced techniques that can elevate your work, making it look polished and flawless. By implementing these tips, you’ll not only save time but also enhance the quality of your finish.
Back-brushing
Back-brushing is a crucial technique that many professionals swear by. After spraying, use a brush to work the paint into the surface. This method helps eliminate drips and ensures even coverage, especially on rough surfaces.
Consider this: I once painted a textured fence. Spraying alone left some areas uneven, but back-brushing transformed the look. It created a smooth, consistent finish that made the texture pop.
Always keep a brush on hand, even if you think spraying alone will do the trick. The combination of both methods can dramatically improve the appearance of your project.
Detail Work With A Handheld Sprayer
A handheld sprayer is a game-changer for detail work. While your airless sprayer covers large areas, the handheld model is perfect for corners, edges, and intricate designs. It offers precision that larger sprayers may lack.
Imagine painting around windows or door frames. With a handheld sprayer, you can easily navigate tight spaces without overspray. This minimizes cleanup and maximizes efficiency.
Many homeowners underestimate the power of detail work. By investing in a handheld sprayer, you ensure that every nook and cranny receives the attention it deserves. Your finished product will reflect your commitment to quality.
How will you adapt these advanced techniques in your next painting project? Your attention to detail can make all the difference.
Frequently Asked Questions
Can You Use An Airless Paint Sprayer Outdoors?
Yes, you can use an airless paint sprayer outdoors. They are ideal for large projects like fences and outdoor furniture. Ensure proper ventilation and avoid windy conditions for best results. Always follow safety guidelines and manufacturer’s instructions while operating the sprayer.
Do You Need To Thin Paint Before Using Airless Sprayer?
Thinning paint before using an airless sprayer depends on the paint type. Generally, thicker paints may require thinning for optimal performance. Always follow the manufacturer’s recommendations for viscosity to ensure smooth application and prevent clogging.
What Is The Number One Rule When Using Airless Spray Guns?
The number one rule when using airless spray guns is to maintain a consistent distance from the surface. This ensures even coverage and reduces the risk of drips or runs. Always practice proper technique to achieve the best results.
How Many Coats Of Exterior Paint With Sprayer?
Apply two to three coats of exterior paint using a sprayer for optimal coverage. Ensure each coat dries completely before applying the next. This approach enhances durability and improves the finish. Adjust the number of coats based on the paint type and surface condition.
Conclusion
Using an airless paint sprayer for your exterior projects offers many benefits. It saves time and provides a smooth finish. Follow the tips shared in this guide for best results. Practice proper technique and prepare your surfaces well. Clean your sprayer thoroughly after each use.
With these steps, you can achieve a professional look. Enjoy your painting project and the beautiful results it brings. Keep experimenting and learning to enhance your skills. Happy painting!