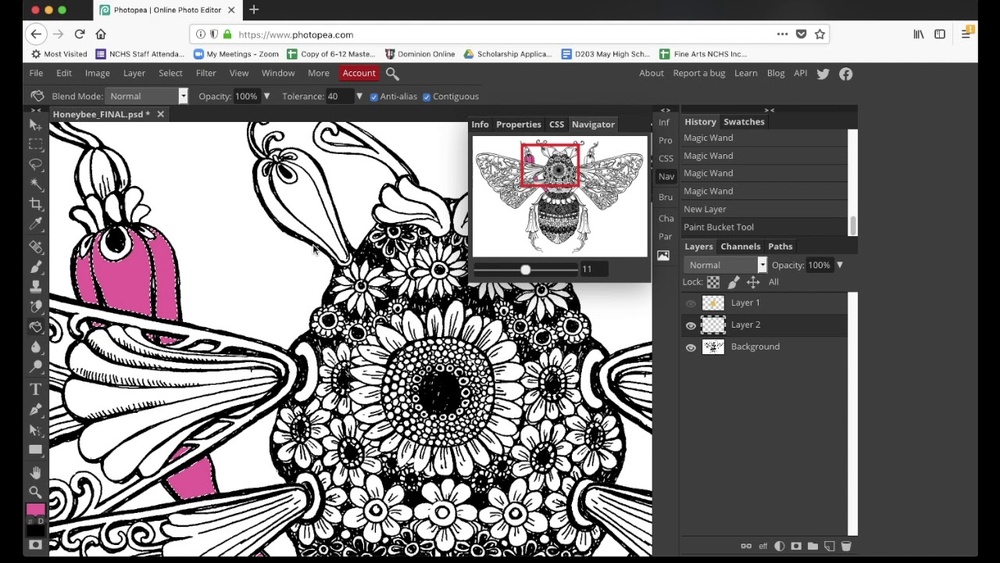
Are you ready to bring your line art to life with vibrant colors, but don’t know where to start? Coloring line art in Photopea can seem tricky at first, but once you learn a few simple techniques, you’ll be amazed at how easy and fun it becomes.
Whether you want to add bold hues beneath your lines or change the color of the lines themselves, this guide will walk you through every step. By the end, you’ll have the skills to transform your black-and-white sketches into colorful masterpieces that truly stand out.
Let’s dive in and unlock your creative potential with Photopea!

Credit: www.reddit.com
Preparing Lineart In Photopea
Preparing lineart in Photopea sets the stage for smooth coloring. Clean lineart helps colors stay inside the lines. Clear lines also make your artwork look sharp and professional. This section explains how to get your lineart ready before adding colors.
Starting with a well-prepared lineart saves time and effort later. It makes coloring easier and more precise. Follow these simple steps to prepare your lineart in Photopea.
Open And Clean Your Lineart
First, open your lineart file in Photopea. Use the Eraser tool to remove any unwanted marks or smudges. Zoom in to check details closely. Clean lines help prevent color spills outside the edges.
Adjust Lineart Brightness And Contrast
Go to Image > Adjustments > Brightness/Contrast. Increase contrast to make lines darker and clearer. Lower brightness if the background looks too bright. This step makes your lineart stand out better for coloring.
Remove The Background
Use the Magic Wand tool to select the white or unwanted background. Press Delete to remove the background. This leaves only your lineart visible. Transparent background helps when coloring on layers below the lines.
Lock The Lineart Layer
Lock the transparent pixels of the lineart layer. Click the checkerboard icon in the Layers panel. This prevents accidental changes to the lines while coloring. You can now paint over the lines without losing their shape.
Setting Up Layers For Coloring
Setting up layers correctly is essential for smooth coloring in Photopea. Proper layers keep your line art safe and make coloring easier and more flexible. Layers help separate line art from colors, so you can edit each part without affecting the others.
Organizing layers also helps you fix mistakes fast. You can try different colors without changing your line art. This section explains how to set up layers for coloring step-by-step.
Creating A New Layer Below The Line Art
First, open your line art file in Photopea. Then, create a new layer and place it below the line art layer. This new layer will hold your base colors. Coloring under the lines keeps the outlines clear and sharp.
To do this, click the “New Layer” button. Drag the new layer below the line art layer in the layers panel. Now you can fill in colors without covering your line art.
Using Clipping Masks For Precise Coloring
Create a new layer above your line art layer next. Right-click the new layer and choose “Create Clipping Mask.” This clips your colors to the shape of the line art below. You can color freely without going outside the lines.
This method works great for shading and highlights. It keeps colors neat and controlled. You can paint over the clipping mask layer without worrying about drawing outside the outlines.
Locking Transparent Pixels On The Line Art Layer
Select the line art layer and activate “Lock Transparent Pixels.” This option lets you change line colors without affecting the transparent background. You can repaint or adjust lines with different colors easily.
Use the brush or paint bucket tool to recolor your lines. Locking transparency ensures you only paint on existing line pixels. This keeps your lines crisp and clean while changing their color.
Using Clipping Masks Effectively
Using clipping masks in Photopea helps keep colors inside your lineart clean and precise. This technique lets you color without worrying about going outside the lines. It works by linking your color layer to the lineart layer below, so colors only appear where the lineart exists. This makes coloring faster and neater.
Clipping masks are easy to set up and very useful for digital coloring. They allow you to experiment with different colors without changing your original lineart. This method also keeps your workflow organized by separating lines from colors.
Creating A Clipping Mask In Photopea
First, open your lineart file in Photopea. Create a new layer above the lineart layer. Right-click the new layer and select “Create Clipping Mask.” Now, any painting on this layer will only show inside the lineart boundaries.
Choosing Colors And Painting Inside The Mask
Select a brush tool and pick your desired color. Paint on the clipped layer. The colors will stay contained within the lines, preventing any stray marks. You can add multiple clipping mask layers for different colors or shading.
Adjusting And Editing Your Clipped Colors
You can change colors anytime by painting over the clipped layer. Use the eraser to fix mistakes without affecting the lineart. You may also adjust layer opacity or blending modes for various effects while keeping colors inside the lines.
Filling Colors Under Lineart
Filling colors under lineart is a key step in digital coloring. It helps keep colors neat and within the lines. This method also allows easy adjustments without altering the original drawing. Using Photopea, you can add colors on layers below your lineart layer. This keeps the lines clear and sharp.
Working with separate layers makes editing faster. You can change colors without affecting the outlines. This technique is perfect for beginners and pros alike. It also keeps your workflow organized and flexible.
Creating A New Layer Beneath The Lineart
Start by opening your lineart in Photopea. Next, create a new layer and place it below the lineart layer. This layer will hold your colors. Name it for easy reference. This setup ensures that your lines stay visible over the colors.
Using The Fill Tool To Add Base Colors
Select the color you want to use. Then choose the Fill tool from the toolbar. Click on the areas you want to color. The Fill tool quickly fills large spaces with a single click. It saves time and keeps edges clean.
Using The Brush Tool For Detailed Coloring
Choose the Brush tool for areas needing more care. Pick a soft or hard brush depending on your style. Paint carefully inside the lines on the color layer. This method gives you more control over shading and highlights.
Locking The Lineart For Protection
Lock the lineart layer to prevent accidental changes. Click the lock icon in the layers panel. This step keeps your outlines intact. It stops paint or fills from spilling onto the lines.
Adjusting And Refining Colors
Use the Eraser tool to fix any color mistakes. Zoom in to work on small details. Change colors by selecting the new shade and painting over old colors. This keeps your artwork fresh and polished.
Changing Line Color With Alpha Lock
Changing line color with Alpha Lock is a simple way to edit your line art in Photopea. Alpha Lock restricts painting to only the visible pixels on a layer. This means you can change line colors without affecting the transparent areas. It helps keep your artwork clean and precise.
Using Alpha Lock lets you recolor lines quickly. You do not need to select the lines manually or erase any background. This method saves time and keeps the line art sharp. It works well for adjusting line colors to fit your artwork’s mood or style.
How To Enable Alpha Lock In Photopea
First, open your line art layer in Photopea. Then, right-click on the layer in the Layers panel. Choose “Alpha Lock” from the menu. You will see a small checkerboard icon appear on the layer. This means Alpha Lock is active.
Changing The Line Color With Brush Tool
After enabling Alpha Lock, select the Brush tool from the toolbar. Pick the color you want for your lines. Now, paint over the lines on your canvas. The brush will only affect the existing pixels on the layer. The transparent parts will stay untouched.
Using Fill Or Paint Bucket For Quick Color Change
You can also use the Paint Bucket tool to fill the lines with a new color. Make sure Alpha Lock is on. Select the color you want. Then, click on the line art to fill it. The fill will only apply to the visible pixels, changing the line color instantly.
Adjusting Line Opacity And Blending
Alpha Lock does not limit you to solid colors. You can lower the opacity of your brush to create softer lines. Try different blending modes like Multiply or Overlay for unique effects. This gives more depth and style to your colored line art.
Selecting And Adjusting Line Colors
Selecting and adjusting line colors is a crucial step in coloring lineart in Photopea. Changing line colors can add depth and style to your artwork. It helps your lines blend better with the colors underneath or stand out more clearly.
This process is simple but requires attention to detail. Using the right tools in Photopea, you can easily modify line colors without affecting the rest of your drawing. Adjusting line colors allows you to create different moods and effects in your art.
Selecting Line Colors In Photopea
Start by selecting the line art layer in your project. Use the Magic Wand tool or Lasso tool to select the lines. Adjust the tolerance to capture all the line pixels accurately. Once selected, you can choose a new color using the color picker.
Changing the color is as easy as filling the selected lines with the new color. You can use the Paint Bucket tool or brush tool. Make sure to work on a copy of your line art layer to keep the original safe. This step ensures you can always return to the original lines if needed.
Adjusting Line Colors With Alpha Lock
Alpha Lock allows you to paint only on the visible parts of a layer. Enable Alpha Lock on your line art layer by right-clicking the layer and selecting it. Pick a new color and paint directly over the lines. This method preserves the transparency of the lines.
Alpha Lock is perfect for subtle color changes. You can add highlights or shadows to your lines by using different shades. Use a soft brush for smooth transitions. This technique adds more dimension and interest to your line art.
Using Blending Modes To Modify Line Colors
Blending modes change how colors on the line art layer interact with layers below. Set your line art layer’s blending mode to “Multiply” to keep lines visible while changing their color. This mode darkens the colors beneath the lines.
Try the “Color” blending mode to change line colors without affecting their brightness. This mode is ideal for colorful or pastel line art. Experiment with different blending modes to find the best look for your artwork.
Blending Modes For Lineart Coloring
Blending modes in Photopea help you color lineart smoothly and naturally. They change how colors on one layer mix with layers below. This makes coloring easier and keeps your lines sharp.
Using blending modes lets you color lineart without losing detail. You can add color on a new layer, then change its blending mode to combine with the lines below.
Multiply Mode For Dark Lines
Multiply is a popular mode for coloring lineart. It makes white areas transparent and keeps black lines visible. This lets you add color below the lines without covering them.
Create a new layer under the lineart. Paint your colors there. The lines stay strong, and colors blend naturally with the drawing.
Overlay Mode For Vibrant Colors
Overlay mode boosts the contrast of your colors. It keeps the lineart clear and makes colors look bright. Use it on a layer above the lineart for special effects.
This mode works best with soft brushes. It adds depth and mood to your artwork without hiding the lines.
Screen Mode For Light Effects
Screen mode brightens your colors and makes dark areas lighter. It is useful for adding highlights or glow effects to your lineart. Use a light color on a new layer with Screen mode.
This mode lets light colors shine through while keeping the lines visible underneath.
Darken Mode To Change Line Color
Darken mode changes the line color by selecting the darkest pixels. Paint over your lines with a new color on a layer above. The lines will take on this new color while keeping their details.
This mode works well for customizing black or gray lineart into different shades.
Adding Shadows And Highlights
Adding shadows and highlights brings depth to your colored lineart in Photopea. Shadows create contrast and define shapes. Highlights add brightness and make your art pop. Both are essential for a more realistic and polished look.
Using layers for shadows and highlights keeps your work flexible. You can adjust opacity and colors without affecting the base colors. This method helps you create smooth transitions and natural lighting effects.
Creating Shadow Layers
Start by making a new layer above your color layer. Set this layer’s blending mode to Multiply. This mode darkens colors beneath it, perfect for shadows. Choose a darker shade of your base color for shadows.
Use a soft brush to paint shadows where light would not hit. Common shadow areas include under hair, beneath objects, and folds in clothes. Adjust the brush opacity for subtle or strong shadows.
Adding Highlights
Create another new layer for highlights. Set this layer’s blending mode to Screen or Overlay. These modes brighten the colors below. Pick a lighter, brighter color to use as your highlight.
Paint highlights on parts that catch light directly. Focus on raised surfaces like cheeks, nose tips, or edges of objects. Use a small, soft brush to blend highlights smoothly into the base colors.
Refining Shadows And Highlights
Use the Eraser tool with low opacity to soften harsh edges. Blur the shadow and highlight layers slightly for a smooth effect. Lower the layer opacity if shadows or highlights look too strong.
Experiment with different brush sizes and opacities for more natural results. Keep checking your work by toggling layers on and off. This helps you see how shadows and highlights affect your art.
Using Brushes For Detail Work
Using brushes for detail work in Photopea enhances your lineart coloring with precision. Brushes let you add fine touches that bring your artwork to life. This step is vital for creating depth and texture in your colored lineart.
Brush tools offer control over size, opacity, and flow. Adjust these settings to suit the detail level you want. Small, soft brushes work well for shading and highlights. Hard brushes are perfect for crisp edges and sharp lines.
Choosing The Right Brush For Details
Select a brush that matches the effect you want. Round brushes provide smooth strokes. Textured brushes add a natural, hand-drawn feel. Try different brushes to see which fits your style best.
Adjusting Brush Settings
Modify brush size to fit the detail area. Use smaller sizes for tight spaces. Change the opacity for subtle shading. Lower opacity builds color gradually. Increase flow for stronger, solid strokes.
Using Pressure Sensitivity
Enable pressure sensitivity if you use a tablet. This feature changes stroke thickness based on your pen pressure. It creates dynamic, natural lines. Pressure sensitivity helps with smooth transitions and shading.
Layer Management For Detail Work
Work on separate layers for details. This keeps your lineart safe. It lets you erase or change colors easily. Use clipping masks to keep colors inside your lines.
Blending Colors With Brushes
Use soft brushes to blend colors smoothly. Lightly paint over edges for seamless transitions. Blending adds realism and depth to your artwork. Practice blending to improve your coloring skills.

Credit: www.youtube.com
Exporting Your Colored Artwork
Exporting your colored artwork in Photopea is the final step in your creative process. This step saves your work in a format that suits your needs. Proper exporting ensures your colors and details stay sharp and vibrant.
Choosing the right file type affects how your artwork looks on screens or print. Photopea offers several export options to fit different uses. Understanding these options helps keep your artwork professional and ready for sharing.
Choosing The Best File Format
Photopea lets you export in formats like PNG, JPEG, and PSD. PNG keeps transparency and sharp lines, ideal for web use. JPEG compresses files, good for photos but may lose some quality. PSD saves layers, perfect if you want to edit later.
Adjusting Export Settings
Before exporting, check the resolution and quality settings. Higher resolution means better detail but larger file size. For web use, 72 dpi is standard. For print, use 300 dpi or more. Adjust quality sliders to balance size and clarity.
Saving Your Artwork
Click “File” then “Export As” in Photopea to start saving. Select your desired format from the list. Name your file clearly for easy access later. Choose a folder on your computer where you want to save it. Finally, click “Save” to complete the process.
Credit: www.reddit.com
Frequently Asked Questions
How Do I Change The Color Of A Line In Photopea?
Select the line art layer and enable “Lock Transparent Pixels. ” Choose a new color and paint over the lines using the brush tool. This changes the line color without affecting transparency.
How To Add Color To Lineart?
Create a new layer below your line art and fill colors inside. Use clipping masks on a layer above to contain colors. To change line color, enable alpha lock and paint over lines with a new color. Use selection tools to adjust specific areas if needed.
How To Color Your Lineart In Photoshop?
Create a new layer below your lineart in Photoshop. Use the brush or fill tool to apply color. For line color changes, enable “Lock Transparent Pixels” on the lineart layer, then paint over with your chosen color. Use clipping masks to keep colors within the lines.
How To Color An Object In Photopea?
Create a new layer below your object. Select a color and use the Paint Bucket or Brush tool to fill it. Use clipping masks or alpha lock to color lines precisely. Adjust colors with selection tools for accuracy. Save your work.
How Do I Add Color To Lineart In Photopea?
Create a new layer below the lineart, then use the fill or brush tool to add color.
Can I Change The Line Color Directly In Photopea?
Yes, use Alpha Lock on the lineart layer and paint with your chosen color.
What Is The Best Way To Keep Colors Inside The Lines?
Use a clipping mask on a layer above the lineart to contain your colors.
How Do I Create A Clipping Mask In Photopea?
Right-click the new color layer and select “Create Clipping Mask” from the menu.
How To Fill Large Areas Of Lineart With Color Quickly?
Use the fill tool or drag and drop color on a new layer below lineart.
Is It Possible To Edit Line Colors After Coloring?
Yes, select the lineart layer, use Alpha Lock, and paint to change line colors.
Conclusion
Coloring lineart in Photopea is simple and fun. Use layers to keep colors neat and organized. Try clipping masks to color inside lines easily. Change line colors by locking transparency or using selection tools. Practice these steps to improve your digital art skills.
Keep experimenting to find your favorite coloring style. Photopea offers great tools for creative and clean coloring. Start coloring today and bring your lineart to life!