If you’ve ever struggled to find the perfect skin color paint for your artwork, you’re not alone. Mixing skin tones can feel tricky because human skin has so many subtle shades and undertones.
But what if you could create your own custom skin color paint using just a few basic colors? In this guide, you’ll learn simple, step-by-step techniques to mix natural-looking skin tones that match your vision. Whether you want warm, cool, light, or dark shades, you’ll discover how to balance colors easily and avoid common mistakes.
Ready to bring your portraits and paintings to life with the right skin color? Let’s dive in and start mixing!
Credit: smart.dhgate.com
Primary Colors For Skin
Creating skin color paint begins with understanding primary colors. These colors form the base for mixing all skin tones. The three primary colors are red, yellow, and blue. Blending these in different amounts creates a wide range of skin shades.
Red adds warmth and life to the skin color. Yellow brings brightness and a golden touch. Blue cools the tone and adds depth. Combining these colors carefully produces natural skin hues.
Red: The Warmth Of Skin
Red is essential for making skin look alive. It mimics the blood flow under the skin. Adding red gives the paint a healthy, warm glow. Use a bright red for lighter skin and a deeper red for darker skin.
Yellow: Bringing Light And Glow
Yellow adds brightness and warmth to skin tones. It helps create peachy and golden hues. Mix yellow with red to get warm, natural colors. Adjust the amount to control how light or dark the skin looks.
Blue: Adding Depth And Coolness
Blue balances the warmth from red and yellow. It creates cooler or shadowed areas in the skin tone. Use blue sparingly to avoid making the color look gray. A small touch of blue helps achieve realistic skin shades.

Credit: www.messylittlemonster.com
Creating A Base Tone
Creating a base tone is the first step in making skin color paint. It sets the foundation for all other shades. A good base tone looks natural and matches the skin’s general hue. Mixing the right base tone helps your painting look realistic and vibrant.
The base tone combines primary colors in simple ways. Red, yellow, and blue are the main colors you start with. Adjusting these colors slightly helps to get the desired warmth or coolness of the skin. This process is easy but needs patience and practice.
Start With Primary Colors
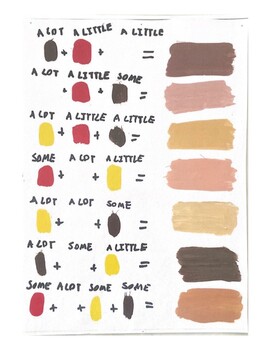
Begin by mixing equal parts of red, yellow, and blue paint. This mix creates a neutral brown color. This brown acts as your base tone. Add small amounts of each color to avoid making the tone too dark or too bright. Use a palette knife or brush to blend the colors well.
Adjust For Warmth Or Coolness
To warm the base tone, add more red and yellow. This creates peachy or golden hues. For cooler tones, add a little more blue. This makes the color look more neutral or slightly grayish. Test small amounts of paint on paper to see the effect before adding more.
Lighten The Base Tone
Add white paint slowly to the base tone to lighten it. White helps create lighter skin shades. Mix thoroughly to avoid streaks. Use this lighter tone for highlights or fair skin colors. Be careful not to add too much white, or the color will lose its richness.
Darken The Base Tone
Add small amounts of brown or burnt sienna to darken the base tone. These colors deepen the shade naturally. Darker tones suit shadows and deeper skin colors. Mix slowly and test often to keep control over the tone. Darkening the base tone is key for realistic portraits.
Adjusting Warmth And Coolness
Adjusting warmth and coolness is key to creating realistic skin color paint. Skin tones vary widely from warm to cool shades. Knowing how to shift your paint color helps match different skin tones accurately.
Warmth in skin colors means adding colors like red, yellow, or orange. Coolness means adding blue or green hues. Balancing these tones creates natural-looking skin paint.
Adding Warm Colors To Your Mix
Add small amounts of red or yellow to your base color. This warms up the paint and gives it a healthy glow. Yellow lightens the tone while red adds richness. Use burnt sienna or orange for deeper warm shades.
Incorporating Cool Colors
Add tiny amounts of blue or green to cool down the base color. This creates shadows or cooler skin tones. Use ultramarine blue or phthalo green sparingly to avoid dulling the color. Cool tones work well for shadows and veins.
Finding The Right Balance
Mix warm and cool colors carefully to avoid unnatural hues. Test your mix on paper and adjust as needed. Warm skin tones need more red and yellow. Cool skin tones need more blue or green. Keep adjusting until the shade looks natural.
Lightening Shades
Lightening shades is a key step in creating realistic skin color paint. It helps to achieve softer and paler skin tones that look natural. Lightening involves adding white or other light colors to the base skin tone. This process brightens the color without losing its warmth or depth.
Careful lightening can bring out subtle highlights and enhance the overall appearance of your painting. It is important to add lightening colors gradually. Too much white at once can make the skin tone look flat or chalky.
Choosing The Right Lightening Color
White is the most common choice for lightening skin tones. However, pure white can sometimes make the color look cold. Mixing white with a tiny bit of yellow or red keeps the warmth. This small change helps maintain a natural glow in lighter skin shades.
How To Add White To Your Base Color
Start with a small amount of white paint. Mix it thoroughly into your base skin color. Check the color after each addition. Stop when you reach the desired lightness. This slow method helps control the shade carefully and avoids over-lightening.
Using Other Light Colors To Lighten
Besides white, pale peach or cream colors can lighten skin tones gently. These colors add a subtle warmth that pure white lacks. Use them in small amounts to keep the skin tone balanced. They are perfect for creating soft highlights on cheeks and forehead.
Darkening Shades
Darkening shades are essential for creating realistic skin color paint. They add depth and dimension to your artwork. Using the right dark colors helps to mimic natural shadows on the skin. This step enhances the richness of your skin tone mix.
Choosing The Right Dark Colors
Start with burnt umber or burnt sienna for a natural dark tone. These colors blend well with reds and yellows. You can also use a tiny amount of ultramarine blue. Blue helps cool down the mix and deepen the shade.
Mixing Dark Shades Gradually
Add dark colors little by little to avoid making the paint too dark. Mix thoroughly after each addition. This method gives you control over the final tone. Stop when you reach the desired depth.
Balancing Warmth In Dark Shades
Dark shades can look too cold or too warm. Adjust by adding red or yellow for warmth. For cooler dark tones, add more blue or burnt umber. Keep testing the color on a white surface to see the true shade.
Using Black Sparingly
Black paint can darken shades quickly but can look unnatural. Use black very carefully and in small amounts. Mix it with other colors to soften its effect. This keeps the skin tone rich and realistic.

Credit: smart.dhgate.com
Mixing For Different Skin Types
Mixing skin color paint requires understanding the variations in skin tones. Different skin types show unique undertones and shades. Adjusting your paint mix can capture these differences. The right balance of colors creates natural-looking skin tones. Below are simple methods to mix paints for various skin types.
Mixing For Light Skin Tones
Start with white paint to create a base. Add small amounts of red and yellow for warmth. Use a tiny drop of blue to cool the tone slightly. Mix until you get a soft peach or cream shade. Increase white to lighten the color as needed.
Mixing For Medium Skin Tones
Begin with equal parts red and yellow to form an orange base. Add a touch of blue to balance warmth. Mix in small amounts of brown or burnt sienna for depth. Adjust white to control brightness. This mix should look warm and natural.
Mixing For Dark Skin Tones
Use a base of burnt sienna or burnt umber for richness. Add red and yellow to bring warmth to the mix. Include blue to cool the tone and add depth. Avoid too much white; use it sparingly to lighten slightly. Keep the mixture deep and earthy.
Adjusting For Warm And Cool Undertones
Warm undertones need more red and yellow in the mix. Cool undertones require more blue or green hints. Test your mix on paper to see the true color. Small adjustments can make a big difference. Match the undertone to the subject for realistic results.
Avoiding Muddy Colors
Creating realistic skin color paint requires careful mixing. One common problem is muddy colors. These dull, lifeless tones happen when colors mix incorrectly. Avoiding muddy colors keeps your skin tones vibrant and natural. This section explains how to prevent muddiness in your paint mixes.
Choose Clean, Pure Colors
Use fresh, pure paint colors. Old or dirty paints can cause dull results. Avoid mixing too many colors at once. Stick to a few basic colors for better control.
Control Color Ratios Carefully
Mix colors in small amounts. Add darker colors slowly. Too much dark paint can make your mix muddy. Balance warm and cool colors for a clear skin tone.
Use White To Lighten, Not Dark Colors
Add white paint to lighten skin tones. Avoid using black or dark colors for lightening. Dark colors can dull your mix and cause muddiness.
Test Your Mix Before Painting
Always test your color on paper or canvas. Let it dry to see the true tone. Adjust the mix if it looks muddy or too dull. Testing helps you keep control over color clarity.
Blending Techniques
Blending techniques are essential for creating smooth, natural-looking skin tones in paint. These methods help merge colors seamlessly, avoiding harsh lines and patchy spots. Proper blending gives depth and realism to your artwork.
Different tools and methods can be used to blend skin color paint effectively. Experiment with brushes, sponges, and even your fingers to see what works best for you. Practice is key to mastering blending and achieving lifelike skin tones.
Using A Dry Brush For Soft Blending
A dry brush blends colors gently without adding extra paint. Use a clean, dry brush with stiff bristles. Lightly stroke over the edges where two colors meet. This technique softens the transition and removes sharp lines.
Wet-on-wet Blending Method
Apply wet paint directly on top of wet paint. Work quickly before the paint dries. Use a soft brush to mix colors on the canvas. This method creates smooth gradients and subtle shifts in tone.
Layering And Glazing
Build skin tones gradually by applying thin layers of paint. Let each layer dry before adding the next. Use transparent glazes to adjust color warmth and depth. This technique adds richness and complexity to skin color.
Blending With Sponges
Sponges help create natural textures in skin tones. Dab the sponge lightly on the paint and then on your surface. This method blends colors softly and adds a subtle, textured effect to the skin.
Finger Blending For Fine Control
Using your fingers allows precise blending in small areas. Warm your fingers slightly before use. Gently rub the paint edges to merge colors smoothly. This tactile approach can make blending feel more intuitive.
Highlighting And Shadows
Highlighting and shadows bring skin color paint to life. They create depth and realism in your artwork. Without these, skin tones look flat and unnatural.
Highlights show where light hits the skin. Shadows reveal areas blocked from light. Combining both shapes the face and body.
Understanding Highlights
Highlights are lighter areas on the skin. Use white or a lighter shade of your base color. Apply highlights on the forehead, nose, cheekbones, and chin. These spots catch the most light naturally.
Keep highlights soft and blended. Sharp highlights look fake. Build them gradually for a smooth effect.
Creating Natural Shadows
Shadows add depth and shape. Mix your base skin tone with a bit of brown, blue, or purple. These colors make shadows look natural and not just darker paint.
Focus on areas under the cheekbones, around the nose, and under the jawline. These spots usually have less light. Paint shadows lightly and blend edges for smooth transitions.
Balancing Highlights And Shadows
Balance is key. Too many highlights or shadows can make skin look odd. Observe real skin or photos to see how light falls. Adjust your paint by adding small amounts of white or dark colors.
Work slowly. Build layers to create a soft, realistic look. This makes your skin color paint more believable and expressive.
Tools And Tips For Accuracy
Creating accurate skin color paint requires the right tools and careful techniques. Using proper tools helps mix colors smoothly and match skin tones closely. Small details matter a lot in achieving realistic shades. Following simple tips can improve your color mixing precision and result.
Essential Tools For Mixing Skin Color Paint
Use a palette with a smooth surface for easy color blending. Quality brushes in various sizes help apply paint precisely. A palette knife allows mixing colors evenly without wasting paint. Keep paper towels or cloth nearby for quick brush cleaning. Use a small container of water to thin paints and clean brushes.
Color Matching Tools To Improve Accuracy
A color wheel guides mixing primary colors to create skin tones. Use sample photos or printed images for reference. Natural daylight helps see true colors better than artificial light. Magnifying glasses or a small mirror can help examine fine color details. Mixing small amounts first avoids wasting paint and helps test colors.
Tips For Accurate Skin Tone Mixing
Start by mixing red, yellow, and blue to form a base color. Add white gradually to lighten the tone without losing hue. Adjust warmth by adding more red or yellow for peach or tan shades. Add blue or burnt sienna to cool or darken the color slightly. Test the mix on paper before painting to check accuracy.
Frequently Asked Questions
Which Colors Make Skin Color?
Skin color forms by mixing red, yellow, and blue in varied ratios. Add white to lighten and brown or burnt sienna for darker shades. Increase red and yellow for warm tones, and add blue for cooler or deeper hues. Adjust gradually for natural skin tones.
How To Make Skin Tone Color With Paint?
Mix red, yellow, and blue to create a base skin tone. Add white to lighten and brown or burnt sienna to darken. Adjust red and yellow for warmth, blue for coolness. Blend gradually until you achieve the desired skin color.
Is There A Universal Skin Tone Paint?
No universal skin tone paint exists due to diverse human complexions. Artists mix red, yellow, blue, white, and brown to create custom shades. Adjusting these colors helps match specific skin tones accurately.
How To Make Light Brown Skin Color Paint?
Mix red, yellow, and blue to create a light brown base. Add white to lighten and burnt sienna for warmth. Adjust ratios until achieving the desired light brown skin tone.
What Colors Make Skin Color Paint?
Skin color paint is made by mixing red, yellow, and blue with white and brown.
How Do I Create Lighter Skin Tones?
Add more white and yellow to your base mix for lighter, peachy skin tones.
How Can I Make Darker Skin Colors?
Use more brown, burnt sienna, or burnt umber to deepen and darken skin tones.
What Is The Best Ratio For Skin Color Mixing?
Start with equal parts of red, yellow, and blue, then adjust for warmth or coolness.
How Do I Make Warm Skin Tones?
Add extra red and yellow to your base to get warm, golden skin colors.
Can I Use Only Primary Colors For Skin Tones?
Yes, you can mix skin tones using just red, yellow, and blue with white.
Conclusion
Creating skin color paint takes practice and patience. Start with red, yellow, and blue as your base. Adjust these colors to match the skin tone you want. Add white to lighten and brown or blue to darken. Keep mixing in small amounts until you find the perfect shade.
Experiment often and trust your eyes. This simple method helps you make natural skin tones for your art. Enjoy painting and bringing characters to life with your custom colors.