If you want your videos to look professional and visually stunning, mastering color grading is a must—and DaVinci Resolve makes it easier than ever. Whether you’re just starting out or looking to refine your skills, this guide will walk you through how to color grade in DaVinci Resolve step by step.
You’ll learn how to enhance your footage’s mood, fix color issues, and make your images pop with vibrant, cinematic tones. By the end, you’ll have the confidence to transform your raw clips into polished masterpieces that captivate your audience. Ready to unlock the full potential of your videos?
Let’s dive in.
Getting Started With Color Grading
Getting started with color grading in DaVinci Resolve is simple. The software offers a clear workspace dedicated to color correction and grading. This section guides you through the basic steps to begin working with your footage.
Understanding the layout and tools helps you make quick, effective adjustments. This foundation allows you to improve your video’s look with confidence.
Accessing The Color Workspace
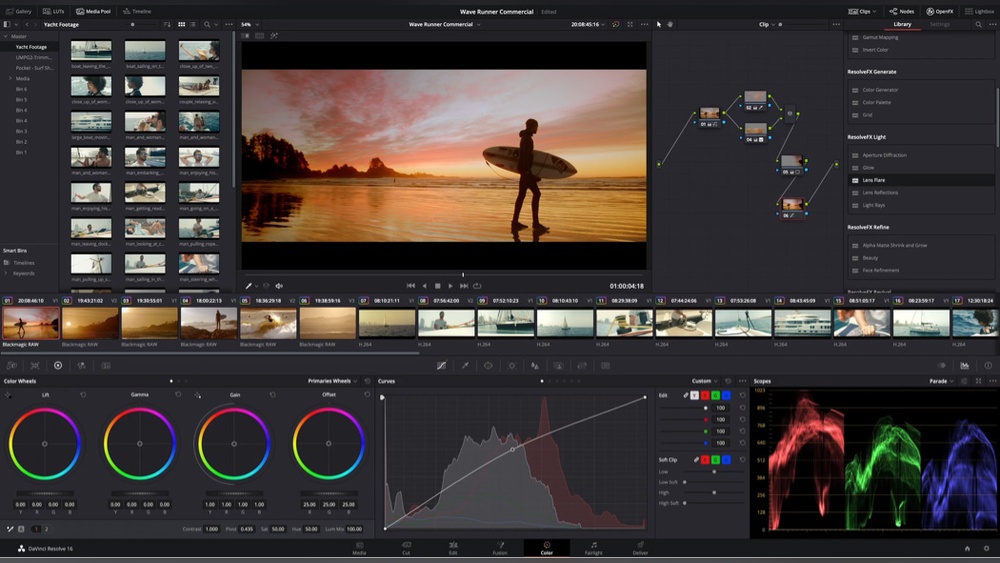
Open DaVinci Resolve and load your project. Click on the Color tab at the bottom of the screen. This switches you to the color grading workspace. You will see various panels, including color wheels, scopes, and clip thumbnails. Each tool serves a specific purpose in adjusting your image.
Organizing Your Clips
Use the clip timeline at the bottom to select the shot you want to grade. Organize clips in the order you want to work on them. Naming clips clearly makes it easier to track changes. This helps maintain a smooth workflow.
Basic Color Correction Tools
Start with the primary color wheels to adjust lift, gamma, and gain. These control shadows, midtones, and highlights. Make small changes to balance the image. Use the Auto Color feature for a quick correction. It sets a neutral base for further manual tweaks.
Navigating The Color Workspace
The Color workspace in DaVinci Resolve is where all color grading happens. It offers a clean and organized interface. This workspace helps you adjust colors, tones, and contrast easily. Understanding how to navigate it is key to smooth color grading.
You will find several panels and tools arranged for quick access. Each area has a specific role in the color grading process. Let’s explore the main sections you will use often.
Color Wheels And Scopes Panel
The Color Wheels allow you to adjust shadows, midtones, and highlights. They are the core tools for color correction. Below the wheels, scopes show waveforms and vectorscopes. These help you monitor color balance and brightness levels accurately.
Node Editor
The Node Editor is a powerful feature in the Color workspace. It lets you build a flowchart of color adjustments. Each node applies a different effect or correction. This setup gives you full control over complex grading tasks.
Gallery And Clips Panel
The Gallery stores your saved looks and still images for reference. You can apply these looks to clips quickly. The Clips Panel shows all your timeline clips for easy selection and grading. It helps you move between shots without losing track.
Using Auto Color Correction
Using Auto Color Correction in DaVinci Resolve is a great way to start color grading quickly. This feature helps balance the colors and contrast of your footage automatically. It saves time and provides a good neutral base for further adjustments. Even beginners can get pleasing results without deep color knowledge.
The Auto Color Correction tool analyzes the image and corrects color shifts and exposure. It adds natural contrast and saturation to improve the look instantly. After this automatic fix, you can tweak the colors manually to fit your style or mood. This method ensures your clips look consistent and polished with minimal effort.
How To Access Auto Color Correction In Davinci Resolve
First, open your project and go to the Color page. Select the clip you want to color grade. In the Color Wheels panel, look for the “A” icon. This button triggers the Auto Color Correction feature. Click it to let DaVinci Resolve balance your shot automatically.
What Auto Color Correction Adjusts Automatically
The tool adjusts the overall color balance by fixing color casts. It improves contrast to make your image pop. Saturation levels are increased for vivid colors. These changes create a natural and visually pleasing look. The auto correction is based on analyzing the current frame’s data.
How To Refine The Auto Correction Results
After auto correction, use the Color Wheels to fine-tune shadows, midtones, and highlights. Adjust curves for more precise color control. Use the Saturation slider to increase or decrease color intensity. You can also apply masks or windows to correct specific areas. This makes your grading more creative and tailored.
Manual Color Adjustments
Manual color adjustments in DaVinci Resolve let you fine-tune your footage with precision. This process helps improve color balance, contrast, and overall mood. It gives you full control over how your video looks.
Adjusting colors manually allows you to fix problems that auto tools may miss. You can target specific areas or tones to create the exact feel you want.
Using Color Wheels For Basic Adjustments
Color wheels are the primary tool for manual color grading. They control Lift (shadows), Gamma (midtones), and Gain (highlights). Move the wheels to shift colors in these ranges. Adjust the sliders for contrast and saturation to enhance the image further.
Applying Curves For Precise Control
Curves offer detailed control over brightness and color channels. You can adjust the RGB curves separately or together. This helps create smooth transitions or sharp contrasts. Use curves to brighten faces or darken backgrounds easily.
Using Qualifiers To Isolate Colors
Qualifiers let you select specific colors or ranges in your shot. You can change the hue, saturation, or brightness of just that area. This tool is perfect for correcting skin tones or enhancing skies without affecting the whole image.
Adjusting Temperature And Tint
Temperature and tint controls help set the color mood. Temperature shifts the image warm or cool. Tint adjusts the green to magenta balance. These tweaks can make your footage look natural or stylized based on your vision.
Working With Color Wheels
Working with color wheels in DaVinci Resolve is a key step in color grading. These wheels let you adjust the colors and tones of your footage with precision. Each wheel controls different parts of the image, helping you create the look you want.
The color wheels are easy to use and give you control over shadows, midtones, and highlights. They allow you to change color balance and brightness in specific areas of your video. This makes your footage look natural or stylized, depending on your goal.
Understanding The Color Wheels Interface
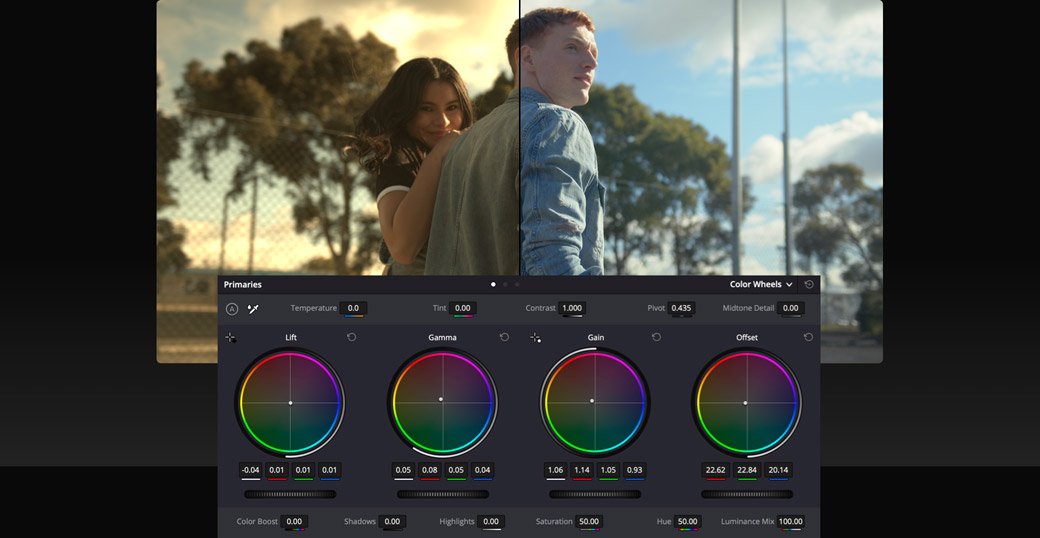
The color wheels panel shows four main wheels: Lift, Gamma, Gain, and Offset. Lift controls the dark areas, Gamma adjusts the midtones, Gain affects the bright areas, and Offset moves the entire image’s color balance. Each wheel has a circle inside that you drag to change color tones.
Next to the wheels are sliders for controlling contrast, pivot, saturation, and hue. These sliders help fine-tune your image. Learning what each wheel and slider does helps you grade faster and more accurately.
Using Lift, Gamma, And Gain For Balanced Color
Start by adjusting Lift to set the shadows. Move the wheel slightly to add color or correct unwanted tones in dark areas. Then adjust Gamma to fix midtones, which affect skin tones and mid-range colors.
Use Gain to brighten or colorize highlights. This step is important for adding sparkle or warm tones to bright parts of the image. Small changes can make a big difference. Always check the image after each move.
Adjusting Offset And Saturation For Final Touches
Offset shifts the overall color balance of the clip. Use it to add a creative look or to fix a color cast that affects the whole image. Be careful with Offset because it changes everything at once.
Saturation controls how vivid the colors appear. Increase saturation for a lively look or reduce it for a muted style. Avoid pushing saturation too high, or the image may look unnatural.
Applying Curves For Precision
Applying curves in DaVinci Resolve gives you precise control over your image’s colors and tones. Curves allow you to adjust brightness, contrast, and color balance with accuracy. This tool helps create smooth transitions and fine details in your color grading process.
Using curves lets you target specific parts of the image. You can brighten shadows, deepen highlights, or tweak midtones. The control points on the curve make it easy to shape the look exactly how you want.
What Are Curves In Davinci Resolve?
Curves are graphical tools that map input tones to output tones. The horizontal axis represents the original brightness. The vertical axis shows the adjusted brightness. Moving points on the curve changes the image’s light and color.
DaVinci Resolve offers different types of curves. These include the custom curve, hue vs hue, hue vs saturation, and more. Each curve type affects different color aspects for detailed control.
How To Use The Custom Curve For Contrast
Start with the custom curve to adjust contrast. Click to add control points on the curve line. Drag points up to brighten or down to darken parts of the image.
Pull the lower part of the curve down to deepen shadows. Lift the upper part to brighten highlights. This S-shape curve enhances contrast naturally and beautifully.
Adjusting Colors With Hue Vs Hue Curve
The hue vs hue curve changes one color hue to another. Select a point on the curve that matches the hue you want to adjust. Drag it up or down to shift that hue’s color tone.
This curve is useful for fixing skin tones or making colors pop. It helps balance colors without affecting brightness or saturation.
Using Hue Vs Saturation To Control Color Intensity
The hue vs saturation curve changes the strength of colors. Pick a hue on the curve. Drag the point up to increase saturation or down to decrease it.
This tool lets you enhance or mute specific colors. It is perfect for making skies bluer or skin tones softer.
Tips For Precise Curve Adjustments
Work slowly and use small movements on the curve. Add multiple points to control different areas precisely. Always check your changes on a calibrated monitor.
Use the split-screen view to compare before and after. This helps ensure your grading improves the image naturally. Save your curve presets for future projects to keep consistency.
Matching Shots For Consistency
Matching shots for consistency is a key step in color grading. It ensures all clips look like they belong together in the same scene. Without matching, viewers may notice sudden color shifts or lighting changes. This breaks the flow and lowers video quality.
DaVinci Resolve offers powerful tools to match shots easily. These tools help balance color, contrast, and brightness across clips. Consistent shots improve storytelling and keep viewers engaged.
Identify Reference Shot
Start by choosing a reference shot. This clip sets the look for the entire scene. Pick the shot with the best lighting and color balance. Use it as a guide for grading other clips.
Use Color Match Tool
DaVinci Resolve has a Color Match feature to speed up matching. Load a color chart if available, or match manually using scopes. This tool adjusts color and tone quickly for consistency.
Adjust Primary Controls
Focus on primary controls like Lift, Gamma, and Gain. These control shadows, midtones, and highlights. Adjust these settings on each clip to match the reference shot.
Check With Scopes
Use DaVinci Resolve’s scopes to compare clips. Waveform and vectorscope help see brightness and color differences. Aim for similar readings across all shots for a uniform look.
Fine Tune With Curves
Use curves for precise control over colors and contrast. Adjust RGB curves to fix small color shifts. This step refines the match and improves visual flow.

Credit: fstoppers.com
Saving And Using Color Presets
Saving and using color presets in DaVinci Resolve saves time and keeps your work consistent. Presets let you apply the same color adjustments to different clips quickly. This method is perfect for projects that require a uniform look across many shots.
Once you create a color grade you like, you can save it as a preset. Later, you can apply this preset to other clips with just a few clicks. This process helps maintain your style and speed up your workflow.
How To Save A Color Preset In Davinci Resolve
First, finish grading your clip on the Color page. Right-click on the node where you made your adjustments. Choose “Grab Still” from the menu. This action saves a snapshot of your grade in the Gallery.
Next, right-click the still in the Gallery. Select “Export” to save the preset file on your computer. You can give it a name that describes the look. This file is easy to share or reuse later.
Applying A Saved Color Preset
To use a saved preset, go to the Gallery panel on the Color page. Click the “Import” button. Find the preset file you saved earlier and open it. The still will appear in your Gallery.
Drag the still onto the clip you want to grade. DaVinci Resolve applies the saved color adjustments automatically. This method is fast and ensures your clips have a consistent look.
Managing Your Color Presets
You can organize your presets inside the Gallery. Group similar looks into albums for easy access. Delete old or unused presets to keep your workspace clean. This keeps your color grading process smooth and efficient.
Tips For Enhancing Skin Tones
Enhancing skin tones is a key step in color grading with DaVinci Resolve. Skin tones can look unnatural without careful adjustment. Proper skin tone enhancement improves the overall look of your footage. It helps your subjects appear healthy and vibrant. Follow these simple tips to achieve natural and pleasing skin tones.
Use The Vectorscope To Check Skin Tone Accuracy
The Vectorscope displays color information of your image. Skin tones usually fall along a specific line on the Vectorscope. This line is called the “skin tone line.” Adjust your color wheels to keep skin tones close to this line. This ensures skin colors look natural and balanced.
Adjust The Midtones For Natural Skin Colors
Focus on midtones because skin colors mostly sit there. Use the Color Wheels panel to tweak midtones gently. Avoid extreme shifts in hue or saturation. Small changes create smooth, natural skin tones. Overdoing it can make skin look too red or orange.
Use Qualifiers To Isolate Skin Areas
Qualifiers help select only the skin tones in your shot. This lets you adjust skin colors without affecting the rest of the image. Use the Hue vs Hue or Hue vs Saturation curves to refine your selection. Then, apply color corrections just to the skin areas.
Apply Softening With The Blur Tool
Use the Blur tool to soften skin tone corrections. This reduces harsh edges around the selected skin area. A smooth transition looks more natural and pleasing. Keep blur levels low to avoid losing important details in the skin.
Balance Skin Tones With Contrast And Saturation
Adjust contrast to add depth to the skin. Increase saturation slightly to make skin tones pop without looking fake. Check your image on different screens to ensure skin looks good everywhere. Balance is key for realistic and attractive skin tones.
Credit: www.blackmagicdesign.com
Exporting Graded Videos
Exporting graded videos is the final step in your color grading workflow in DaVinci Resolve. This process turns your edited and color-enhanced project into a video file that you can share or upload. A smooth export ensures your color work looks just as you intended on all devices. Understanding export settings helps keep your video quality high and file size manageable.
Setting Up The Deliver Page
Open the Deliver page to start the export process. This workspace offers options for format, codec, and resolution. Choose a preset or customize your settings. Make sure the timeline you want to export is selected. This avoids exporting wrong clips or incomplete projects.
Choosing The Right Format And Codec
Pick a format that suits your project needs. Common formats include MP4, MOV, and QuickTime. Select a codec like H.264 for web or ProRes for higher quality. The codec affects file size and playback compatibility. Match your choice with the platform where you will share the video.
Adjusting Resolution And Frame Rate
Set the resolution to match your source footage or delivery requirements. Typical resolutions are 1080p or 4K. Keep the frame rate consistent with your original clips. Changing frame rate can cause playback issues. Confirm these settings before exporting to maintain video smoothness and sharpness.
Exporting With Quality Control
Use the Quality settings to control file size and video clarity. Options include automatic, best, or custom bitrate. Higher bitrate means better quality but larger files. Check the export location and filename carefully. Click Add to Render Queue, then Start Render to export your video.

Credit: blog.pond5.com
Frequently Asked Questions
Can You Color Grade In Davinci Resolve?
Yes, DaVinci Resolve offers powerful color grading tools in its Color workspace. You can manually grade or use Auto Color for quick corrections. The free version includes professional-grade color grading features suitable for filmmakers and editors.
Can You Do Color Grading In Davinci Resolve For Free?
Yes, DaVinci Resolve’s free version offers powerful color grading tools used by professionals. Download it for free and start grading.
Does Davinci Resolve Have Auto Color Grading?
Yes, DaVinci Resolve offers an Auto Color feature that automatically balances color and contrast. It provides a quick baseline for grading. Users can then manually adjust settings for precise results. This feature helps speed up the color grading process effectively.
Is Davinci Good For Color Grading?
DaVinci Resolve excels in color grading with professional tools and an intuitive Color workspace. It offers precise manual controls and helpful auto color features for quick adjustments. Many filmmakers trust it for its powerful, versatile grading capabilities in both free and paid versions.
What Is Color Grading In Davinci Resolve?
Color grading adjusts colors and tones to enhance the look of your video footage.
How Do I Start Color Grading In Davinci Resolve?
Open the Color page workspace to access all grading tools and controls.
Can I Color Grade For Free In Davinci Resolve?
Yes, the free version includes professional color grading tools for all users.
What Are The Main Color Grading Tools In Davinci Resolve?
Color wheels, curves, scopes, and nodes are the key tools for grading.
How Does The Auto Color Feature Work In Davinci Resolve?
It automatically balances color and contrast as a starting point for grading.
What Is A Node In Davinci Resolve Color Grading?
A node is like a layer that holds color adjustments applied to footage.
Conclusion
Color grading in DaVinci Resolve improves your video’s look and feel. Start with the Auto Color feature for a quick fix. Then, fine-tune colors manually using wheels and curves. Practice helps you understand how each tool changes your footage. Keep your edits simple and consistent across clips.
Use Shot Match to keep colors uniform in your project. Remember, good color grading enhances storytelling and mood. With time, your skills will grow naturally. Enjoy the creative process and keep experimenting.