
Want to add a splash of color to your eggs this season? Dyeing eggs with food coloring is an easy and fun way to create vibrant, beautiful results right at home.
Whether you’re preparing for Easter, a craft project, or just looking to brighten up your kitchen, you can achieve stunning colors using simple ingredients you probably already have. In this guide, you’ll discover straightforward steps to dye eggs perfectly every time.
Ready to transform plain eggs into colorful works of art? Keep reading, and you’ll be amazed at how simple and rewarding this process can be!

Credit: pagingsupermom.com
Boiling And Cooling Eggs
Boiling and cooling eggs is the first step to dyeing eggs with food coloring. It sets the base for bright and even colors. Proper boiling ensures the eggs are hard enough to handle and dye without cracking. Cooling the eggs fully helps the dye stick better and prevents spots.
How To Boil Eggs For Dyeing
Place eggs in a single layer in a pot. Add cold water to cover eggs by an inch. Heat the pot over medium-high heat until water boils. Once boiling, turn off the heat and cover the pot. Let eggs sit in hot water for 10 to 12 minutes. This method avoids overcooking and cracked shells.
Cooling Eggs Before Dyeing
Drain the hot water and immediately place eggs in cold water. Use ice cubes or run cold tap water to cool them quickly. Let eggs sit in cold water for at least 5 minutes. Cooling stops the cooking process and makes eggs easier to handle. Cold eggs absorb color more evenly and prevent dye blotches.
Tips For Best Results
Use fresh eggs for easier peeling after dyeing. Avoid leaving eggs at room temperature for too long. Store cooled eggs in the refrigerator until ready to dye. Handle eggs gently to prevent cracks during the dye process.
Choosing Food Coloring
Choosing the right food coloring is key to dyeing eggs successfully. The type and quality of color affect the brightness and evenness of the dye. Several options exist, so understanding them helps create vibrant, beautiful eggs.
Liquid Food Coloring Vs. Gel Food Coloring
Liquid food coloring is easy to find and use. It dissolves quickly in water, making it perfect for simple dye baths. Gel food coloring has a thicker consistency. It offers more intense colors with less quantity. Gel colors work well for mixing and layering shades.
Natural Food Coloring Options
Natural food coloring comes from fruits, vegetables, and spices. They provide softer, earthy tones. Examples include beet juice for red and turmeric for yellow. Natural dyes may take longer to set but create unique effects. These are ideal for those who prefer chemical-free dyes.
Choosing Colors For Vibrant Eggs
Bright colors stand out best on white or light-colored eggs. Darker eggs show muted tones regardless of dye. Choose primary colors like red, blue, and yellow for mixing custom shades. Avoid pastel shades if you want bold, eye-catching eggs.
Food Coloring Safety Considerations
Pick food coloring safe for consumption. Eggs dyed with non-toxic colors remain edible. Avoid craft dyes that may contain harmful chemicals. Always read labels and choose trusted brands to ensure safety for your family.
Preparing Dye Baths
Preparing dye baths is a key step in coloring your eggs brightly. The right mix helps the color stick well and look vibrant.
Simple ingredients and careful mixing make the dye baths effective and safe for eggs.
Gather Necessary Supplies
Start with clean containers for each color. Use cups or bowls that fit your eggs comfortably.
Have food coloring, white vinegar, and hot water ready. These three create the perfect dye solution.
Mix The Dye Solution
Fill each container with 1/2 cup of hot water. The water should be hot, not boiling.
Add 1 teaspoon of white vinegar to help the dye stick. Vinegar also brightens the colors.
Put 10 to 20 drops of food coloring in each cup. Adjust drops for deeper or lighter shades.
Stir And Test The Dye
Stir each dye bath gently to mix the color evenly. Avoid splashing the dye on surfaces.
Test a small piece of paper towel or an egg shell to see the color shade. This helps you adjust the color if needed.
Prepare all colors before starting to dip the eggs. This keeps the process smooth and fun.
Adding Vinegar For Vibrancy
Adding vinegar to your egg dye mixture is a simple step that makes a big difference. Vinegar helps the food coloring stick better to the eggshell. This creates brighter and more vibrant colors that last longer.
Without vinegar, colors may appear dull or fade quickly. The acid in vinegar reacts with the eggshell’s surface. This reaction allows the dye to bond firmly, resulting in rich and even color coverage.
Why Use Vinegar In Egg Dyeing?
Vinegar contains acetic acid, which changes the eggshell’s surface. It breaks down minerals, making the dye soak in better. This process ensures that colors pop and look fresh.
How Much Vinegar Should You Add?
Use about one tablespoon of vinegar per half cup of water. This ratio works well for most food coloring dyes. Too much vinegar can make the color uneven, so stick to the recommended amount.
When To Add Vinegar During Dye Preparation
Add vinegar to the warm water before mixing in the food coloring. Stir well to blend the vinegar and color evenly. Then, dip your eggs into the dye bath for best results.
Dyeing Techniques
Dyeing eggs with food coloring is a fun and creative activity. Choosing the right technique helps achieve vibrant colors and smooth finishes. Careful handling prevents cracks and uneven dye spots. Each step influences the final look of your eggs. Below are simple methods to dye eggs easily and beautifully.
Using Tongs Or Holders
Use tongs or an egg holder to handle eggs safely. This keeps your hands clean and avoids smudging the dye. Metal tongs or wire holders work best for dipping eggs. Hold the egg gently and lower it into the dye slowly. Lift the egg carefully to prevent drips and color streaks. Using tools also reduces the risk of dropping eggs.
Soaking Time Tips
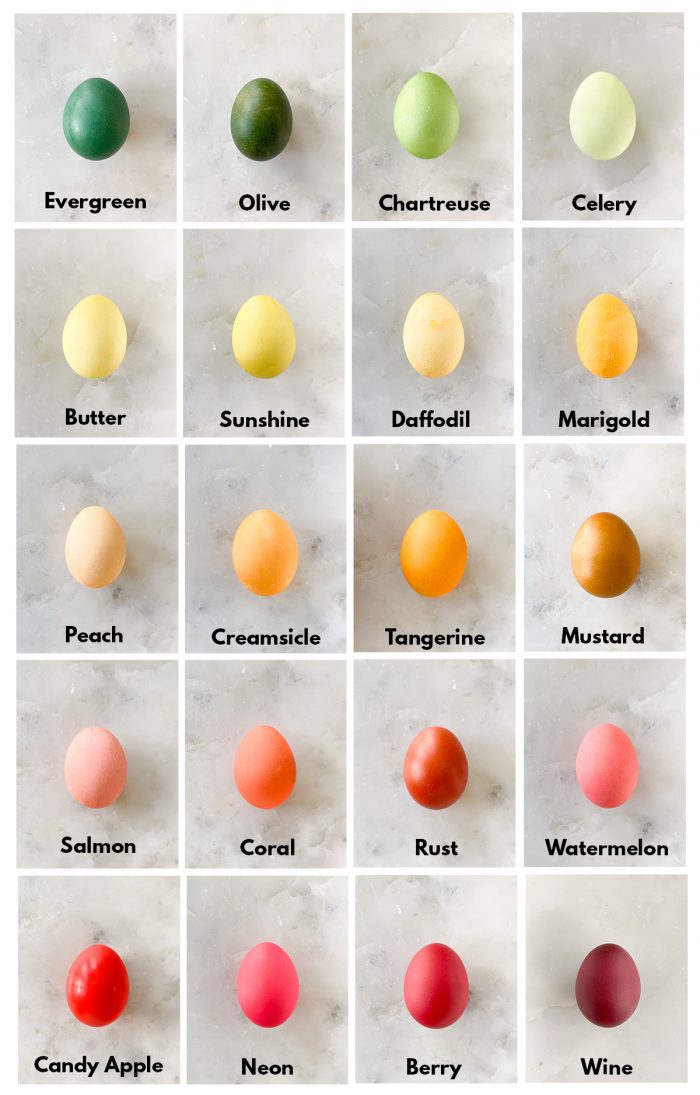
The time eggs stay in the dye affects their color depth. Short soaking creates light, pastel shades. Longer soaking results in brighter, richer colors. Check eggs every minute to find your perfect shade. Avoid soaking eggs too long to prevent cracks or blotches. After dyeing, let eggs dry completely before handling or decorating.
Credit: studiodiy.com
Creating Custom Colors
Creating custom colors makes dyeing eggs more fun and unique. It lets you mix shades and find new hues. You can make pastel tones or bold colors by combining basic dyes. This section explains simple ways to create your own egg colors with food coloring.
Mixing Primary Colors
Start with primary colors: red, blue, and yellow. Mix drops of these in water to form new colors. For example, red and blue make purple. Add more drops for a stronger color. Use small containers to try different mixes.
Adjusting Color Intensity
Control color brightness by changing dye amount. Use fewer drops for light colors and more for dark. Soak eggs longer for deeper shades. Keep an eye on the egg to avoid uneven colors.
Using White Eggs For Vibrant Colors
White eggs show colors better than brown ones. They highlight pastel and bright shades clearly. Choose white eggs for the most vivid results. This helps your custom colors stand out more.
Creating Pastel Shades
Pastel colors are soft and light. Mix a few drops of food coloring with more water. Soak eggs briefly for gentle hues. Pastels are perfect for a subtle, spring look.
Setting The Color
Setting the color is a key step in dyeing eggs with food coloring. It helps the color stick well and look bright. This step involves how long you leave the eggs in the dye and how to handle them after.
Choosing The Right Time To Soak
Soak the eggs in the dye bath for at least 5 minutes. Longer soaking gives deeper, richer colors. Watch the color change carefully. Remove eggs when they reach the shade you like.
Handling Eggs During Dyeing
Use tongs or a spoon to dip eggs gently. Avoid dropping them. Handle eggs with care to keep the shell intact and smooth. This helps the color apply evenly.
Using Vinegar To Fix Color
Add 1 tablespoon of vinegar to the dye solution. Vinegar helps the food coloring stick better to eggshells. It also brightens the colors and makes them last longer.
Drying Eggs Properly
After dyeing, place eggs on a drying rack or paper towels. Let them dry fully at room temperature. Avoid stacking eggs while wet to prevent smudging. Drying well keeps the colors sharp.
Drying And Handling Eggs
Drying and handling dyed eggs is an important step in the coloring process. Proper care helps the colors stay bright and prevents smudging. It also keeps your eggs safe to eat.
After removing eggs from the dye bath, handle them gently. Wet eggs can be fragile, so avoid squeezing or dropping them. Use a slotted spoon or tongs for safe removal.
Use A Wire Rack Or Paper Towels For Drying
Place the dyed eggs on a wire rack to dry evenly. This allows air to circulate around the eggs. If you don’t have a rack, use a paper towel-lined plate. The paper towels absorb extra dye and moisture.
Blot Excess Dye Carefully
Pat the eggs gently with a paper towel to remove extra dye. Avoid rubbing, which can remove color or cause streaks. Blotting keeps the eggs neat and vibrant.
Handle Eggs With Clean Hands
Wash your hands before touching the dyed eggs. Oils and dirt can dull the colors or leave marks. Clean hands help maintain the eggs’ bright, smooth finish.
Let Eggs Dry Completely Before Storing
Wait until the eggs are fully dry before moving them. Wet eggs can stick together or stain surfaces. Fully dried eggs are easier to store and display safely.
Using Hot Vs Cold Water
Choosing between hot and cold water affects how your eggs absorb food coloring. The temperature of the water changes the dye’s strength and the speed of color absorption. This simple choice can lead to very different results in your egg-dyeing project.
Using Hot Water For Vibrant Colors
Hot water helps the food coloring dissolve quickly. This creates a strong dye bath that coats the eggs evenly. The heat opens the eggshell pores, allowing the color to soak in better. Expect bright and bold colors with hot water dyeing.
Mix the food coloring with hot water and a bit of vinegar. The vinegar helps the color stick to the eggshell. Dip the eggs for a few minutes, then watch the colors deepen fast. Hot water is great for quick, vivid results.
Using Cold Water For Soft, Pastel Shades
Cold water slows down how the dye works on the eggshell. This makes the colors lighter and softer. Cold water dyeing is perfect for pastel colors or subtle shades.
Mix your food coloring in cold water and add vinegar as usual. Soak the eggs longer to get a gentle tint. The colors will be less intense but still pretty. Cold water is best for a delicate, natural look.
Which Water Temperature Should You Choose?
Pick hot water to get bright, fast colors. Choose cold water for soft, slow color changes. Your choice depends on the look you want for your eggs. Both methods are easy and fun to try.
Try both to see which effect you like best. Experimenting will help you learn how water temperature changes the dyeing process. Make your egg-dyeing experience creative and enjoyable.

Credit: www.skiptomylou.org
Adding Finishing Touches
After dyeing your eggs with vibrant colors, the fun continues with adding finishing touches. These small details make your eggs stand out and look unique. Simple techniques like adding glitter or creating crayon and paint effects can turn plain eggs into little works of art. These finishing steps are easy and enjoyable for all ages.
Glitter And Shine
Glitter adds sparkle and catches the light beautifully. Use a small brush to apply a thin layer of glue or clear varnish on the dry egg surface. Sprinkle fine glitter gently over the glue. Let it dry completely before handling. This method gives your eggs a festive, shimmering finish that looks magical.
For a shiny look without glitter, try rubbing a small amount of vegetable oil or cooking spray on the eggs. This simple trick enhances the colors and gives a glossy shine. Use a soft cloth to polish the eggs carefully.
Crayon And Paint Effects
Crayons create lovely patterns and textures on dyed eggs. Before dyeing, draw simple designs on the eggshell with a white or colored crayon. The wax resists the dye, leaving your drawings visible. After dyeing, add more details with crayons or markers for extra creativity.
Water-based paints or acrylics also work well on dry eggs. Use fine brushes to paint delicate flowers, stripes, or dots. Let each layer dry before adding another. These effects give your eggs a personal touch and artistic flair.
Frequently Asked Questions
How Do You Dye Eggs With Food Coloring?
Boil and cool hard eggs. Mix food coloring, hot water, and vinegar. Dip eggs in dye until desired color forms. Dry on rack.
How To Get Food Coloring To Stick To Eggs?
Add vinegar to the dye solution to help food coloring stick to eggshells. Soak eggs in dye for several minutes. Use cold, hard-boiled eggs for best results. Dry eggs on a rack or paper towel to set color evenly.
Is It Better To Dye Eggs Hot Or Cold?
Dye eggs with hot water for better color absorption and vibrant results. Hot dye sets faster than cold. Use cold eggs to prevent cracking.
How Long Do You Let Eggs Sit In Food Coloring?
Let eggs sit in food coloring for 5 to 10 minutes for vibrant color. Longer soaking deepens the shade.
How Do You Prepare Eggs For Dyeing With Food Coloring?
Hard boil eggs and let them cool completely before dyeing. Refrigerate until cold for best results.
What Ingredients Are Needed To Dye Eggs With Food Coloring?
You need food coloring, white vinegar, boiling water, and hard-boiled eggs.
How Long Should Eggs Stay In The Dye Bath?
Dip eggs for 5 to 10 minutes, depending on the color intensity desired.
Can I Mix Food Coloring To Create Custom Egg Colors?
Yes, mix different food coloring drops in water to create unique colors.
Why Is Vinegar Added To The Egg Dye Solution?
Vinegar helps the dye stick better to the eggshell, making colors brighter.
How Do I Avoid Uneven Coloring On Dyed Eggs?
Stir the dye bath gently and fully submerge eggs for even color coverage.
Conclusion
Dyeing eggs with food coloring is simple and fun. You only need a few basic supplies. Hard-boil your eggs and prepare the dye baths carefully. Submerge eggs to get bright, vibrant colors. Let them dry fully before handling. This activity is perfect for families and parties.
Experiment with color mixing for unique designs. Enjoy the creative process and colorful results. Try this easy method for your next holiday celebration.