
Painting a straight line between two colors can be tricky. But with the right steps, it’s achievable.
Imagine a perfectly clean line dividing two colors on your wall. It adds a professional touch to any room. Whether you’re a beginner or a seasoned painter, getting that straight line can seem daunting. But don’t worry! With some simple tools and techniques, you can achieve this with ease.
In this guide, we will walk you through the process step-by-step. You’ll learn how to prepare, tape, and paint like a pro. Ready to give your walls a flawless finish? Let’s dive in and make that straight line happen!
Credit: www.instructables.com
Choosing The Right Tools
Choosing the right tools is crucial for painting a straight line between two colors. The right tools ensure clean, crisp lines that make your painting project look professional. Without the right tools, even the steadiest hand can falter. Let’s explore what you need.
Essential Painting Supplies
Before starting, gather all necessary supplies. You’ll need painter’s tape, a paint tray, and drop cloths. These items help protect surfaces and create clean lines. Don’t forget a level for straight edges.
High-quality paint is also essential. Cheap paint can bleed under the tape. Choose paint that is easy to work with and has good coverage. This will save time and effort.
Selecting Quality Brushes
Brushes make a big difference. Quality brushes provide smooth, even strokes. Look for brushes with firm, synthetic bristles. They hold their shape and don’t shed.
A good brush for straight lines is an angled sash brush. It allows for precise control and detail work. This type of brush makes it easier to paint along edges and corners.
Use a brush size appropriate for the area. For thin lines, a smaller brush works best. For broader lines, choose a larger brush. Always clean brushes well after use to maintain their quality.

Credit: www.makingmanzanita.com
Preparing The Surface
Painting a straight line between two colors can be challenging. But, with proper preparation, you can achieve a professional finish. Preparing the surface is the key to a neat and clean paint job. Let’s dive into the steps to ensure your surface is ready for painting.
Cleaning The Wall
A clean wall is essential before painting. Dust and dirt can affect the paint’s adherence. Use a damp cloth to wipe down the wall. Remove any cobwebs, dust, or grime. Pay attention to corners and edges. Let the wall dry completely.
Sanding Imperfections
Inspect the wall for imperfections. Sand any rough spots or bumps with fine-grit sandpaper. Smooth surfaces help paint adhere better. Use a sanding block for larger areas. After sanding, wipe away the dust with a damp cloth. This ensures a smooth, even surface for painting.
Taping The Line
Creating a crisp line between two colors can be challenging. Taping the line is essential for a clean, professional finish. With the right techniques, anyone can achieve perfect edges.
Using Painter’s Tape
Painter’s tape is designed for this purpose. It’s easy to use and removes cleanly. Choose high-quality tape for best results.
- Ensure the surface is clean and dry.
- Unroll the tape slowly to prevent stretching.
- Press the tape down firmly to avoid paint seepage.
Proper application is key. Press along the edges with a putty knife or a credit card. This ensures a tight seal.
Ensuring Straight Edges
To achieve straight edges, take your time. Rushing can lead to mistakes.
- Measure and mark the line with a pencil.
- Use a level to check the line is straight.
- Apply the tape along the marked line.
Double-check your work before painting. This saves time and effort in the long run.
For corners and intricate areas, use smaller pieces of tape. This provides more control and precision.
Credit: www.instructables.com
Applying The Base Color
Applying the base color is a crucial step in painting a straight line between two colors. This process ensures the final result looks clean and professional. Follow these simple steps to achieve a flawless finish.
Priming The Wall
Start by priming the wall. Primer helps the paint adhere better and provides a uniform surface. Choose a primer suitable for your wall type. Apply a thin, even coat with a roller. Let it dry completely before moving to the next step.
Painting The First Color
Next, paint the first color. Use painter’s tape to mark the edges where you want the straight line. This tape will act as a barrier and ensure a crisp line. Carefully apply the paint within the marked area. Use a brush for edges and a roller for larger areas.
Let the first color dry completely. It’s important to allow enough drying time to avoid smudging. Once dry, gently remove the painter’s tape. Now, you have a clean base color that will serve as one half of your straight line.
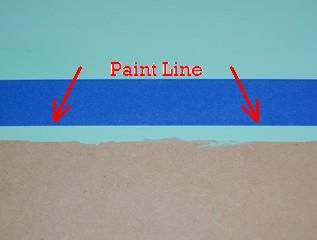
Creating A Barrier
Creating a barrier is crucial when painting a straight line between two colors. This barrier ensures that the colors do not bleed into each other. Follow these steps to achieve a clean, professional finish.
Sealing The Tape
First, apply painter’s tape along the edge where the two colors will meet. Press the tape firmly to avoid gaps. This step is important to prevent paint from seeping underneath the tape.
Next, seal the tape edge with the base color. Paint a thin layer of the base color along the tape. This seals any gaps, preventing the new color from bleeding through. Allow it to dry completely before moving to the next step.
Using A Clear Coat
Another method to create a barrier is using a clear coat. After applying the painter’s tape, brush a clear coat along the tape edge. This method also seals gaps, ensuring a crisp line.
Wait for the clear coat to dry. It usually takes about 30 minutes. Once dry, proceed to paint the second color. The clear coat helps maintain a sharp line between the colors.
Summary
- Apply painter’s tape carefully.
- Seal the tape with the base color.
- Or use a clear coat to seal the tape.
Both methods help create a clean, straight line between two colors. Take your time and follow each step for the best results.
Painting The Second Color
Painting the second color on a wall can be tricky. It requires precision and care to keep the edges clean and sharp. This section will guide you through the process, ensuring your lines are perfect.
Applying The Paint
First, make sure the first color is completely dry. Use painter’s tape to mark the edge where the two colors will meet. Press the tape down firmly to prevent paint from seeping under it.
- Use a high-quality brush or roller.
- Dip the brush into the paint and remove excess.
- Apply the paint in even strokes along the tape’s edge.
- Work slowly to avoid mistakes.
For the best results, apply a second coat once the first layer dries.
Maintaining Clean Edges
Clean edges are crucial for a professional look. Here are some tips:
- Remove the tape while the paint is still wet. This prevents peeling.
- Pull the tape back at a 45-degree angle.
- If paint bleeds, touch up with a small brush.
Using these steps will help you achieve a crisp, clean line between the two colors. Patience and attention to detail are key.
Removing The Tape
Removing the tape is a crucial step in painting a straight line between two colors. This step can make or break your clean, crisp line. Doing it right ensures the paint edges are sharp and professional-looking. Timing and technique are key. Let’s delve into the details.
Timing The Removal
Timing is everything in tape removal. Remove the tape while the paint is still slightly wet. If the paint dries fully, the tape can pull up the paint, ruining your hard work. Wet paint allows the tape to come off smoothly.
Pulling The Tape Correctly
Pulling the tape at the right angle is essential. Pull the tape back on itself at a 45-degree angle. This technique ensures a clean edge. Do it slowly to avoid paint drips or smears. Take your time. Rushing can lead to mistakes.
Touch-ups And Finishing
Touching up and finishing your paint job is crucial. It ensures a clean, professional look. This stage involves fixing mistakes and adding final touches. These steps help create a seamless line between two colors.
Fixing Mistakes
Even the best painters make mistakes. Don’t worry if your line isn’t perfect. You can fix it. Here are some tips:
- Use a small brush to correct errors.
- Dip the brush in the correct color.
- Carefully paint over the mistake.
- Allow the paint to dry before adding another coat.
If the mistake is large, use painter’s tape. Tape off the area you need to correct. Repaint the line. Remove the tape before the paint dries. This keeps the new line sharp and clean.
Final Touches
Once the paint is dry, inspect your work. Check for any uneven lines or missed spots. For the final touches:
- Use a fine brush for touch-ups.
- Ensure even coverage.
- Blend the edges carefully.
Consider using a small sponge. It helps blend colors seamlessly. Lightly dab the sponge along the line. This technique softens the transition between colors.
Clean your tools thoroughly. This prevents dried paint from affecting future projects. Store brushes and rollers properly. They will be ready for your next painting job.
Following these steps ensures a professional finish. Your painted line between two colors will be straight and clean.
Frequently Asked Questions
What Tools Do I Need To Paint A Straight Line?
To paint a straight line, you’ll need painter’s tape, a level, a pencil, and a quality brush. These tools help ensure precision and accuracy in your work.
How Do I Prepare The Surface?
Clean the surface thoroughly and ensure it’s dry. Sand any rough areas and repair imperfections. This ensures the tape sticks well and the paint adheres smoothly.
How Do I Apply Painter’s Tape Correctly?
Apply painter’s tape along the line where the two colors meet. Press down firmly on the edges to prevent paint bleed. Remove the tape carefully after painting.
Can I Use A Laser Level For Straight Lines?
Yes, a laser level is very helpful. It projects a straight line onto the surface, making it easier to apply painter’s tape accurately.
Conclusion
Painting a straight line between two colors can be simple. Follow the steps outlined above carefully. Use painter’s tape and a steady hand. Take your time for a clean finish. Practice makes perfect. Soon, your walls will look professionally done.
Enjoy your beautifully painted space. Happy painting!