
Cleaning oil paint brushes between colors can be tricky but is essential. It helps maintain brush quality and ensures color accuracy in your artwork.
Oil painting is a rewarding yet demanding craft. One of the keys to producing beautiful work is maintaining clean brushes. A dirty brush can mix colors unintentionally, leading to muddied hues and a less vibrant piece. Proper cleaning between colors not only preserves the integrity of your brushes but also keeps your paintings crisp and true to your vision.
In this guide, we will show you simple, effective steps to clean your oil paint brushes between colors. This way, you can focus more on creating and less on worrying about your tools. Let’s dive in!

Credit: www.tiktok.com
Choosing The Right Brush Cleaner
Choosing the right brush cleaner is essential for maintaining your oil paint brushes. Different types of cleaners work better for different needs. Some painters prefer solvent-based cleaners, while others opt for natural alternatives. Understanding each type will help you make the best choice for your brushes.
Solvent-based Cleaners
Solvent-based cleaners are effective for removing oil paint from brushes. They break down the oil quickly. Popular solvents include mineral spirits and turpentine. These cleaners are strong and can handle tough paint residue. However, they have strong fumes. Use them in a well-ventilated area to avoid inhaling harmful vapors.
Solvent-based cleaners can also be harsh on your brushes. Prolonged use may damage the bristles. To reduce this risk, rinse brushes with water after cleaning. This helps remove any remaining solvent. Always follow safety guidelines when using solvent-based cleaners.
Natural Alternatives
Natural alternatives are gentle on your brushes and the environment. They are made from plant-based ingredients. One popular option is linseed oil soap. It cleans oil paint effectively without harsh chemicals. Another choice is walnut oil. It works well for cleaning and conditioning your brushes.
Natural cleaners are safer to use indoors. They have no strong fumes. This makes them a great choice for artists with sensitivities. They are also biodegradable. This means they have less impact on the environment. Consider natural alternatives for a healthier cleaning option.

Credit: blog.daisie.com
Preparing Your Workspace
Before cleaning oil paint brushes between colors, it is crucial to prepare your workspace. This ensures you can work efficiently and keep your area clean. A well-prepared workspace helps maintain the quality of your brushes and your artwork.
Protecting Surfaces
Cover your work surface with old newspapers or a plastic sheet. This protects against paint spills and stains. An old tablecloth or drop cloth can also work well. Secure the covering in place with tape to prevent it from moving.
Organizing Supplies
Keep all necessary cleaning supplies within reach. You will need a container for clean water or solvent. Have paper towels or rags ready for wiping brushes. Place a small container for used solvent or water nearby. Arrange your paint tubes and palette in an organized manner.
Use a brush holder or stand to keep brushes upright. This helps them dry properly and avoids damage. A clean workspace supports a smoother painting process.
Initial Wipe Down
Cleaning oil paint brushes between colors ensures vibrant, true-to-life artwork. The initial wipe down is a crucial first step. It helps remove excess paint before you proceed with deeper cleaning methods.
Removing Excess Paint
Begin by removing as much paint as possible from the brush. This step prevents colors from mixing and maintains your artwork’s clarity.
Using A Rag Or Paper Towel
Use a rag or paper towel to wipe the brush. Gently press the brush against the rag, moving it back and forth. This action removes the majority of the paint.
Continue wiping until the brush no longer transfers paint onto the rag. This step is essential for a cleaner brush, making the next cleaning stages more effective.
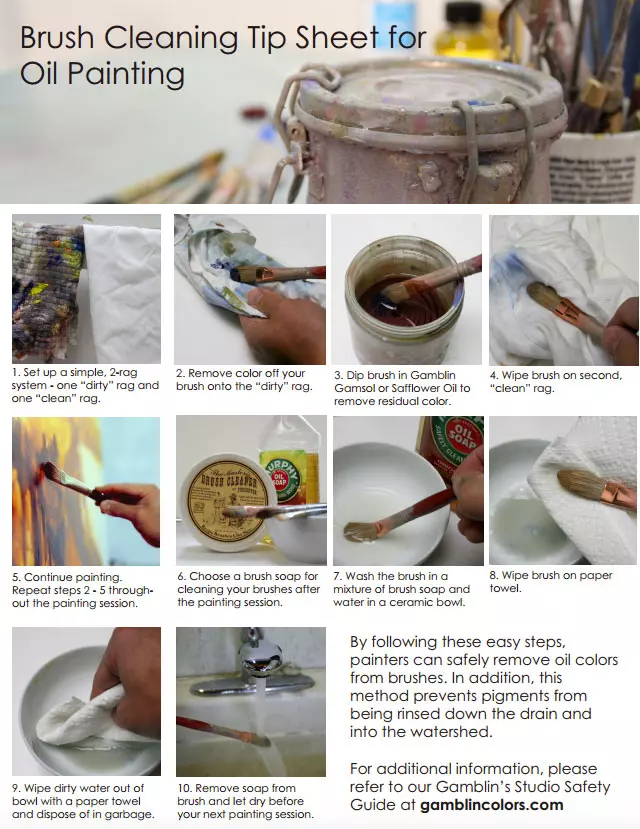
Credit: gamblincolors.com
Rinsing With Solvent
Keeping your oil paint brushes clean is crucial for achieving vibrant paintings. Rinsing with solvent between colors ensures your brushes are in top shape. This technique prevents color contamination. Let’s dive into the best ways to rinse your brushes.
Choosing The Right Solvent
Choosing the right solvent is the first step in the rinsing process. Common solvents include turpentine, mineral spirits, and linseed oil. Each has its pros and cons.
- Turpentine: Effective but has a strong odor.
- Mineral Spirits: Less odor, but still effective.
- Linseed Oil: Gentle on brushes but slower to clean.
Consider the solvent’s impact on your health and the environment. Always work in a well-ventilated area.
Proper Rinsing Technique
Use the proper technique to rinse your brushes. Here’s a simple step-by-step guide:
- Pour a small amount of solvent into a container.
- Swirl the brush in the solvent gently. Avoid pressing hard.
- Wipe the brush on a clean cloth to remove excess paint.
- Repeat the process until the brush is clean.
Use a fresh solvent for each rinse. This prevents contaminating the brush with old paint.
Rinsing your brushes with the right solvent and technique keeps them in great condition. This ensures your paintings remain vibrant and true to your vision.
Using Soap And Water
Cleaning oil paint brushes between colors is essential to keep your artwork clean. One effective method is using soap and water. This method is simple and uses items you already have at home.
Selecting The Right Soap
The type of soap you use is important. Mild soaps work best. For example, baby shampoo or dish soap. Avoid harsh soaps that can damage your brushes.
Check the label of your soap. Look for soaps that are gentle on hands. These are usually safe for brushes too.
Effective Scrubbing
Start by rinsing the brush under warm water. This removes excess paint. Be gentle while doing this.
Next, apply a small amount of soap to the bristles. Use your fingers to work the soap into the bristles. Do not scrub too hard. This can damage the brush.
Rinse the brush under warm water again. Repeat this process until the water runs clear. Ensure no paint is left in the brush.
Finally, use a clean towel to dry the brush. Gently squeeze the bristles to remove excess water. Lay the brush flat to dry. This helps the brush keep its shape.
Conditioning The Bristles
Conditioning the bristles of your oil paint brushes is important. It keeps them soft and flexible. This helps maintain the quality of your artwork. Proper care extends the life of your brushes. Below are some tips for conditioning your brushes.
Using Brush Conditioner
Brush conditioner is a special product. It helps keep bristles in good shape. Here’s how to use it:
- After cleaning your brush, squeeze out excess water.
- Apply a small amount of conditioner to the bristles.
- Work it through the bristles with your fingers.
- Rinse lightly with water and reshape the brush.
- Let the brush dry flat or hanging with bristles pointing down.
Preventing Bristle Damage
Bristle damage can ruin your brushes. Here are some tips to prevent it:
- Never leave brushes sitting in water. This bends and weakens bristles.
- Avoid using hot water. It can make bristles fall out.
- Clean brushes immediately after use. Dried paint is hard to remove.
- Store brushes properly. Keep them flat or hanging with bristles down.
Following these steps can keep your brushes in top condition. Proper care will save you money and improve your painting experience.
Drying The Brushes
After cleaning your oil paint brushes, drying them correctly is crucial. Proper drying ensures your brushes maintain their shape and last longer. Let’s explore the best techniques for drying your brushes and common mistakes to avoid.
Proper Drying Techniques
Use a clean cloth to blot excess water from the brushes. Gently press the bristles between the folds of the cloth. This removes most of the moisture without damaging the bristles.
After blotting, lay the brushes flat on a clean surface. Ensure the bristles extend over the edge. This helps maintain their shape. If the brush is left upright, water may seep into the handle. This causes the wood to swell and the bristles to loosen.
For better results, hang the brushes with bristles facing down. You can use a brush holder or a simple hook. This prevents water from seeping into the handle.
Avoiding Common Mistakes
Avoid standing the brushes upright in a jar. This can deform the bristles and damage the handle.
Don’t use a hairdryer to speed up the drying process. The heat can damage the bristles and loosen the glue holding them together.
Never leave your brushes to dry in direct sunlight. Exposure to heat can cause the bristles to become brittle and break.
Skipping the blotting step can lead to brushes retaining too much moisture. This can cause mildew and a bad smell.
Proper care is key to maintaining your oil paint brushes. Follow these tips, and your brushes will remain in excellent condition for years.
Storing Brushes Correctly
Storing your brushes the right way is essential. It helps maintain their quality and lifespan. Proper storage prevents damage and keeps the bristles in good condition.
Ideal Storage Conditions
Store your brushes in a clean, dry place. Ensure they are completely dry before storage. Moisture can damage the bristles and the handle.
Use a brush holder or a jar to keep them upright. This keeps the bristles straight. Avoid leaving them lying flat. It can cause deformation.
| Storage Tip | Reason |
|---|---|
| Keep Brushes Upright | Prevents bristle damage |
| Ensure Brushes are Dry | Prevents mold and damage |
| Use a Brush Holder | Maintains shape and quality |
Avoiding Brush Deformation
Brush deformation can ruin your painting tools. To avoid this, always clean your brushes immediately after use. Use warm water and a mild soap. Dry them gently with a clean cloth.
Never store brushes with the bristles facing down. This can bend and ruin them. Instead, use a brush holder or a jar. Ensure they stand upright.
Avoid using harsh chemicals for cleaning. They can weaken the bristles over time. Stick to mild soaps or specialized brush cleaners.
- Clean brushes right after use
- Dry them gently with a cloth
- Store brushes upright
- Avoid harsh chemicals
By following these steps, your brushes will stay in top condition. Proper storage and care are key to maintaining their quality. Happy painting!
Frequently Asked Questions
How Do You Clean Oil Paint Brushes Quickly?
To clean oil paint brushes quickly, use a solvent like mineral spirits or turpentine. Swirl the brush in the solvent, wipe on a paper towel, and repeat until clean.
Can You Use Dish Soap To Clean Oil Brushes?
Yes, dish soap can help clean oil brushes. After using a solvent, wash the brush with dish soap and warm water. Rinse thoroughly.
How Often Should You Clean Oil Paint Brushes?
You should clean oil paint brushes immediately after each painting session. This prevents paint from drying and damaging the bristles.
Is It Necessary To Condition Oil Paint Brushes?
Yes, conditioning oil paint brushes is essential. After cleaning, apply a small amount of brush conditioner or linseed oil. It keeps bristles soft and prevents damage.
Conclusion
Cleaning oil paint brushes between colors is essential for great results. Follow these steps to maintain your brushes. Use soap and water, or a special cleaner. Rinse thoroughly to remove all paint. Dry the brushes completely before storing them. Proper care extends the life of your brushes.
Happy painting!