Have you ever found your mouse pointer hard to spot on a busy screen? Changing its color can make a huge difference—not just for style, but for ease and speed.
Whether your eyes strain to follow the default white arrow or you simply want a fresh look, customizing your mouse pointer color is easier than you think. In this guide, you’ll discover simple steps to change your pointer’s color on Windows, making your computer experience smoother and more personalized.
Ready to make your cursor stand out and boost your productivity? Keep reading to find out how!
Credit: mcmw.abilitynet.org.uk
Accessing Mouse Settings
Accessing mouse settings is the first step to change your mouse pointer color. This area controls how your cursor looks and behaves. It is easy to find and simple to use.
Most computers group these settings under system or accessibility options. You can open them quickly using built-in tools. Let’s explore how to access these settings on a Windows PC.
Opening Settings From The Start Menu
Click the Start button on your taskbar. Look for the gear icon labeled “Settings.” Click it to open the Settings window. This is the main control center for your system preferences.
Using Keyboard Shortcut
Press the Windows key and the letter I simultaneously. This shortcut opens the Settings app instantly. It saves time and avoids searching through menus.
Finding The Mouse Pointer Options
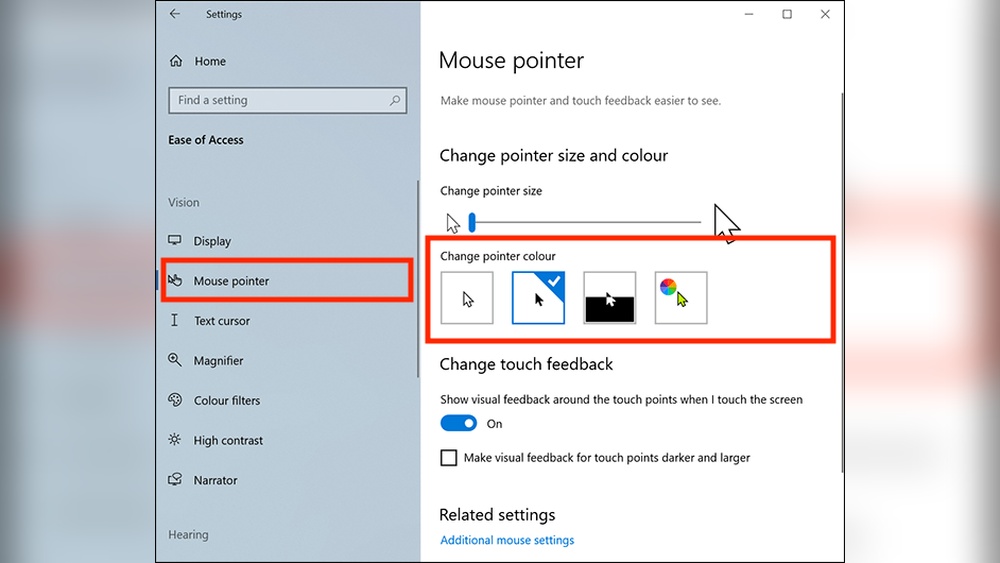
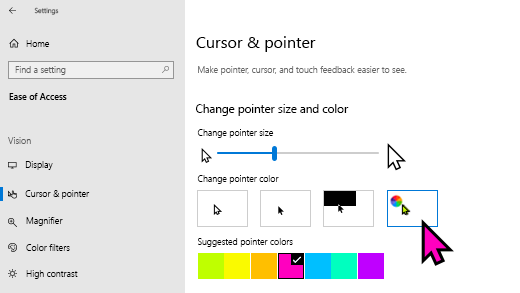
In the Settings window, select “Ease of Access.” This section helps you adjust your device to your needs. Next, click on “Mouse pointer” or “Cursor & pointer” on the left menu. Here, you will find options to change the pointer’s color and size.
Alternative Access Via Control Panel
Type “Control Panel” in the Start menu search bar. Open the Control Panel app. Navigate to “Hardware and Sound” then click on “Mouse.” This opens the Mouse Properties dialog where you can customize the pointer.
Credit: www.youtube.com
Changing Pointer Color In Windows
Changing the mouse pointer color in Windows helps improve visibility and personalization. Windows provides easy settings to adjust pointer color without extra software. This feature benefits users who want a pointer that stands out on their screen.
You can switch the pointer color to white, black, inverted, or even a custom color. The process works on Windows 10 and Windows 11. Follow simple steps inside the Settings menu to make changes.
Accessing Mouse Pointer Settings
Open the Settings app by pressing Windows + I keys together. Alternatively, click the Start menu and select the gear icon. Inside Settings, find and click on Accessibility or Ease of Access depending on your version.
Next, choose Mouse pointer from the left sidebar. This opens the menu where you can change pointer size and color.
Selecting A Pointer Color
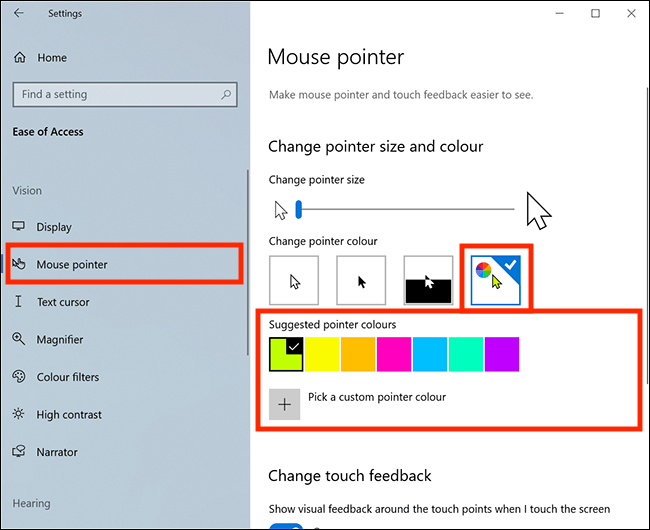
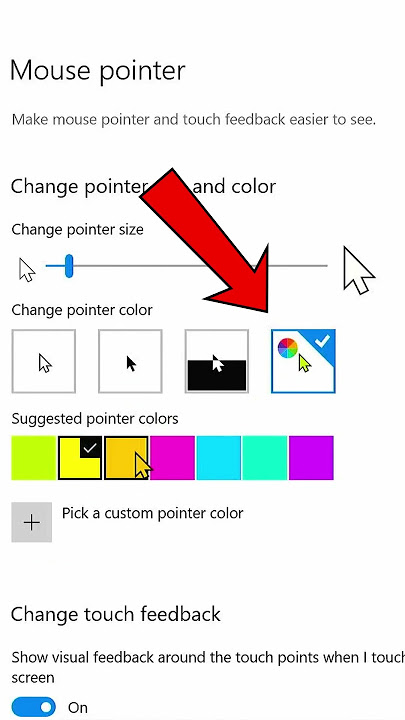
Under the Mouse pointer style section, select the Custom option. You will see a palette of color choices below. Pick any color that suits your preference from the preset options.
For more control, click the plus sign to open a color wheel. This lets you pick any shade using RGB sliders or by entering hex codes.
Using The Inverted Pointer Option
Windows includes an Inverted pointer style. This option automatically changes the pointer color to contrast with the background. It helps make the pointer more visible on different screen colors.
Simply select Inverted under pointer styles to enable this feature. It works well if you often switch between light and dark backgrounds.
Applying And Testing Your Changes
Once you choose a color or style, Windows applies changes immediately. Move your mouse to see the new pointer color in action. No need to restart your computer or open any other windows.
You can return to the settings anytime to try different colors or reset to the default pointer style.
Using The Custom Color Wheel
Using the custom color wheel to change your mouse pointer color gives you full control over its appearance. This feature lets you pick any shade you like. It is perfect for matching your desktop theme or improving pointer visibility.
The color wheel shows a wide range of colors. You can select a bright or soft tone to suit your needs. This flexibility helps create a more personal and comfortable computer experience.
Accessing The Custom Color Wheel
Open the Settings app by pressing Windows + I keys. Click on “Ease of Access” or “Accessibility” depending on your system. Choose “Mouse pointer” from the menu on the left side. Select the “Custom” pointer option. Click the plus sign (+) to open the full color wheel.
Selecting Your Desired Color
Use the color wheel to pick any hue. Move the cursor around the wheel to browse colors. Adjust brightness and saturation using the sliders. Click on the color you want to apply it. The pointer color changes immediately after selection.
Tips For Choosing The Best Pointer Color
Pick a color that contrasts well with your background. Bright colors like yellow or cyan stand out on dark backgrounds. Dark colors suit light desktop themes. Avoid colors that blend in with your screen content. This helps you find the pointer quickly.
Resetting To Default Pointer Color
To return to the standard pointer color, open the mouse pointer settings. Select the default white or black pointer option. This removes any custom colors you applied. The pointer will look like the original system style again.
Selecting Pointer Size
Selecting the right pointer size improves visibility and comfort. A pointer that is too small can be hard to see. A pointer too large may block important screen details. Adjusting pointer size helps users with different vision needs. It also enhances your overall computer experience.
Selecting The Default Pointer Sizes
Windows offers several default pointer sizes. These range from small to extra-large. You can quickly switch between them in settings. The medium size works well for most users. Larger sizes help those with vision difficulties. Choose the size that feels easiest to follow on your screen.
How To Change Pointer Size In Settings
Open the Settings app on your PC. Go to the “Ease of Access” or “Accessibility” section. Find the “Mouse pointer” option. You will see size options with a slider or buttons. Drag the slider or click to increase or decrease the size. The pointer changes size immediately for quick feedback.
Tips For Choosing The Best Pointer Size
Try different sizes to see which one fits best. Use a size that stands out against your background. Avoid sizes that cover too much screen space. Keep your pointer visible but not distracting. Adjust size based on your screen resolution and distance from the display.
Applying The Inverted Pointer Option
Applying the inverted pointer option changes the mouse pointer color automatically. It helps the pointer stand out against any background. The pointer color flips to the opposite color of what is behind it. This makes the pointer easier to see in all situations.
The inverted option is useful for users with vision challenges. It works well on both light and dark screens. This feature is built into Windows and does not require extra software.
How To Enable The Inverted Pointer Option
Open the Settings app by pressing Windows + I keys. Click on “Ease of Access” or “Accessibility” settings. Find the “Mouse pointer” section in the menu. Select the “Inverted” pointer style from the available options.
The change happens instantly. Move the mouse pointer to check the new color effect. The pointer automatically adjusts based on the background color.
Benefits Of Using The Inverted Pointer
The inverted pointer improves visibility in all lighting conditions. It helps users find the mouse pointer quickly. It reduces eye strain during long computer use. The pointer color always contrasts with the screen behind it.
Who Should Use The Inverted Pointer Option
People with low vision or color blindness benefit from this feature. It is also helpful for users working in bright or dim environments. Anyone who struggles to see the default pointer can try the inverted style.
Installing Custom Cursor Themes
Installing custom cursor themes allows you to personalize your mouse pointer beyond standard color options. You can choose from many unique designs that suit your style or enhance visibility. This process makes your computer experience more enjoyable and tailored to your needs.
Custom cursor themes often come as downloadable files or packages. These themes can change the pointer’s shape, size, and color. Installing them is simple and does not require advanced technical skills.
Finding Custom Cursor Themes
Start by searching for cursor themes on trusted websites. Look for themes that are safe and compatible with your operating system. Popular sites offer free and paid options with various styles and colors.
Downloading And Extracting Cursor Files
Download the cursor theme package to your computer. Most themes come in a compressed file format like .zip or .rar. Use built-in tools or apps to extract these files to a folder you can easily access.
Installing Cursor Themes On Windows
Open the Control Panel and go to “Mouse” settings. Click the “Pointers” tab and then “Browse” to find your downloaded cursor files. Select each cursor role (normal select, busy, text select) and assign the new cursor files. Click “Apply” to save changes.
Using Third-party Software
Some programs help manage and install cursor themes easily. These apps offer extra features like animated cursors and sound effects. Always download software from reliable sources to avoid security risks.
Using Third-party Cursor Software
Using third-party cursor software offers more options to change your mouse pointer color. These programs provide unique styles and effects not found in standard system settings.
They allow you to customize the pointer’s size, shape, and color with ease. Some even add animations or sounds for a more personalized experience.
Choosing The Right Cursor Software
Select software that fits your needs and is easy to use. Look for programs with good reviews and regular updates. Avoid software that may slow down your computer or contain ads.
Installing And Setting Up The Software
Download the installer from the official website. Follow the on-screen instructions to complete installation. Open the software and explore the cursor options available.
Customizing Pointer Color And Style
Most programs let you pick colors from a palette or create custom shades. You can also change the pointer’s shape and add special effects. Save your settings to apply changes instantly.
Restoring Default Pointer Settings
To go back to the original pointer, use the software’s reset option. You can also uninstall the program to return to system defaults. Keep a backup of your favorite cursor styles for future use.
Tips For Better Visibility
Improving mouse pointer visibility helps reduce eye strain and increases productivity. Clear and distinct pointers make it easier to track movements on the screen. Small changes can make a big difference for users with vision challenges or those working in bright environments.
Applying a few simple tips enhances pointer visibility and comfort during daily computer use.
Use High-contrast Colors
Choose pointer colors that sharply contrast with your desktop background. Bright colors like yellow, green, or red often stand out well. Avoid colors similar to your wallpaper or icons to prevent blending in.
Increase Pointer Size
Larger pointers are easier to spot quickly. Most operating systems allow you to adjust pointer size in settings. Try medium or large sizes to see what feels best without blocking too much screen space.
Enable Pointer Trails
Pointer trails leave a short visual path behind the cursor as it moves. This effect can improve visibility by making the pointer’s path clearer. Adjust trail length to avoid distraction while enhancing tracking.
Try Inverted Pointer Option
Some systems offer an inverted pointer that changes color based on background brightness. This dynamic color switch improves visibility on varied screen content. It is especially helpful for users who switch between dark and light themes.
Test Custom Colors
Use custom color options to find a shade that works best for your eyes. Experiment with different tones and brightness to identify the most comfortable pointer color. This personalization can reduce visual fatigue over long use.
Troubleshooting Pointer Color Issues
Changing the mouse pointer color can improve visibility and comfort. Sometimes, the new color might not show correctly or revert to the default. Troubleshooting pointer color issues helps ensure the pointer stays easy to see. This section covers common problems and solutions.
Check Pointer Settings In Windows
Open Settings and go to the Mouse pointer section. Confirm the chosen pointer color is set to “Custom” or another option. If the pointer color resets, try selecting a different color and then return to your preferred one. Restarting the computer can also refresh the settings.
Update Or Reinstall Mouse Drivers
Outdated or corrupt mouse drivers can cause pointer color problems. Open Device Manager and find your mouse device. Right-click and select “Update driver.” If issues persist, uninstall the driver and restart the PC. Windows will reinstall the driver automatically, fixing many glitches.
Check For Conflicting Software
Some third-party apps may override pointer settings. Close programs that customize the cursor or add effects. Restart the computer and test the pointer color again. Uninstall or disable conflicting software if it blocks color changes.
Use Windows Accessibility Features
Try the “Inverted” pointer option in accessibility settings. It automatically adjusts the pointer color based on the background. This option improves visibility without manual color selection. It works well for users with vision difficulties or changing screen themes.
Reset Mouse Settings To Default
If the pointer color still has issues, reset all mouse settings. In the Mouse settings menu, choose to restore defaults. This clears any incorrect customizations. After resetting, customize the pointer color again carefully.
Credit: www.softwarehubs.com
Customizing Pointer On Other Operating Systems
Customizing the mouse pointer on different operating systems varies slightly. Each system offers unique ways to change the pointer color to suit your needs. This section covers how to adjust the pointer on macOS, Linux, and Chrome OS.
Changing Mouse Pointer Color On Macos
macOS allows pointer color changes through its accessibility settings. Open System Preferences, then click Accessibility. Select Display, then the Pointer tab. Here, you can change the pointer outline and fill colors. Choose colors that improve pointer visibility on your screen.
Customizing Pointer Color In Linux
Linux distributions often use different desktop environments, which affect pointer customization. In GNOME, open Settings and go to Accessibility. Look for the cursor or pointer options to change its color. KDE users can find similar settings under System Settings and Workspace Theme. Some distros support installing custom cursor themes for more color choices.
Adjusting Pointer Color On Chrome Os
Chrome OS has limited built-in options for pointer color changes. To customize, open Settings and go to Accessibility. Enable the “Highlight the mouse cursor” feature to make it easier to see. Users can also install Chrome extensions that offer extra pointer customization options.
Frequently Asked Questions
Can I Change The Color Of My Mouse Pointer?
Yes, you can change your mouse pointer color via your operating system’s settings. Go to Settings > Mouse pointer, then select a custom color or use the inverted option for better visibility. Third-party apps offer advanced pointer customization too.
How Do I Customize My Mouse Pointer?
Open your system settings and navigate to mouse or accessibility options. Choose pointer settings to change size, color, or style. Select a preset or custom color. Save changes to apply immediately. Some third-party apps offer advanced cursor effects and themes.
How To Change Mouse Rgb Color In Windows 11?
Open Settings in Windows 11, go to Accessibility > Mouse pointer and touch. Choose a pointer style, then pick or customize the RGB color. Changes apply instantly.
How To Change Cursor Color Shortcut Key?
Press Windows + I to open Settings. Go to Accessibility > Mouse pointer. Choose a new color under “Mouse pointer style. ” Changes apply immediately.
How Do I Change Mouse Pointer Color In Windows 10?
Open Settings > Ease of Access > Mouse pointer. Choose a new color under “Change pointer color. “
Can I Customize Mouse Pointer Color On Mac?
Mac allows pointer color changes via System Preferences > Accessibility > Display > Cursor.
What Are The Best Colors For Mouse Pointers?
High contrast colors like yellow, green, or white improve pointer visibility and reduce eye strain.
Does Changing Pointer Color Affect Mouse Speed?
Changing the pointer color does not change the mouse speed or sensitivity.
How To Reset Mouse Pointer Color To Default?
Go to mouse pointer settings and select the default white or black pointer option.
Can I Use Custom Colors For My Mouse Pointer?
Yes, select the “Custom” option in pointer settings and pick any color you like.
Conclusion
Changing your mouse pointer color is quick and simple. It helps you see the cursor better on your screen. You can pick a color that suits your style or needs. Windows makes this easy through its settings menu. Try different colors until you find the best one for you.
A clearer pointer can improve your computer experience. Give it a try today and notice the difference.