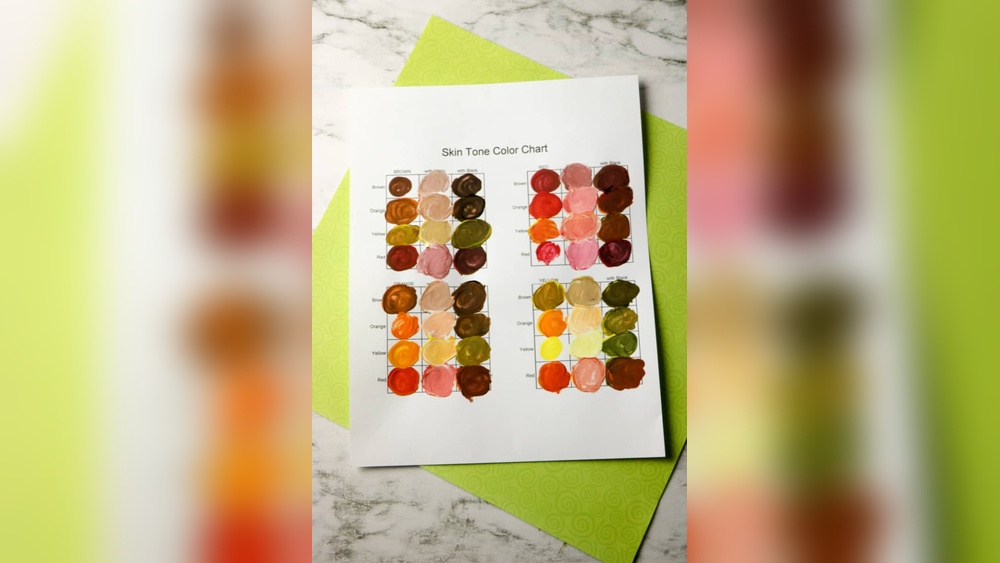
Are you ready to bring your artwork to life with realistic human skin colors? Mixing the perfect skin tone paint can feel tricky, but it doesn’t have to be.
With just a few basic colors and simple steps, you can create a wide range of natural-looking skin tones that match your vision. Whether you’re painting portraits, figures, or characters, understanding how to blend colors to capture the subtle variations in skin will instantly elevate your work.
Keep reading, and you’ll discover easy-to-follow tips and tricks that will make mixing human skin color paint a breeze for you. Your next masterpiece is just a mix away!
Essential Colors For Skin Paint
Creating human skin color paint requires knowing the essential colors. These colors form the base for realistic skin tones. Mixing them correctly helps capture the natural look of skin.
Start with primary colors and add earth tones. Each color plays a role in making the paint lifelike and balanced. Understanding these colors is key to achieving various skin shades.
Red
Red adds warmth and life to skin paint. It mimics blood flow under the skin. Use it sparingly to avoid making the tone too bright.
Yellow
Yellow brings brightness and warmth. It helps create a healthy glow. Mixing yellow with red forms the base of many skin tones.
Blue
Blue cools the skin tone and adds depth. Use it to create shadows or darker areas. A small amount balances the warmth of red and yellow.
White
White lightens the color and creates highlights. It adjusts the paint to match lighter skin tones. Use it to soften the mixture without losing vibrancy.
Burnt Sienna
Burnt sienna is an earth tone essential for natural skin. It adds richness and a subtle brown hue. This color helps create mid-tones and shadows.
Raw Umber
Raw umber deepens skin tones with a dark brown shade. It is useful for shadows and darker skin tones. Use it carefully to avoid making the paint too muddy.

Credit: smart.dhgate.com
Creating A Base Tone
Creating a base tone is the first step to making realistic human skin color paint. This tone acts as the foundation for adding highlights and shadows later. A good base tone matches the general warmth and lightness of the skin you want to paint. It should not be too bright or too dark but somewhere in the middle. Starting with the right base makes the rest of the painting easier and more natural.
Choosing The Right Primary Colors
Start with red, yellow, and white paint. These three colors create a warm base. Use more yellow for lighter skin tones. Add more red for pinkish or rosy tones. Mix small amounts of each color slowly. Test the mix on a palette before painting.
Mixing The Base Tone
Blend yellow and red first to get an orange shade. Add white to lighten the mix. Stir well to create a smooth color. Adjust by adding tiny amounts of red or yellow. Aim for a soft, even color that feels natural.
Adjusting Warmth And Depth
To make the skin tone cooler, add a small bit of blue or green. For warmer tones, add more yellow or a touch of burnt sienna. Darken the base tone with a little brown or burnt umber. Test the color often under natural light.
Lightening Skin Tones
Lightening skin tones in paint helps capture the natural look of human skin. It creates a soft, bright effect that adds depth to portraits. Adjusting the color carefully keeps the tone realistic and vibrant.
Use White Paint To Lighten
Start with a base skin tone mix. Slowly add small amounts of white paint. Mix well each time to avoid over-lightening. White brightens the skin tone without changing its warmth.
Incorporate Yellow For Warmth
Adding a touch of yellow keeps the skin tone warm. Yellow helps avoid a chalky or dull look. Use it sparingly to maintain a natural glow.
Balance With Red For Pinkish Hues
Mix in a tiny bit of red to add healthy pink undertones. Red mimics blood flow under the skin. This step brings life and softness to the color.
Adjust Slowly For Best Results
Lighten the skin tone in small steps. Too much white or yellow can make the paint look flat. Test the color on a palette before applying it to your artwork.

Credit: www.youtube.com
Darkening And Cooling Tones
Darkening and cooling tones are key steps in creating realistic human skin color paint. These tones add depth and natural variation to the skin. They help paint look less flat and more lifelike. Adjusting these tones allows you to depict shadows and cooler areas on the skin.
Using the right mix of colors is important for darkening and cooling skin tones. Small changes can make a big difference in the final look. Understanding how to balance these tones helps you create a wide range of human skin shades.
Adding Blue Or Green To Cool Skin Tones
Blue or green paints can cool skin tones effectively. Add very small amounts to avoid making the skin look unnatural. These colors help create shadows or cooler areas on the face. They mimic the cooler parts under the cheekbones or around the eyes.
Start by mixing a tiny bit of blue or green into your base color. Mix well and check the effect before adding more. This step keeps the skin tone balanced and realistic.
Using Burnt Umber Or Burnt Sienna To Darken Tones
Burnt umber and burnt sienna are excellent for darkening skin tones. They add warmth and depth without making the color too harsh. Mix a small amount into your base paint and blend thoroughly.
These earth tones help replicate natural shadows and darker skin areas. Use them gradually to control the darkness level. Avoid over-darkening to maintain a natural appearance.
Balancing With White For Softening
White paint softens darkened and cooled tones. It lightens the mix and makes the skin tone look smooth. Add white in small amounts after darkening or cooling the base color.
This balance helps keep the skin tone from becoming too intense. It also adds highlights and subtle brightness. Adjust white paint carefully to achieve the desired softness.
Adjusting With Earth Tones
Adjusting with earth tones is key to creating natural human skin color paint. These tones bring warmth and depth to your mix. Earth tones like burnt sienna, raw umber, and ochre help mimic real skin shades. They add subtle reds, browns, and yellows needed for realistic skin.
Start with a basic mixture of red, yellow, and white paint. Then, add small amounts of earth tones to adjust the color. This process lets you match different skin colors more easily. Earth tones also reduce the brightness of your paint, making it look more natural.
Using Burnt Sienna For Warmth
Burnt sienna is a reddish-brown earth tone. It adds warmth and richness to skin paint. Add it gradually to your base mix. This helps create a healthy, warm glow in your paint. Burnt sienna works well for medium to dark skin tones.
Adding Raw Umber To Deepen Shade
Raw umber is a dark brown earth tone. It darkens your paint without making it look flat. Use raw umber to add shadows and depth. A little goes a long way, so add it slowly. This tone is perfect for cool or olive skin shades.
Incorporating Yellow Ochre For Brightness
Yellow ochre is a muted yellow earth tone. It brings brightness and softness to your mix. Adding yellow ochre creates a warm, golden undertone. This is useful for lighter skin colors. It balances out redness and adds a natural glow.
Using Complementary Colors
Using complementary colors helps create natural and balanced skin tones. Complementary colors sit opposite each other on the color wheel. They can adjust the warmth or coolness of your paint. This technique adds depth and realism to skin color paint.
Complementary colors can mute overly bright tones. They also help fix skin colors that look too flat or fake. Learning to use them improves your painting skills.
What Are Complementary Colors?
Complementary colors are pairs that contrast strongly. For example, red and green or blue and orange. Using these pairs affects the tone of your paint. They bring harmony and make colors look more natural.
How To Use Complementary Colors In Skin Paint
Start with a base skin tone using red, yellow, and white. Add a tiny amount of the complementary color to adjust. For example, add a bit of green to reduce redness. This creates a softer, more realistic shade.
Balancing Warm And Cool Tones
Human skin has warm and cool areas. Use complementary colors to balance these tones. Add small touches of blue or green to warm tones. Add orange or red to cool tones. This keeps the skin looking lifelike and dynamic.
Tips For Mixing Complementary Colors Safely
Add complementary colors slowly. Too much can dull the paint. Mix in small amounts and test on paper. Adjust until you reach the perfect shade. Keep your colors fresh and vibrant for the best results.
Mixing For Different Skin Shades
Mixing paint to match different human skin shades requires a careful balance of colors. Each skin tone has unique undertones and hues. Understanding the basics helps you create a realistic look. Start with a base color, then adjust it to fit the skin shade you want. Small changes in color can make a big difference.
Use simple colors like red, yellow, and blue as your starting point. Earth tones such as burnt sienna or raw umber add natural warmth. White lightens the mix, while a touch of blue or green cools it down. Experiment with ratios to find the perfect shade for your painting.
Mixing Light Skin Tones
Begin with a base of white and a small amount of red and yellow. Add more white to keep the color pale and soft. Use a tiny bit of blue to cool down pinkish or peach tones. For a warmer look, increase yellow slightly. Avoid adding too much red, or the skin will look too bright.
Mixing Medium Skin Tones
Start with a balanced mix of red, yellow, and white. Add burnt sienna to bring warmth and depth. Adjust the red and yellow to match the undertones, such as peach or olive. A little blue can help to reduce redness. Keep testing small amounts to get the right balance.
Mixing Dark Skin Tones
Use burnt umber or burnt sienna as the base color. Add red and yellow to warm the tone. Mix in a small amount of blue or black to deepen the shade. Avoid too much white, which can make the color look gray. Focus on creating rich, earthy tones for realism.
Techniques For Realistic Texture
Creating realistic human skin color paint requires more than just mixing the right colors. The texture plays a key role in making the skin look natural. Realistic texture adds depth and life to your painting. It captures the subtle details of human skin, like pores, wrinkles, and soft shadows.
Different techniques help achieve these textures. Using the right brush strokes and layering methods can mimic the skin’s surface. Small details bring the paint to life and make it believable. Let’s explore some effective techniques for creating realistic skin texture.
Using Layered Glazes For Depth
Apply thin layers of paint called glazes to build skin depth. Each layer changes the color slightly. This creates a soft, glowing effect. Use transparent paints to keep earlier layers visible. Let each glaze dry before adding the next. This method mimics how light passes through skin layers.
Dry Brushing For Fine Details
Dry brushing uses a small amount of paint on a dry brush. Lightly drag it over the surface to add texture. This technique highlights small bumps and pores. Use it sparingly to avoid harsh marks. It works well for rough or uneven skin areas.
Stippling For Pore Effects
Stippling adds tiny dots of paint to mimic pores and freckles. Use a stiff brush or sponge for this. Dab gently on the skin areas needing texture. Vary the size and color of dots for realism. Stippling breaks up smooth paint and adds natural imperfections.
Soft Blending For Smooth Transitions
Blend colors softly to create smooth color shifts on skin. Use a clean, dry brush or a soft cloth to blend edges. This removes harsh lines between colors. Blending mimics the gentle color changes found in real skin. It helps paint look smooth and natural.
Incorporating Subtle Highlights And Shadows
Add small highlights and shadows to enhance skin texture. Use lighter tones for highlights on raised areas. Darker tones go into creases and shaded parts. This contrast brings volume and realism. Keep highlights soft to avoid a shiny look.
Common Mistakes To Avoid
Making human skin color paint requires care and attention. Mistakes can make your paint look unnatural. Avoiding these errors helps create realistic skin tones. Focus on the basics and keep your colors balanced. Watch out for these common pitfalls.
Using Too Much White
White paint lightens color but using too much makes skin look chalky. It removes warmth and depth from the tone. Add white gradually to keep a natural look.
Ignoring Undertones
Skin has warm, cool, or neutral undertones. Forgetting these causes flat or strange colors. Mix small amounts of red, yellow, or blue to match the undertone.
Mixing Colors Without Testing
Not testing your mix on paper leads to surprises. Paint a small sample first. Adjust the colors before applying to your artwork.
Overusing Primary Colors Only
Relying only on red, yellow, and blue makes dull skin colors. Earth tones like burnt sienna or raw umber add richness. Combine them for better results.
Not Adjusting For Light And Shadow
Skin color changes with light and shadow. Using one flat color loses depth. Mix lighter and darker shades to show curves and contours.
Tips For Consistent Results
Consistent skin color paint needs balanced mixing of red, yellow, and white tones. Test small batches to adjust shades gradually. Keep notes on your color ratios for easy replication next time.
Use A Standard Palette
Choose a few colors as your base. Stick to these colors for every mix. This helps maintain the same skin tone across paintings. Common base colors include red, yellow, white, and burnt sienna. Keep your palette consistent to avoid color shifts.
Measure Paints Carefully
Use small containers to mix your paints. Measure each color with a brush or palette knife. Avoid freehand mixing to keep proportions the same. Write down your mixing ratios for each shade. This practice ensures you can recreate the exact tone later.
Test On Paper First
Always test your mix on a scrap piece of paper. Let it dry before judging the color. Wet paint looks different than dry paint. Adjust your mix based on the dry test. This helps you get the perfect skin tone every time.
Keep Lighting Consistent
Work in the same light source for mixing and painting. Natural daylight is best for true color perception. Avoid changing light during your session. Different lighting can make colors appear different. Consistent lighting leads to more accurate results.
Mix Small Amounts
Mix only what you need for a session. Large batches can dry out or change color over time. Small mixes allow you to adjust tones easily. It also reduces paint waste. Keep your skin tone fresh and vibrant.
Store Mixed Paint Properly
If you need to save mixed paint, use airtight containers. Label each container with the date and color ratio. Store them in a cool, dark place. Proper storage keeps paint from drying or changing color. This helps you reuse mixes later without problems.

Credit: www.youtube.com
Frequently Asked Questions
How To Make Color Human Skin?
Mix red and yellow to create a base skin color. Add white to lighten and a small amount of blue to darken or cool the tone. Use burnt sienna or yellow ochre for earthy undertones. Adjust with purple or green for shadows and variations.
What Colors Make Skin Color Paint?
Mix red and yellow to create a base skin tone. Add white to lighten and a touch of blue to darken or cool it. Use burnt sienna or yellow ochre for earthy undertones. Adjust with purple or green for shadows and variations.
How To Make Realistic Skin Tones With Acrylic Paint?
Mix red and yellow for a base skin tone. Add white to lighten, blue or burnt sienna to darken or cool. Adjust with small amounts of purple, green, or brown for realistic undertones. Blend gradually for smooth, natural skin colors using acrylic paint.
How To Make A Tan Skin Color With Paint?
Mix red and yellow to create a base tan color. Add white to lighten and a touch of blue or burnt sienna to deepen or cool the tone. Adjust gradually for the perfect tan shade.
What Colors Are Needed To Make Human Skin Color Paint?
Mix red, yellow, and white for a base. Add blue or brown to adjust shade.
How Can I Make Skin Tone Paint Lighter Or Darker?
Add white to lighten. Use small amounts of red, blue, or brown to darken.
What Is The Best Way To Mix Skin Tones Accurately?
Start with primary colors and adjust by adding small amounts of complementary colors.
Can I Use Acrylic Paint To Make Skin Color?
Yes, acrylic paints mix well and dry fast, making them good for skin tones.
How Do I Create Different Human Skin Color Shades?
Change amounts of red, yellow, white, and add blues or browns for variation.
Why Add Blue Or Brown To Skin Tone Paint?
Blue cools the tone, making it more neutral. Brown adds warmth and depth.
Conclusion
Creating human skin color paint takes practice and patience. Start with basic colors like red, yellow, and white. Adjust tones by adding small amounts of blue or brown. Experiment to find the right shade for your artwork. Remember, every skin tone is unique and beautiful.
Keep mixing and testing until the color feels natural. This skill improves with time and careful observation. Enjoy the process and trust your eyes. Painting skin tones becomes easier with each attempt.