If you want your videos to look professional and eye-catching, learning how to color grade in Premiere is a must. Color grading can completely transform your footage, setting the mood and making your story more powerful.
Whether you’re working on a personal project or a commercial video, mastering this skill will help you grab your audience’s attention from the first frame. In this guide, you’ll discover simple, step-by-step techniques to enhance your colors, correct lighting issues, and create stunning visuals—all right inside Adobe Premiere Pro.
Ready to make your videos stand out? Let’s dive in and unlock the full potential of your footage.
Credit: ask.video
Premiere Pro Color Tools
Premiere Pro offers powerful color tools for enhancing your videos. These tools help adjust colors, contrast, and brightness easily. Using them, you can create a professional look for your footage. The Lumetri Color panel is the heart of color grading in Premiere Pro. It provides an intuitive interface with multiple sections to control different aspects of color.
Each tool in Premiere Pro serves a unique purpose in color correction and grading. Beginners and professionals alike benefit from these user-friendly options. Understanding these tools makes color grading faster and more effective. Let’s explore the main color tools available in Premiere Pro.
Lumetri Color PanelThe Lumetri Color panel is where most color grading happens. It divides color correction into sections like Basic Correction, Creative, Curves, Color Wheels, and HSL Secondary. Each section offers sliders and controls to adjust specific color parameters. This panel gives you real-time feedback on your adjustments.
Basic CorrectionBasic Correction lets you fix exposure, contrast, and white balance. Adjust temperature to make colors warmer or cooler. Use tint to remove green or magenta tones. The Auto button applies quick fixes using AI, saving time. Fine-tune these settings manually for the perfect look.
Creative SectionThe Creative section adds style to your footage. Apply LUTs (Look-Up Tables) to change the overall color mood. Adjust vibrance and saturation to make colors pop without losing detail. Use the faded film slider for a vintage look. This section helps give your video a unique feel.
Color Wheels & MatchColor Wheels control shadows, midtones, and highlights separately. Move each wheel to tint specific brightness areas. The Match feature helps match colors between different clips. It uses AI to balance shots for consistent color across your timeline. This tool is great for multi-camera projects.
CurvesCurves give precise control over color and contrast. The RGB curve adjusts brightness and contrast overall. Hue vs Hue and Hue vs Saturation curves let you tweak specific colors. Curves are ideal for detailed color work and special effects. They require practice but offer powerful control.
HSL SecondaryHSL Secondary isolates specific colors in your footage. Select a color range to adjust its hue, saturation, or luminance. This tool is useful for correcting skin tones or enhancing a single color. It helps create subtle or dramatic effects based on color selection.
Auto Color Correction
Auto Color Correction in Premiere simplifies the color grading process. It quickly fixes color and exposure issues using built-in AI. This tool is perfect for beginners and saves time for pros. You start with a decent base and adjust from there. The results look natural and balanced, improving your video’s overall look.
How To Access Auto Color Correction
First, select the clip you want to correct in the timeline. Then open the Lumetri Color panel by choosing Window > Lumetri Color. Inside the panel, find the Basic Correction section. Click the Auto button to let Premiere analyze your clip. The software adjusts color, contrast, and exposure automatically.
Adjusting Auto Correction Intensity
After auto correction, you can control how strong the effect is. Use the Intensity slider below the Auto button. Slide left to reduce the effect or right to increase it. This feature helps you get the look you want without overdoing it. It keeps your video natural and easy on the eyes.
Manual Fine-tuning After Auto Correction
Auto correction is a great start but may need tweaks. Adjust sliders like Temperature, Tint, Exposure, and Contrast manually. These controls let you perfect skin tones, fix lighting, and enhance colors. Small changes can make a big difference in the final video quality.
Basic Correction Controls
Basic Correction Controls are the first step in color grading your video in Premiere Pro. These controls help fix the overall look of your footage. They adjust color balance, exposure, and contrast to create a clean base for further grading.
Using Basic Correction Controls, you can quickly improve the colors and brightness. This makes the image look more natural and pleasing to the eye. Each control works on a specific part of the image, so understanding them is key.
Exposure
Exposure adjusts the brightness of your video. Increasing exposure makes the image lighter. Decreasing it makes the image darker. Use this control to fix videos that are too dark or too bright.
Contrast
Contrast changes the difference between the light and dark areas. Higher contrast makes shadows darker and highlights brighter. Lower contrast creates a softer, flatter look. Adjust contrast to add depth and detail to your footage.
Highlights
Highlights control the brightest parts of your video. Lowering highlights recovers details in bright areas. Raising highlights makes bright areas pop more. This control helps balance bright spots without affecting the whole image.
Shadows
Shadows adjust the dark areas of your video. Increasing shadows brightens dark details. Decreasing shadows makes shadows deeper and richer. This helps reveal hidden details or create mood in shadow areas.
Whites
Whites set the brightest white point in the image. Adjusting whites affects overall brightness and contrast. Raising whites makes the image appear more vivid. Lowering whites can prevent bright parts from clipping.
Blacks
Blacks set the darkest black point in the image. Raising blacks lightens dark areas and reduces contrast. Lowering blacks deepens blacks for a stronger look. Use this to control the depth and mood of your video.
Temperature
Temperature changes the color tone from cool to warm. Moving the slider left adds blue tones (cool). Moving it right adds orange tones (warm). This sets the overall mood and feel of your video.
Tint
Tint adjusts the green to magenta balance. Slide left for more green, right for more magenta. Use this to correct color casts or add creative color effects.
Using Lumetri Color Panel
The Lumetri Color Panel in Adobe Premiere Pro offers a simple way to color grade your videos. It provides all the tools needed to adjust color, light, and tone in one place. Using this panel helps create a polished and professional look for your footage.
This panel is easy to access and designed for quick edits. It suits beginners and experienced editors alike. You can make changes that instantly show on your video, allowing you to see results in real time.
Opening The Lumetri Color Panel
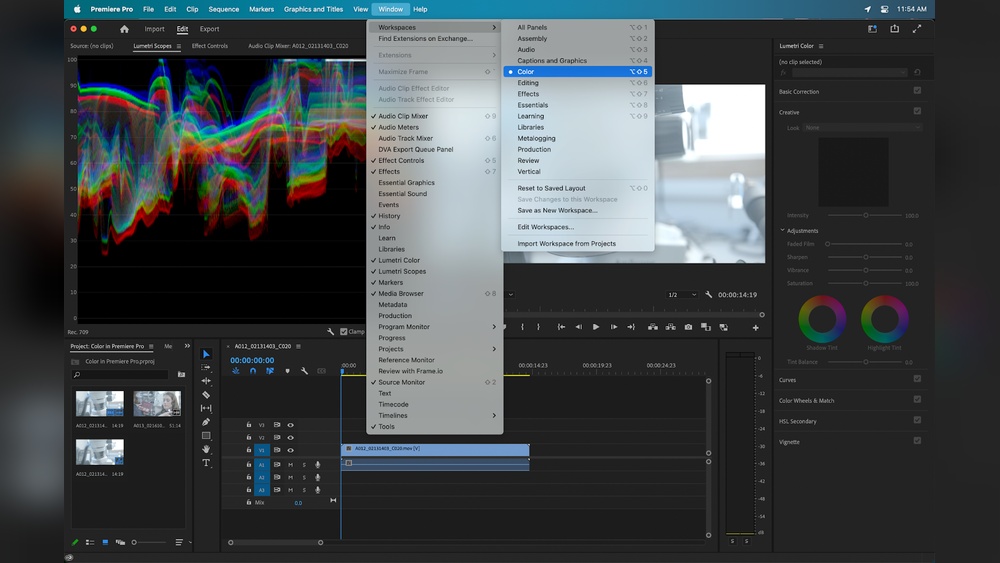
Start by selecting your clip on the timeline. Then go to Window > Lumetri Color to open the panel. It will appear on the right side of your screen. If you do not see it, check if the workspace is set to Color.
Using The Basic Correction Section
The Basic Correction tab is where you begin color grading. Adjust white balance by changing Temperature and Tint. Use Exposure, Contrast, Highlights, and Shadows sliders to fix lighting issues. The Auto button can also apply instant corrections.
Adjusting Creative Looks
The Creative section lets you add style to your video. Choose from built-in Look presets for different moods. Use the Intensity slider to control the effect strength. You can also tweak Vibrance and Saturation for richer colors.
Refining With Curves And Color Wheels
Curves allow precise control over brightness and color. Use the RGB curves to adjust tones or the Hue vs Hue curve to shift specific colors. Color Wheels help balance shadows, midtones, and highlights separately for better color harmony.
Adding Vignette For Focus
The Vignette tab creates a darkened border around your video. Adjust Amount, Midpoint, Roundness, and Feather to soften edges. This effect draws the viewer’s eye to the center of the frame and adds a cinematic touch.
Applying Luts For Style
Applying LUTs for style is a quick way to give your video a unique look. LUTs, or Look-Up Tables, change colors and tones all at once. They help create moods like warm sunsets or cool, moody scenes. Using LUTs saves time and adds professional flair to your projects.
Premiere Pro makes it easy to apply and adjust LUTs. You can experiment with different styles fast. This lets you focus on storytelling rather than complex color tweaks.
What Are Luts And Why Use Them?
LUTs are preset color profiles for videos. They transform the colors of your footage instantly. Many filmmakers use LUTs to achieve consistent looks across scenes. They give your video a polished, cinematic feel. You can find free and paid LUTs online for various styles.
How To Apply Luts In Premiere Pro
Start by selecting your clip on the timeline. Open the Lumetri Color panel through Window > Lumetri Color. Go to the Creative tab inside the panel. Find the Look dropdown menu and click it. Choose a LUT from the list or import your own by clicking Browse. The LUT will apply immediately to the clip.
Adjusting Lut Intensity For Best Results
Sometimes LUTs can be too strong. Use the Intensity slider in the Creative tab to reduce the effect. Lowering intensity keeps your footage natural but stylish. You can also tweak settings like Contrast, Saturation, and Highlights below the LUT. These adjustments help fine-tune your desired look.
Credit: blog.frame.io
Adjustment Layers Setup
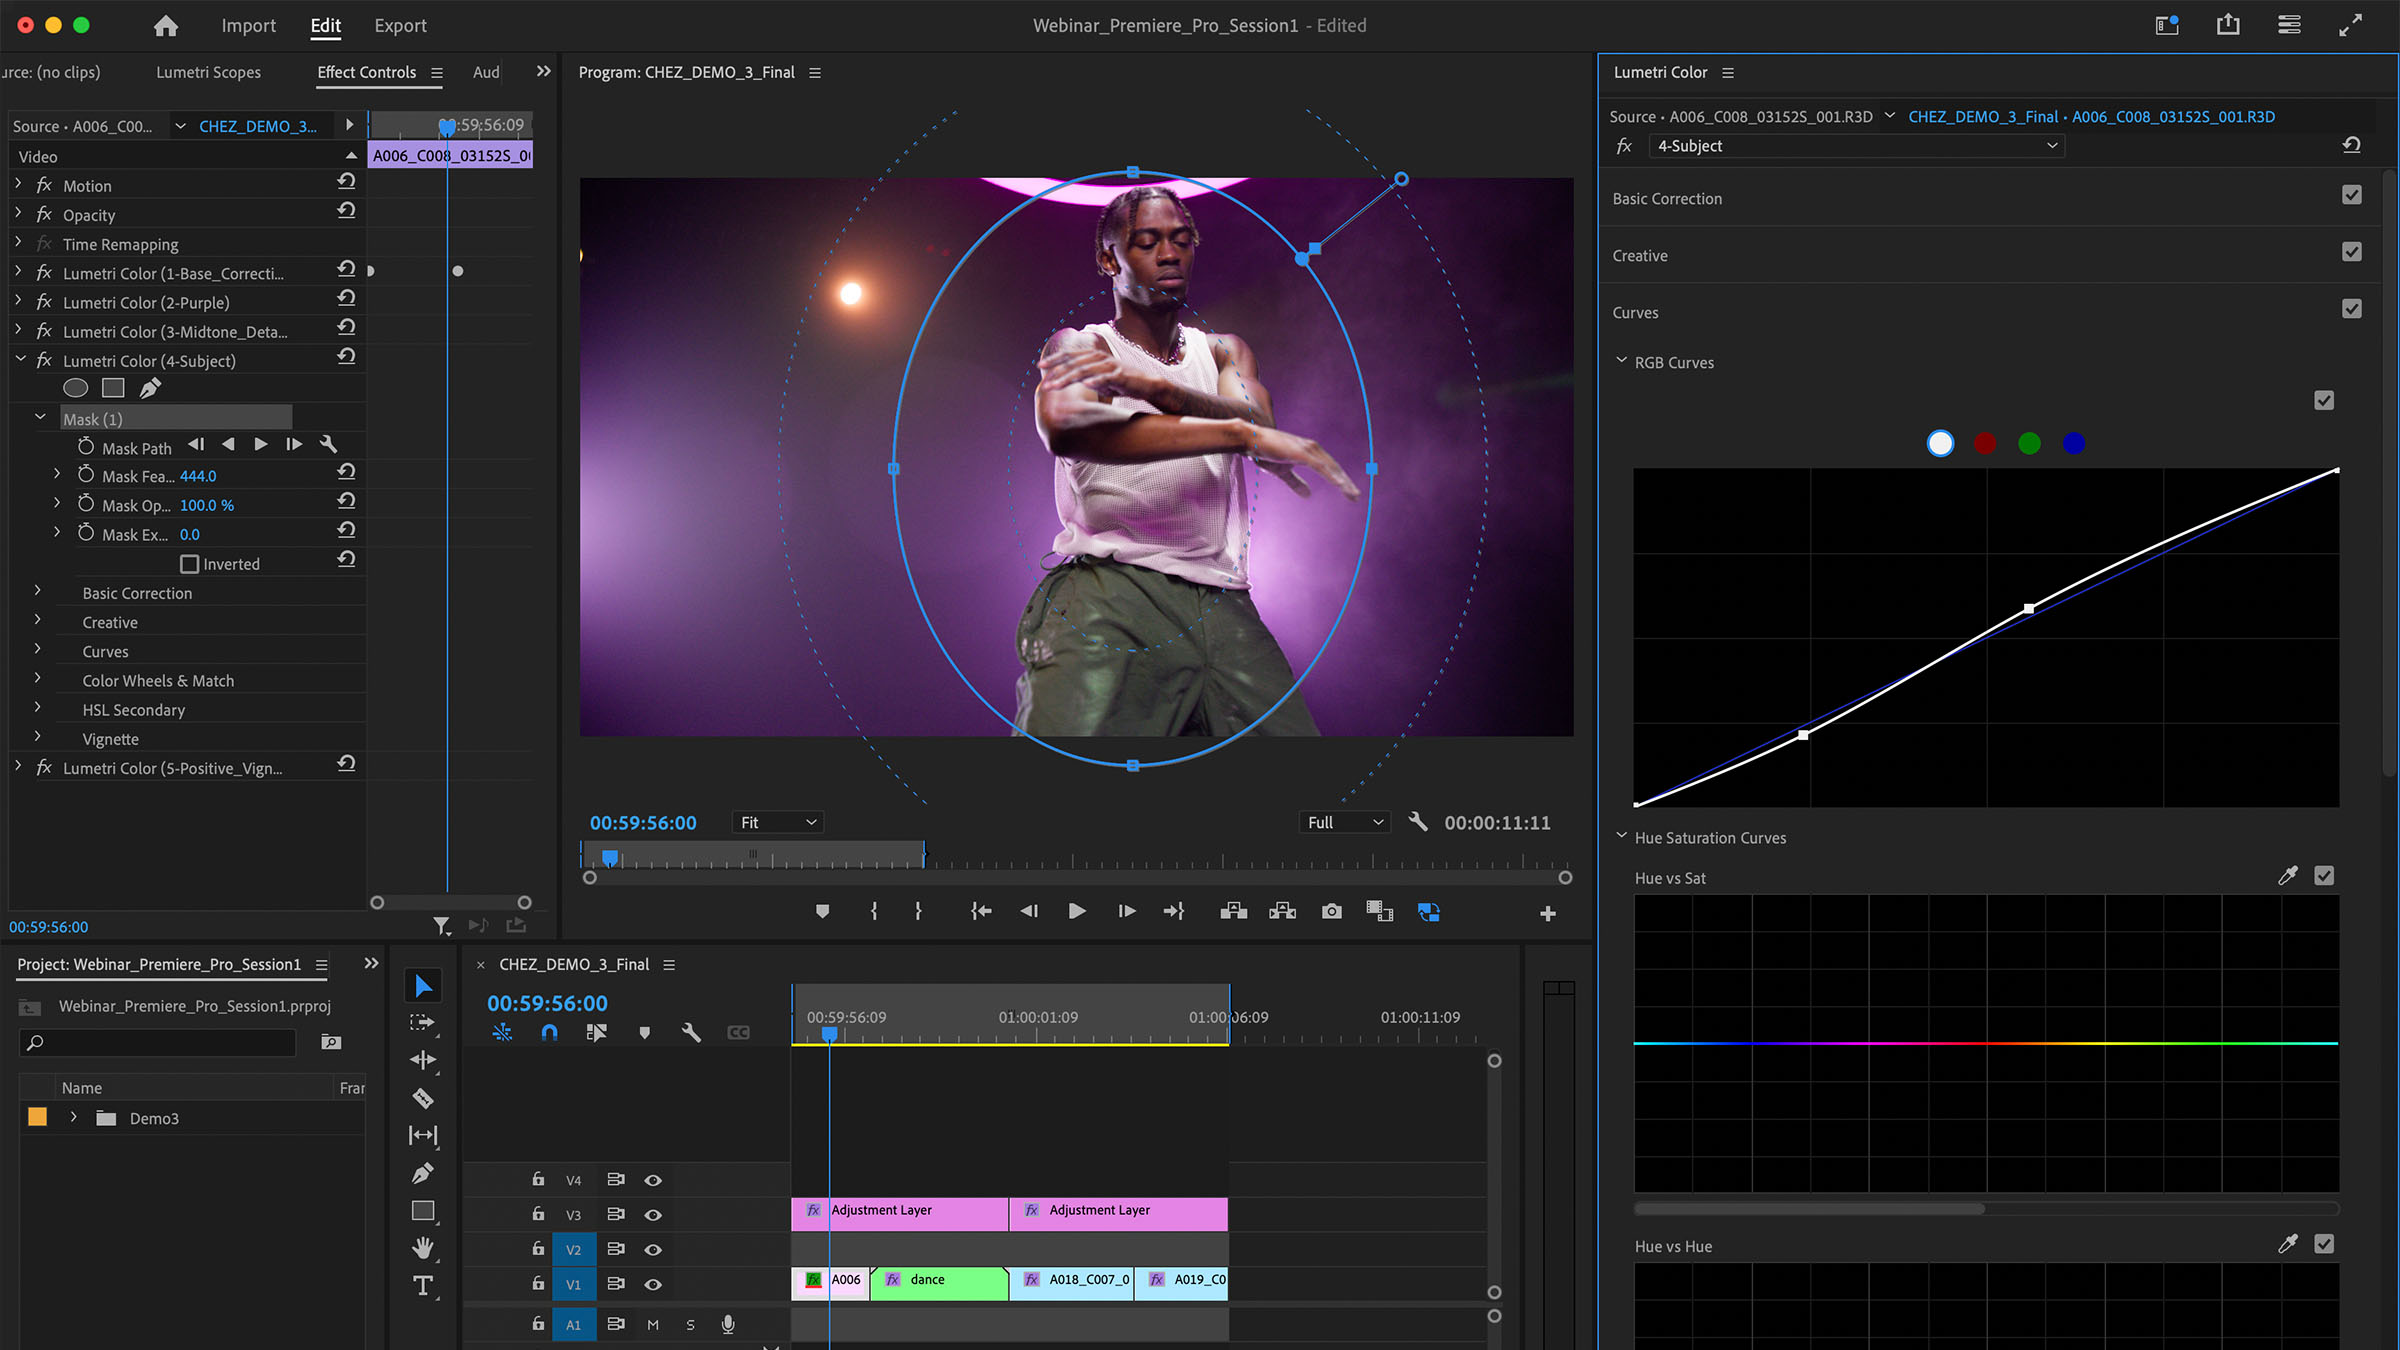
Using adjustment layers in Premiere Pro simplifies the color grading process. It lets you apply effects to multiple clips at once. This method saves time and keeps your project organized. Adjustment layers create a flexible workspace for experimenting with looks.
Setting up adjustment layers correctly is the first step to smooth color grading. This setup allows you to control colors without changing the original clips. You can tweak settings anytime without damage to your footage.
Creating An Adjustment Layer
Open the Project panel in Premiere Pro. Click the New Item icon and select Adjustment Layer. Confirm the settings match your sequence’s resolution and frame rate. Drag the new adjustment layer onto the timeline above your clips.
Placing The Adjustment Layer On The Timeline
Extend the adjustment layer to cover the clips you want to grade. You can layer several adjustment layers for different effects. Make sure the adjustment layer is above the clips, so it affects them properly.
Applying Color Grading Effects
Select the adjustment layer on the timeline. Open the Lumetri Color panel from the Window menu. Apply your desired color corrections or creative looks. The changes will affect all clips under the adjustment layer.
Editing And Fine-tuning
Adjust the settings on the adjustment layer anytime. You can add more adjustment layers for specific scenes or shots. This setup keeps your workflow flexible and non-destructive.
Refining With Curves
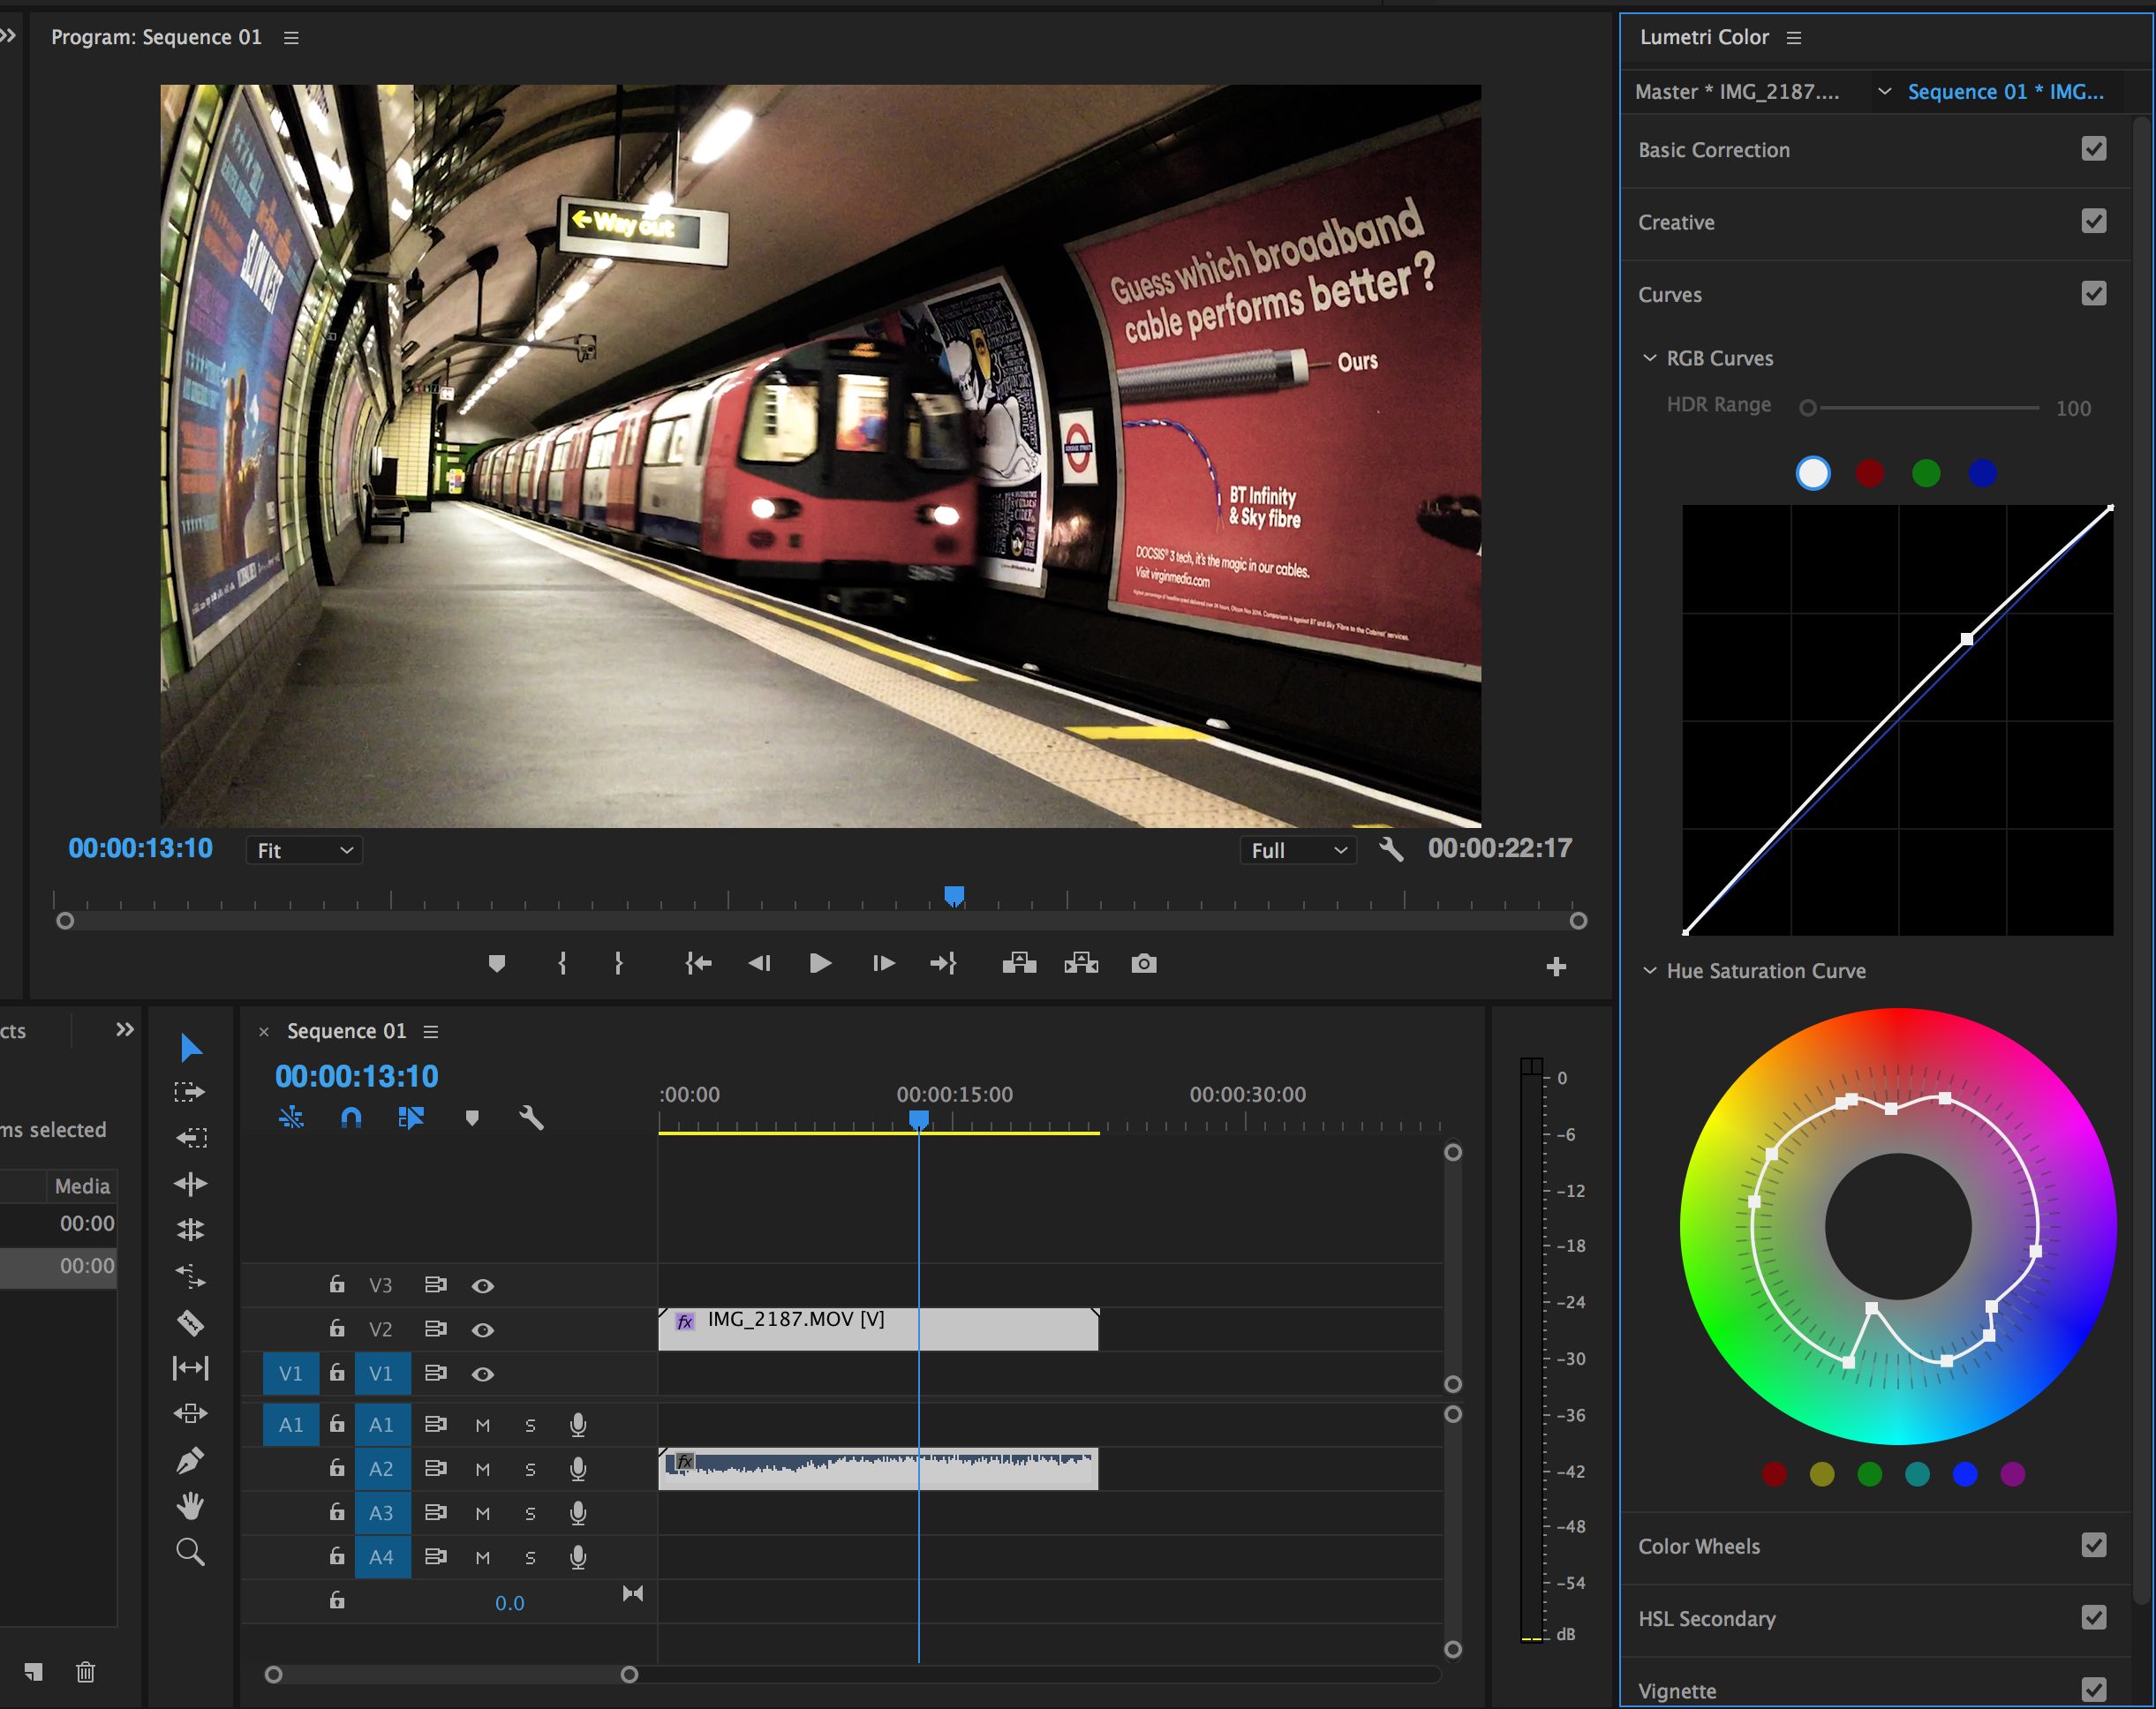
Refining with curves is a key step in color grading within Premiere Pro. It allows you to adjust the brightness and color balance with precision. Curves give control over shadows, midtones, and highlights. This helps create a balanced and polished look for your footage.
Using curves can enhance contrast and color tones subtly or dramatically. The tool is visual and easy to understand once you get the hang of it. It works by modifying the input and output levels of the image.
Understanding The Curves Interface
The curves panel shows a diagonal line on a grid. This line represents the current brightness and color values. Dragging the line changes how light or dark parts of the image appear. You can adjust the overall brightness or target specific color channels like red, green, or blue.
Adjusting The Rgb Curve
The RGB curve affects the image’s luminance. Pull the curve up to brighten the image and down to darken it. Add points on the curve to adjust shadows, midtones, and highlights separately. This lets you create a custom contrast that fits your style.
Modifying Color Channels
Select individual color channels to change color balance. For example, increasing red in shadows adds warmth. Lowering blue in highlights can soften bright areas. Small changes here can fix color casts or create creative effects.
Using Curves For Contrast
Create an S-shaped curve to add contrast. Pull down the shadows point and push up the highlights point. This makes dark areas darker and light areas lighter. It gives depth and sharpness to your footage.
Tips For Smooth Curve Adjustments
Make small, gradual changes for natural results. Avoid sharp bends that cause color banding. Use multiple points to control the curve shape. Keep checking your image to avoid unwanted color shifts.
Color Wheels For Balance
Color wheels help adjust shadows, midtones, and highlights to create a balanced look in Premiere. Using them, you can fix color casts and enhance mood easily. Each wheel targets a specific tone, making grading precise and smooth.
Understanding Color Wheels
Color wheels help adjust the color tone in your video. They control shadows, midtones, and highlights separately. This control brings balance and mood to your footage.
Each wheel lets you shift colors toward a specific hue. For example, you can add blue to shadows or warm up highlights with orange. These changes affect how the scene feels to the viewer.
Using Color Wheels For Shadows
Shadows are the darkest parts of your video. Use the shadow wheel to add color or correct unwanted tints there. Small changes can make shadows look natural or dramatic.
Lower the brightness to deepen shadows. Then, move the shadow wheel toward the color that fits your style. Avoid overdoing it to keep details visible.
Adjusting Midtones With Color Wheels
Midtones hold most of the image’s details and skin tones. The midtone wheel helps balance these important colors. Use it to make skin look healthy and natural.
Shift the midtones slightly to correct color casts. For instance, add warmth for a sunny look or cool tones for a calm mood. Keep changes subtle for realism.
Enhancing Highlights Using Color Wheels
Highlights are the brightest parts of the image. Use the highlight wheel to add glow or color accents. This step helps brighten skies, lights, or reflections.
Increase brightness to make highlights pop. Then adjust the color to match the scene’s atmosphere. Soft yellows create warmth, while blues add coolness.
Balancing Overall Color With Color Wheels
Balance all three wheels to create a unified look. Adjust shadows, midtones, and highlights until colors feel natural. This balance improves the video’s visual appeal.
Check your work on different screens if possible. Proper balance makes videos look good on phones, computers, or TVs. Color wheels are key to this harmony.
Creative Looks And Presets
Creative Looks and Presets in Adobe Premiere simplify color grading. They offer ready-made styles that change your video’s tone quickly. Instead of starting from scratch, you can apply these presets to get a professional look instantly.
These presets save time and help maintain consistency across your project. You can adjust them further to match your vision. They work well for beginners and experienced editors alike.
What Are Creative Looks?
Creative Looks are preset color styles available in the Lumetri Color panel. They change color, contrast, and mood in one click. Each look offers a unique style, such as vintage, cinematic, or vibrant.
Applying a Creative Look can give your footage a polished feel. You can tweak it to fit your video’s style or keep it as is for a quick upgrade.
How To Apply Presets In Premiere Pro
First, select your clip on the timeline. Open the Lumetri Color panel by clicking Window > Lumetri Color. Go to the Creative tab within this panel.
Scroll through the Looks dropdown to see the available presets. Click one to apply it to your clip. Adjust the Intensity slider to control the effect strength.
Customizing Creative Looks
After applying a preset, you can customize it. Use the sliders for contrast, saturation, and temperature. Adjust these to better suit your footage.
You can also combine presets with other Lumetri tools. For example, use Basic Correction to fix exposure before applying a look.
Saving Your Own Presets
Create a color grade you like? Save it as a custom preset for future use. In the Lumetri Color panel, click the three dots and select Save Preset.
Name your preset and save it. It will appear in the Effects panel under Presets. This speeds up editing on future projects.
Tips For Faster Grading
Color grading can be time-consuming without the right approach. Faster grading saves time and keeps your workflow smooth. Simple techniques help you achieve good results quickly. Follow these tips to speed up your color grading process in Premiere Pro.
Use Adjustment Layers
Adjustment layers apply color changes to multiple clips at once. This avoids grading each clip individually. Create one adjustment layer and place it above your clips. Apply color effects to the adjustment layer. This method ensures consistency and saves editing time.
Apply Presets And Luts
Presets and LUTs provide ready-made color styles. Use them as a base for your grading work. Premiere Pro includes many presets in the Lumetri Color panel. Import third-party LUTs to expand your options. Adjust the intensity to fit your video’s look.
Use The Auto Color Feature
The Auto button in Lumetri Color offers a quick fix. Premiere Pro analyzes your clip and applies basic corrections automatically. This is a great starting point for further manual adjustments. It speeds up the initial grading step significantly.
Organize Clips With Color Labels
Label clips by scene or type using color labels in the timeline. This helps identify which clips need similar grading. Grouping clips reduces the chance of missing any during color adjustments. It also helps maintain a smooth and efficient workflow.
Save Custom Presets
Create your own color grading presets after adjustments. Save these presets for future projects. This reduces repetitive work on similar videos. Custom presets keep your style consistent and make grading faster every time.

Credit: www.youtube.com
Frequently Asked Questions
Is Adobe Premiere Pro Good For Color Grading?
Adobe Premiere Pro offers powerful, professional color grading tools through its Lumetri Color panel. It supports both automatic and manual adjustments for precise results.
How Do You Auto Color Grade In Premiere Pro?
To auto color grade in Premiere Pro, select your clip, open the Lumetri Color panel, and click the Auto button in Basic Correction. Adjust the Intensity slider to control the effect and fine-tune settings manually if needed for better results.
Does Premiere Pro Have Color Grading Presets?
Yes, Premiere Pro offers built-in color grading presets called Lumetri Looks. Users can apply and customize these for quick grading.
How To Apply Color Grade To All Clips In Premiere Pro?
To apply color grade to all clips in Premiere Pro, create an adjustment layer, place it above clips, then apply Lumetri Color effects to it.
What Is Color Grading In Premiere Pro?
Color grading enhances video colors to create a specific look or mood using Premiere Pro tools.
How Do I Start Color Grading In Premiere?
Open the Lumetri Color panel and select your clip on the timeline to begin grading.
Can I Auto Color Grade Clips In Premiere?
Yes, use the Auto button in Lumetri Color’s Basic Correction to apply quick fixes.
What Are The Main Tools For Color Grading?
Lumetri Color panel offers Basic Correction, Creative, Curves, Color Wheels, and HSL Secondary tools.
How Do I Adjust Brightness And Contrast?
Use the Basic Correction section in Lumetri Color to tweak Exposure and Contrast sliders.
What Is The Best Way To Fix Skin Tones?
Use the HSL Secondary tool to isolate and adjust skin color precisely.
Conclusion
Color grading in Premiere Pro can greatly improve your videos’ look. Start with the Lumetri Color panel and explore its tools. Use auto correction to save time, then adjust settings to fit your style. Practice often to gain confidence and develop your own techniques.
Small changes make big differences in mood and tone. Keep your edits simple and clear for the best results. With patience, your videos will look professional and polished. Color grading is a skill anyone can learn with some effort. Enjoy the creative process and keep experimenting.