
Have you ever found yourself straining to spot your mouse cursor on the screen? Changing its color can make a huge difference in visibility and ease of use.
Whether you want a bright, bold cursor that stands out or a subtle shade that matches your personal style, customizing your mouse pointer is easier than you think. In this guide, you’ll learn simple, step-by-step ways to change your mouse cursor color on Windows.
By the end, you’ll have a cursor that not only catches your eye but also enhances your overall computer experience. Ready to make your cursor truly yours? Let’s dive in!
Change Cursor Color In Windows Settings
Changing the mouse cursor color in Windows Settings helps improve visibility and personalizes your computer. Windows offers simple options to adjust cursor color and size without extra software.
Follow these steps to customize the cursor directly within Windows. The process works on most recent Windows versions and requires only a few clicks.
Access Mouse Pointer Settings
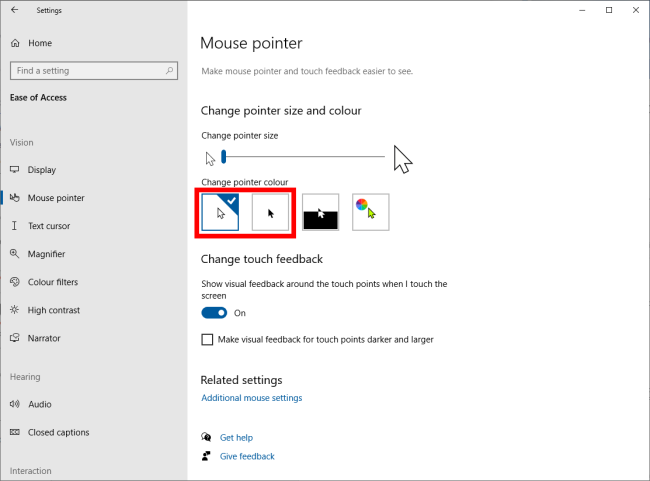
Open the Start menu and click on Settings. Choose Accessibility from the menu. Next, select Mouse pointer and touch. This section controls your mouse pointer’s appearance.
Choose A Cursor Color
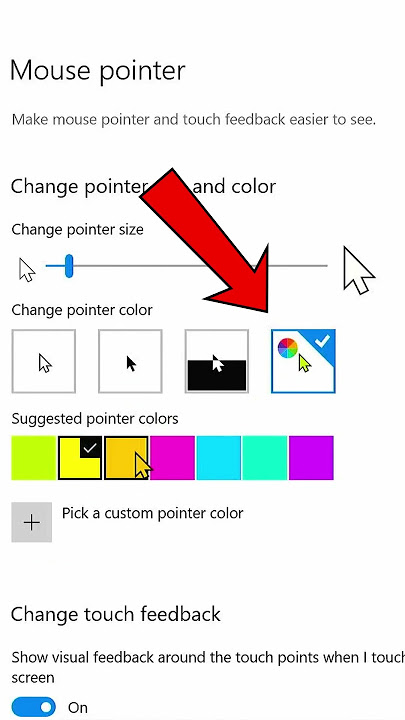
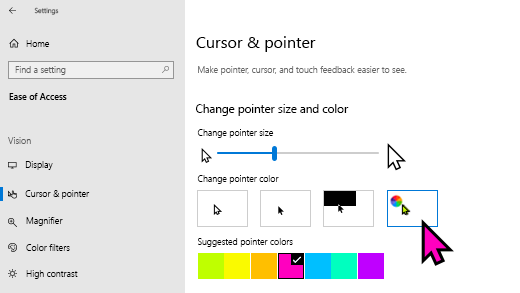
Windows gives several color options for the cursor. Pick from white, black, inverted, or a custom color. To use a custom color, click the color wheel and select any shade you prefer.
Adjust Cursor Size
Use the slider below the color options to change the pointer size. Move it left for smaller or right for larger. Find a size that fits your screen and comfort level.
Apply And Test Changes
After selecting color and size, the changes apply immediately. Move your mouse to see the new cursor style. Adjust again if needed for better visibility or comfort.
Credit: mcmw.abilitynet.org.uk
Adjust Cursor Size Easily
Adjusting the cursor size improves visibility and comfort. It helps users see the pointer better on different screens.
Changing cursor size is simple and quick. You can do it through your computer’s settings without extra software.
Adjust Cursor Size In Windows Settings
Open the Start menu and select Settings. Next, click on Accessibility, then choose Mouse pointer and touch. Here, use the slider to increase or decrease the pointer size. The change applies immediately, allowing you to find the perfect size easily.
Use Additional Mouse Options For More Control
Go to Start > Settings > Devices > Mouse. Click on Additional mouse options to open the Mouse Properties window. Select the Pointers tab to choose a different pointer scheme. You can also browse and select custom pointer files for a unique look and size.
Quick Access Via Search
Type “Mouse” in the Start menu search box and select Mouse settings. From there, click Additional mouse options. This method quickly opens the Mouse Properties window for size and style adjustments.
Use Mouse Properties For More Options
The Mouse Properties window offers more ways to change your mouse cursor color. It provides detailed options beyond basic settings. You can select different cursor schemes or customize each pointer icon.
This method works well for users who want more control. It lets you browse and apply new cursor files. Also, you can adjust the cursor size and style in one place.
Open Mouse Properties On Windows
Press the Start button and type “Mouse” in the search box. Click on “Mouse settings” from the results. Scroll down and select “Additional mouse options.” This opens the Mouse Properties window.
Use The Pointers Tab To Change Cursor Color
In Mouse Properties, go to the “Pointers” tab. Here, you see a list of pointer roles like Normal Select, Busy, and Text Select. You can change each pointer’s color by clicking “Browse” and choosing a new cursor file.
Apply A Pre-set Cursor Scheme
Mouse Properties offers pre-set cursor schemes that change color and style. Select a scheme from the drop-down menu under the “Scheme” section. Click “Apply” to see how it looks. Pick one that suits your preference.
Customize Individual Cursor Icons
Click on any pointer role in the list to customize it. Press “Browse” to open the cursor file folder. Choose a cursor file with your desired color. Repeat for other pointers to create a unique look.
Save Your Custom Cursor Scheme
After customizing, click “Save As” to name your new scheme. This lets you switch back to it anytime. It helps keep your favorite cursor colors and styles ready to use.
Download Custom Cursor Themes
Changing your mouse cursor color is simple through your system settings. Choose from preset colors or pick a custom shade to suit your style. Downloading custom cursor themes adds new designs and colors for a fresh look.
Where To Find Custom Cursor Themes
Custom cursor themes are available on many websites. Some sites offer free downloads, while others sell premium packs. Choose a trusted source to avoid malware or poor quality files. Popular sites include DeviantArt, RW-Designer, and Cursor.cc.
These platforms host thousands of cursor designs. You can find themes that match your style or mood. Themes range from simple color changes to animated cursors. Download the one that fits your needs.
How To Download Cursor Themes Safely
Before downloading, check user reviews and ratings. Avoid files with many negative comments. Use antivirus software to scan downloads. Save cursor themes in a dedicated folder for easy access. This helps keep your system organized and secure.
Installing Custom Cursor Themes On Windows
Locate the downloaded cursor files, usually ending in .cur or .ani. Open the Control Panel and go to Mouse settings. Click the Pointers tab, then browse to the new cursor files. Apply the theme and test the new cursor to ensure it works well.
You can save the new scheme for future use. This process changes your cursor color and style quickly. It also offers a personalized look beyond basic system options.
Install And Apply Cursor Packs
Installing and applying cursor packs gives your mouse pointer a fresh, personalized look. Cursor packs contain sets of cursor designs with different colors and styles. Using these packs lets you quickly change your cursor’s color and shape beyond the default system options.
Many cursor packs are easy to install and apply. They often come with instructions or setup files. After installation, you can select the new cursor style through your system settings. This method works well for Windows users who want more color choices and unique cursor themes.
Download Cursor Packs From Trusted Sources
Start by searching for cursor packs from safe websites. Choose packs that match your color preference. Avoid downloading files from unknown or suspicious sites. Look for reviews or ratings to ensure quality and safety.
Install Cursor Packs On Your Computer
Most packs come as a compressed file. Extract the files using a tool like WinRAR or 7-Zip. Some cursor packs include an installer. Run the installer and follow the instructions. For manual installation, copy the cursor files to the Cursors folder in the Windows directory.
Apply New Cursor Packs Via Mouse Settings
Open Control Panel and go to Mouse settings. Select the “Pointers” tab. Click “Browse” to find the new cursor files you installed. Assign each cursor role to the new colored cursor you want. Click “Apply” and then “OK” to save changes.
Test Your New Cursor Colors
Move your mouse to see the new cursor colors in action. Check that all cursor states (loading, text select, etc.) changed correctly. Adjust if needed by returning to the Pointers tab. Enjoy the refreshed look that suits your style.
Create And Save Custom Cursor Schemes
Creating and saving custom cursor schemes lets you personalize your mouse pointer easily. You can pick colors and styles that suit your taste and save them for future use. Custom schemes improve visibility and add a unique touch to your desktop.
Designing your own cursor scheme involves choosing pointer colors, sizes, and shapes. After customizing, saving the scheme ensures quick access whenever needed. This section explains how to create and save these custom cursor schemes step-by-step.
Create A New Cursor Scheme
Open the Mouse Properties window by searching “Mouse” in the Start menu. Click on the “Pointers” tab to see current schemes. Click “Browse” to pick new cursor files or change colors. Select each pointer role and customize it to your liking.
Customize Cursor Colors And Sizes
Use the Settings app to change pointer color and size. Navigate to Settings > Accessibility > Mouse pointer and touch. Pick a preset color or choose a custom one. Adjust the pointer size using the slider for better visibility.
Save Your Custom Scheme
After customizing, click “Save As” in the Pointers tab. Enter a name for your new scheme that is easy to remember. Click “OK” to save the scheme for future use. Your custom cursor scheme will appear in the list.
Apply And Manage Cursor Schemes
Select your saved scheme anytime from the Mouse Properties window. Click “Apply” to activate the chosen cursor style. You can delete or rename schemes by managing cursor files. Keep your favorite schemes handy for quick changes.
Customize Individual Cursor Pointers
Customizing individual cursor pointers lets you personalize each cursor state. Each pointer shape shows different actions on your screen.
Changing color or style for each pointer helps improve visibility. This makes it easier to know what your mouse is doing.
Access The Mouse Properties Window
First, open the Mouse Properties window. Search for “Mouse” in the Start menu and select Mouse settings.
Click on “Additional mouse options” to open the Mouse Properties window. This is where you can customize each pointer.
Navigate To The Pointers Tab
In Mouse Properties, select the “Pointers” tab. This tab shows all the different cursor types used by Windows.
Each pointer type has a specific role, like “Normal Select” or “Busy.” You can change each one separately here.
Select And Customize Individual Cursors
Click on a pointer type to select it. Then, click “Browse” to choose a new cursor file.
Choose a cursor color or style from the list or download custom cursor files online. This changes only that pointer.
Repeat for each pointer to fully customize your mouse experience.
Credit: www.youtube.com
Change Cursor Color On Macos
Changing the mouse cursor color on MacOS helps improve visibility and personalizes your experience. The system offers easy settings to adjust the cursor color and size. These adjustments enhance accessibility and make navigation simpler for everyone.
Follow simple steps to customize your cursor color without extra software. MacOS provides built-in tools for a quick and effective change.
Open System Settings On Macos
Click the Apple menu at the top left of your screen. Select “System Settings” from the dropdown menu. This opens the main settings panel for your Mac.
Go To Accessibility Options
In System Settings, find and click “Accessibility.” This section contains features to improve usability for all users. Scroll down to locate the “Display” settings within Accessibility.
Adjust Cursor Color And Size
Under “Display,” look for the “Pointer” section. You will see options to change the cursor color and outline color. Choose the colors that suit your preference or need.
Use sliders to increase or decrease the cursor size. This makes the pointer easier to see on different backgrounds.
Save Changes And Test
After selecting your desired colors and size, close the settings window. Move your mouse to check the new cursor appearance. Adjust again if necessary to get the best visibility.
Browser Extensions For Cursor Customization
Browser extensions offer a simple way to customize your mouse cursor directly within your web browser. These tools let you change the cursor’s color, shape, and size without altering your system settings. They work on popular browsers like Chrome and Firefox, making cursor customization quick and accessible.
Many extensions come with a variety of cursor options. Some even allow you to upload your own cursor designs. This flexibility helps create a unique browsing experience that fits your style or accessibility needs.
How To Find Cursor Customization Extensions
Open your browser’s extension store or add-ons page. Search for keywords like “cursor color” or “mouse pointer.” Look for extensions with good ratings and recent updates. Read user reviews to ensure reliability and ease of use.
Popular Cursor Color Extensions
Extensions like “Custom Cursor for Chrome” offer colorful and fun cursor options. “CursorFX” allows color changes and animations. These tools let you switch cursor colors instantly while browsing.
Installing And Using Browser Cursor Extensions
Click the “Add to Browser” button to install the extension. Once added, access the extension icon near the address bar. Choose your preferred cursor style or color from the menu. Changes apply immediately without restarting the browser.
Benefits Of Using Browser Extensions For Cursor Customization
Extensions do not require deep technical skills or system changes. They let you personalize your cursor only in the browser, keeping other apps unaffected. This helps maintain system stability while enhancing your browsing comfort.
Credit: www.softwarehubs.com
Tips For Choosing Cursor Colors
Choosing the right mouse cursor color can improve your computer experience. A well-chosen color makes the cursor easy to spot and reduces eye strain. It also adds a personal touch to your desktop environment. Here are some simple tips to help you pick the best cursor color.
Use High Contrast Colors
Pick colors that stand out against your desktop background. Bright colors like red, yellow, or green often work well. Avoid colors that blend into your wallpaper or icons. This makes the cursor easier to find on the screen.
Consider Your Lighting Conditions
In bright rooms, darker cursor colors may be easier to see. In low light, brighter colors help the cursor pop. Adjust the cursor color based on where you usually use your computer. This reduces eye strain and improves visibility.
Match Your Personal Style
Choose colors that you enjoy looking at. The cursor is part of your daily computer use. A color that feels good can make using your PC more pleasant. Try colors that reflect your mood or personality.
Test Different Colors
Experiment with several colors before deciding. Small changes can make a big difference in visibility. Use the cursor color settings on your computer to preview choices. Pick the color that feels most comfortable and clear.
Keep It Simple
Avoid overly bright or flashing colors. These can distract or annoy you during work. Simple, solid colors often provide the best balance. They keep the cursor clear without being overwhelming.
Frequently Asked Questions
How Can I Customize My Mouse Cursor?
Customize your mouse cursor by adjusting size and color in Settings > Accessibility > Mouse pointer. Install custom cursor themes via Mouse Properties > Pointers tab. Download, extract, then browse and apply cursor files. Some browsers also support cursor extensions for personalization.
How To Change Mouse Rgb Color In Windows 11?
Open your mouse software or Windows Settings. Navigate to the RGB lighting section. Choose your preferred color and save changes.
How Do I Change The Cursor Color Back To Black?
To change the cursor color back to black, go to Settings > Accessibility > Mouse pointer. Select the black color option or customize the pointer color to black. Click OK to save changes.
How Do I Change The Cursor Color In Chrome?
To change the cursor color in Chrome, use a cursor customization extension from the Chrome Web Store. Install and activate the extension, then select your preferred cursor color. Chrome itself does not have a built-in cursor color option.
How Do I Change My Mouse Cursor Color In Windows?
Open Settings > Accessibility > Mouse pointer. Choose a new color or create a custom one.
Can I Make My Mouse Cursor Bigger And Colored?
Yes, use the slider in Mouse pointer settings to adjust size and pick a color.
Where Is The Mouse Pointer Color Option On Windows 10?
Go to Settings > Ease of Access > Mouse pointer to find color options.
Can I Use Custom Mouse Cursors On My Pc?
Yes, download cursor packs and apply them via the Pointers tab in Mouse Properties.
How To Change Mouse Cursor Color Without Software?
Use built-in Windows settings under Accessibility to change cursor color easily.
Is Changing Cursor Color Helpful For Visibility?
Yes, bright or contrasting colors make the cursor easier to see on the screen.
Conclusion
Changing your mouse cursor color is simple and quick. Use your computer’s settings to pick a color that suits you. You can also make the cursor bigger or smaller for better visibility. If you want something unique, try downloading a custom cursor theme online.
Personalizing your cursor helps you see it clearly and adds a touch of style. Experiment with different colors and sizes until you find what feels right. Enjoy a mouse pointer that matches your needs and preferences easily.